Can someone offer simplified instructions to set timing?

cmyoch

XS650 Junkie
Messages
647
Reaction score
23
Points
18
Location
Smithton, IL
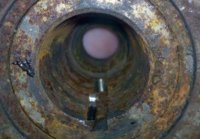
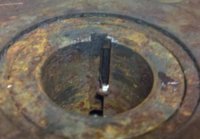
Ok. I posted in my previous thread that I replaced my entire charging system with a used and functional rotor and stator, a VR115 regulator, and the Radio Shack rectifier. The bike is now charging. I noticed on my old rotor when I pulled it that it was cut on the side of the keyway which has me thinking the PO torqued this rotor on without it properly aligned. I posted two pictures. My bike no longer idles which has me thinking that my timing is now off. I've looked through the manuals and I cannot understand the instructions well enough to dive right into timing. I assume I will need to make a slight adjustment but I am looking for the simplest timing instructions for dummies because I don't want to make matters worse by not knowing what I am doing. Are there any posts on here that really simplify the process? Videos and pictures too?

Thanks,

Craig

BTW, it's a '78 Special with points ignition.
 

Attachments

  • Rotor2.jpg
    Rotor2.jpg
    308.4 KB · Views: 317
  • Rotor.jpg
    Rotor.jpg
    301.2 KB · Views: 304
What I just did was hooked up a meter, black to ground, red to wire on points right side. Key on set to AC. Turn the rotor CCW until the mark is in the F zone. There is a keyway on the end of the rod that you can just see behind the nut that should be pointing upwards. If it is pointing down, turn rotor 360. Loosen right side points plate, hold red lead to points wire and slide it left to right until it just moves. Lock it down. Do the same thing for the left side, keyway down, moving left points plate and holding red lead to that wire.

I don't know about fine tuning it with a timing light, as I do not have one yet and did not do it.
 
So as long as the keyway is pointed directly up for the right points and directly down for the left points, does it matter what area within the F zone I'm in? Also, by adjusting the points plate, what am I looking for in my meter?

Like I said, I'm sure it's simple but I've been known to complicate even the simplest tasks. That's why I ask a lot of questions.

Thanks for the quick reply!
 
You want them to be in as close to the same spot as you can get it.

You are looking for voltage in your meter. as soon as the contacts open you will get voltage. That is where you want to lock them down, right when they open up.

The keyway may not be exactly straight up and down.
 
Thanks,
I know I'm sounding like a total dummy here asking for the simplest instructions but I don't want to make matters worse since I'm pretty sure my timing is close. I'm worried that I would make matters worse by not knowing what I'm doing. I'll give this a shot tonight and report my results.
 
Changing the rotor shouldn't change the timing. What has changed a little is the location of the slash mark on the rotor since your new one is mounted correctly in a slightly different spot. What that means is that if your timing looked correct before, it will show as being off slightly now. The timing hasn't changed, the pointer location for checking it has.
 
That being the case, would you have any thoughts why I won't idle now? I also noticed that it took forever to start. My starter has never worked so it's kick only. I kicked like mad to get it started. It runs fine as long as I keep on the throttle but dies immediately when I let off.
 
Old timey and easy way to set point timing: you need a piece of cellophane like that on a cigarette pack, or even a cigarette paper. (The cellophane works better because it's less likely to stick to the points or tear.) Notebook paper etc is too thick, that will throw the readings off.

Turn the crank till the points open, then slide the cellophane between the points, turn the engine until the points trap the cellophane. Now pull gently on the cellophane and turn the crank, watching for the mark. When the points open, the cellophane will be released. If the timing marks line up at the time the cellophane is released, you are on the money.
 
I can't say for sure why it's stalling now. You changed a whole bunch of stuff at once so it might be related to any of that. Do check the timing. The points models need that every few thousand miles. Install new plugs as well if you haven't recently. Points models can use those every few thousand miles too. Is it backfiring or kicking back on the kicker? That's a sign that the timing is off but so is hard starting. You may just need to turn your idle speed up a little.
 
Yeah I considered changing everything at once may have had an affect on it. Plugs were replaced a couple hundred miles ago so they are good. I will clean the points and check my adjustments based on your tips.

No backfiring or kickback, just tough to start and no idle.
 
Yes, do check the timing as I said but you may just have had a new, unrelated problem develop here, like dirty carbs. No idle and hard starting when warm could be a sign of a plugged up idle circuit. Hard starting when cold could be a plugged up choke jet.
 
It has set a while when I worked on it so dirty carbs could be part of the problem. I started it a week ago for my stator test before replacing parts and it was idling. Anything can happen in a weeks time though.
 
It has set a while when I worked on it so dirty carbs could be part of the problem. I started it a week ago for my stator test before replacing parts and it was idling. Anything can happen in a weeks time though.

cm, based on that, your pilot circuit(s) may be a little plugged or varnished if she has sat some. It doesn't take much.

Know what? Run a few ounces of SeaFoam into your tank and let it pass through your pilots for a bit. I have had that stuff apparently clear up some minor varnishing. It's a cheap fix if it works. Failing that, clean the pilots and all the associated apertures and see if that helps. It might be as simple as that.

TC
 
Seafoam saved my rear a week ago when starting my Camaro after sitting since last October. I have about half a bottle left. I have a little less than half a tank of gas so I'll run a good concentration through the carbs this evening.

I also thought about pulling the bowl plugs and spraying some carb cleaner up in there to help it along.
 
Okay, so I worked on my timing for well over an hour and I've gotten nowhere. First thing, I gapped my points to the proper gap. I worked with the right side plate with my meter set to AC with the key on. The only time I got a change in my reading was when I was a TDC. Nothing in the F range at all. I put my rotor on the F mark and tried to adjust my right plate. No matter how far I adjusted the plate back and forth, I had no change in my reading. The points stayed separated. Am I missing something here? I'll need to probably start from scratch now since I've moved both plates around.
 
I never had much luck with the meter, I use a little 12V bulb. It lights up when the points open. But actually, I don't even use that anymore. Only to get things close. Then it's the dwell meter and timing light. People have been using the cellophane, feeler gauges, 12V bulb, etc. for ages to set their timing. It gets it close, maybe correct if your lucky, mostly the bike runs like ass. Good enough to run but not exact. Spend the 100 or so dollars for a dwell meter and timing light so you can set it correctly once a month or spend the 100 or so dollars for a Pamco and set it once (maybe twice).
 
I'll pick up a bulb at the local hardware store this morning. My main goal is to get it running decent so I can test all the work I've done to get it charging again. I agree I should just go the Pamco route and be done with it.

I'll work on it tonight with the test light. Hopefully this will do the trick. Hopefully I didn't get things too out of adjustment.
 
set meter to ohms, neg lead on motor positive to the points. turn the motor to the first timing mark, to left of the "F". adjust points so they are just beginning to open.

you have to play with different point gap settings, some like to be .12, some like .16.. also the points backing plate may move up and down, mine only set correctly with the plate pushed up.

always clean after setting. wet some card stock with laq thinner, close points a few times on it.
 
Be aware that when the key is on, the coils are getting power. When a points set is closed, it's coil is charging up and will get hot. Try not to leave the key on for extended periods of time with the bike not running. A coil can overheat. Turn the key on, check the timing, then turn the key off while you do all the adjusting. Key on to check, key off while adjusting.
 
Back
Top