First start after rebuild

Eric12171

XS650 Enthusiast
Messages
64
Reaction score
97
Points
18
Location
Pennsylvania
I guess I should have stuck with 1 single thread on this bike ,
But too late now .

Finally got the engine rebuilt and back in the bike.
Thanks completely to everyone here for all the information on this forum.
Especially Jim’s top end rebuild series.

Here’s a link to a video of it ,

Sounds very tractor like for some reason.

Thanks again guys.

 
Running on one cylinder only ? feel the exhaust pipe -Ignition point not correct ? Oil Flow ? Valve play ?
don't run much sounding like that
 
Running on one cylinder only ? feel the exhaust pipe -Ignition point not correct ? Oil Flow ? Valve play ?
don't run much sounding like that
yeah, I’ll have to go through everything again.
Very likely there was something I didn’t get right.
 
Well first... congrats!!! :D
I suspect you set the valves a little loose. .003" int and .006" ex seems to work well on all years. Put a half dozen heat cycles on it and readjust the valves and chain.

It does sound a bit labored when you rev it. For starters you could recheck your advance is working properly and set your timing with a timing light.

It runs though. That's a damn good start. ;)
 
I guess I should have stuck with 1 single thread on this bike ,
But too late now .

Finally got the engine rebuilt and back in the bike.
Thanks completely to everyone here for all the information on this forum.
Especially Jim’s top end rebuild series.

Here’s a link to a video of it ,

Sounds very tractor like for some reason.

Thanks again guys.
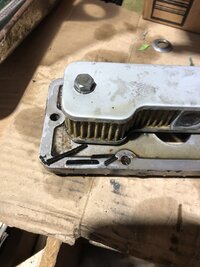
You made the video with the right side advance cover off. Its a noisey mechanism.
How about making another vid with the cover ON?


.
 
Well, that sounds much better, lol. This is a rather crude old motor design so it will never be as quiet or smooth as a newer bike motor. In other words, it's going to make some mechanical noises even with everything set right. The best and easiest way to adjust/check the cam chain tension is with the motor idling. Observe the little plunger in the end of the adjuster bolt. You want to see a small amount of in-out movement, maybe a MM or 2. No movement means it's set too tight, and too much can make noise just like loose valves. It's easy to demonstrate this to yourself. First, loosen the adjuster until the motor starts "ticking" and making noise. Then tighten it back up and the noise will go away. I like to tighten it down until the in-out movement stops or almost stops, then loosen it back up until I get the desired 1 to 2mm of in-out movement. This adjustment method is pretty much foolproof and will give you the perfect setting, backed out slightly from being too tight and just loose enough. This is also best done on a warmed up motor so all the parts are expanded. Set it on a cold motor and the chain may become too tight once warmed up and parts expand.
 
Sounds good!
thumbsup.gif
 
Well, that sounds much better, lol. This is a rather crude old motor design so it will never be as quiet or smooth as a newer bike motor. In other words, it's going to make some mechanical noises even with everything set right. The best and easiest way to adjust/check the cam chain tension is with the motor idling. Observe the little plunger in the end of the adjuster bolt. You want to see a small amount of in-out movement, maybe a MM or 2. No movement means it's set too tight, and too much can make noise just like loose valves. It's easy to demonstrate this to yourself. First, loosen the adjuster until the motor starts "ticking" and making noise. Then tighten it back up and the noise will go away. I like to tighten it down until the in-out movement stops or almost stops, then loosen it back up until I get the desired 1 to 2mm of in-out movement. This adjustment method is pretty much foolproof and will give you the perfect setting, backed out slightly from being too tight and just loose enough. This is also best done on a warmed up motor so all the parts are expanded. Set it on a cold motor and the chain may become too tight once warmed up and parts expand.


Im liking the older, noisy, simpler things more and more ,

The new ones are nice , but I’m not into all the computerized items on them..


Well,
I’ve let it run for 10 to fifteen minutes probably six times , between Sunday and Tuesday,took it for a quick spin yesterday, and went out for about 45 minutes today,

Drained the oil when I got back
It Had less than i started with because my dumb ass forgot to tighten the counter shaft sprocket.so my chain is well oiled now 🙃,
Luckily it didn’t come off.

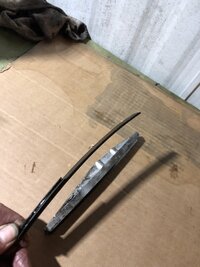
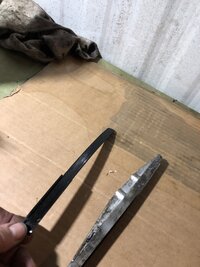
The oil was semi dark, a little bit of fine glitter in the pan and some plastic /rubber pieces.which I think is the back of the starter gear I replaced.it was all missing on the old one
, it started spinning again after I tried it the third time.
I’m hoping that is what all the mess is from.

So now take apart the clutch again and see what’s what.
Clean the filters etc..
then have another go at it.

Fun stuff 😁
 
Time to check the head bolt and nut torques again too. You need to do this several times after a rebuild in the first thousand miles or so. All the new gaskets will be compressing so the bolts and nuts are going to become loose, especially the big acorn nuts on top. But you'll also want to check the two smaller bolts under the spark plugs, and the little M6 at the rear between the carbs. Those 3 are also part of the head gasket torque pattern.
 
That was new? Who'd you buy it from?
 
Any chance it being parts of the old one ?
Could be actually.
Here’s the old one.
I figured I had gotten everything out.

And and one point putting it back together something bound and the crank wouldn’t rotate. Then I messed with the chain some then it rotated again. Didn’t hear any crunching while doing so.
 

Attachments

  • IMG_4227.jpeg
    IMG_4227.jpeg
    227.4 KB · Views: 33
  • IMG_4226.jpeg
    IMG_4226.jpeg
    246.5 KB · Views: 33
Back
Top