First Time Xs2

Captmandel

XS650 Addict
Messages
121
Reaction score
13
Points
18
Location
Asheville, North Carolina
Hey guys, I already did an intro and I have posted a ton of questions. The time has finally come. I have everything I need to start this bad girl up on order. Ill attach a link to some pictures of the bike. Its a red 72 xs2 I bought from a guy named Scott in Orlando. His dad owned some shop called jacks rebels or something like that. Well the bike was in worse condition than i thought so I ordered a bunch of stuff right away. Plug wires, plugs, fuel lines, air filters, etc. Then I realized I had more money than I thought and figured why try and start this with points when I could just buy a pamco setup. So I did. Im gonna install it this weekend. The tank was rusty. I tried to clean it my self and just made a big ole mess. I realized after a few times cleaning it with powder draino and then later clr that there was no metal on the bottom and the chemicals were eating through the rust and putting holes in the tank. I quickly took to the forum and found a clean xs1 tank with badges and petcocks for 150 shipped which i think is a really good price! Bought from forum member Johnny Action. The electric works on the bike and I already did an oil change. The carbs look clean and the PO said they were cleaned recently, but he also said the tank was solid aside from rust, Who knows. Well anyways people, Hopefully I will keep up with this and post lots of pictures of my progress. Basically right now I just wanted to post because I am super stoked on getting a tank and finally getting to fire her up! Thanks for the support and advice from everyone on the forum.


http://www.flickr.com/photos/91975103@N07/
 
H-bar; either new bushings or a couple of washers to put some squeeze on the old ones.

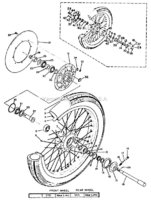
Good idea on new brake parts. check the brake rotor carrier bearing it can be a issue on a 72. The rubber rotor/wheel pads are often worn away or missing on that year also.
 
OK im back! I installed my pamco and got my tank! THANKS ActionJOhnny!!!!! This guy is legit if anyone is planning on buying anything from him.

Well the pamco went in easily... i think. the instructions assume a lot about the person doing the install. anyways im gonna post some more picture to my flickr and leave the link here. First question, what the hell is a brake rotor carrier or a rubber wheel pad? Next question, are there two condensers? or is one of them a regulator? I took two things that look the same off but one has a green bar. (pictures in the link.) Also, can the power from the pamco and the kill switch wire be together on the same coil terminal? Thats what the instructions show. Finally, how the hell do i mount the "ultimate" coil without welding, or grinding? is it possible? Right now its on with a screw and a twist tie lol. Im thinking maybe taking this bike to a mechanic and having them do the rest is a good idea, but I know they will want like 3 hours of labor. Anyone in south Florida wanna help me out? I have beer and/or pizza.

Last thing is the damn bushings under the handle bars. I cant get them tight. Do i need washers or just new bushings? Probably both right. I took a picture of some weird key hole thing too, please check out my pictures and tell me if anything looks amiss. Thanks for your help!


http://www.flickr.com/photos/91975103@N07/

^^ theres the link. If anyone sees anything in any picture and hasa comment or suggestion it is GREATLY appreciated. And again, if anyone is in south florida and wants to help me out or just kick it, I am totally down. I live in Boynton/ Delray area
 
front brake.jpg

bearing is #21 pad is #36

This thread covers the pad issues,
http://www.xs650.com/forum/showthread.php?t=16441
I think you get the idea of checking for a bad bearing?
 
Mmm pizza but damn that's gonna be a long ride.....

the key thing is (was) a fork lock. I always thought they were pointless. Then again I leave my bike in parking lots with my coat, helmet, and key.
I have had luck with just a fender washer on the bottom to snug the bar mounts.
There is a guy called Dan that has a great "motorcycles for dummies" website, it covers all basic MC101 in detail without making you feel stupid about it.
http://www.dansmc.com/
really a great guy.
 
You can wire your Pamco as Pete shows or take a slightly different approach. Originally, you had two power feeds coming out of the harness, one running to each coil. These come from the kill switch and are the same wire, just split into two. You can run one to the coil and the other to the Pamco red. I added the appropriate bullet and (ground) ring connectors to my Pamco wires so they would "plug and play" with the original harness .....

PamcoPick-upPlate.jpg


PamcoConnections.jpg


There is one condenser "pack" that has both condensers mounted on it end to end. At 1st glance, it may appear to be only one, but it is two. It's stock location is behind the left upper motor mount. Look closely because it's pretty well hidden. I don't see a pic of it in your link. The electrical components you do have pictured are your voltage regulator (thing with the green bar) and your starter safety relay. I think you're gonna need them, lol.
 
Ok, so what I've learned, I didn't take off the condenser it was two things i have to put back on. Will I need those things if I buy Hugh's pma? I'm running kick only. The other thing I have learned is that I don't know shit about wiring. My original coils had a orange and what appears red coming out of them and that's all. Also there is only one red and white wire on my harness. Ugh I think it might be time to hire a professional :-/
 
For kick only, you won't need the starter relay. For the PMA, I don't know what's required as far as a voltage regulator goes. Someone running that set-up will have to answer that one.

Your old coils sound correct. Each orange ran to a set of points, the red to power from the harness. My '78 had the R/W split in the harness so two leads came out. Your early model apparently did not. No biggy, make all the power connections at the coil as per Pete's instructions or make a "Y" pigtail to run from the harness R/W to the coil and the Pamco red.
 
In pics 53-55, those things are the safety relay and regulator. The one with the green bar is the regulator. You won't need the regulator or the rectifier if you replace the stock alternator with a PMA.
The key hole looking thing is a key hole. Pic 44. You use the switch key, turn the bars fully around so that key slot is fully visable. Know insert the key, push it in turn back, this locks the forks.
In pic 52 you can see the bottom of the riser. The part that holds the bars. The bolt part that comes down through the rubber damper has a shoulder. This prevents compressing the damper too much. If you remove the nut and washer you can see the shoulder. I think it's about 1/2. Measure to be sure. Go to the hardware store with the washer you took off. Find washers that fit inside the cup of the washer that has a hole just big enough to slip over the shoulder. Get several pairs. When you get home try one washer on each side. It should tighten the risers in the dampers to remove most of the movement. If not add another set.
Leo
 
let me start by saying that I got the regulator put back on! Haven't messed with the bars yet. got all the fuel lines hooked up, new tank on spark plugs gapped and everything ready to go, then I ran into some trouble with my carbs. Mainly they were leaking fuel out of them because they were missing some barbs and hose that connect them. Through the advice of the forum I decided to not use the original carbs and instead I bought a rebuilt set of linked carbs from a 76. I also ordered a pair of uni filters from tc brothers. the carbs are coming with a throttle sleeve and cable and a bunch of jets. also the carb holders are coming with them because I know they are important to match. They should hopefully get here around the same time (the carbs and air filters) so I can mount them and hopefully this bike will start. I am going to do some research right now on carbs and try and learn a thing or two about jetting. I have been told to jet them for my stock engine to 135 main with the needle in the middle position. Or someone else said one up one the pilot and two or 3 on the main. Does anyone care to elaborate on these things? Also maybe someone can offer me what they are running on a similar setup, stock engine, bs38 and uni pod filters. Also, the exhaust is chopped at the muffler. I bought it that way and intend on buying mufflers but for now.... any ideas? Ill take any and all. Thanks!!

inb4 there is no exact jetting but I would just like to know what people are running so I can have an idea


Josh.
 
The 76 carbs had a 122.5 main jet, a 25 pilot as stock. The needle in the #3 slot from the top. idle mix scrws 1 1/2 turns out.
Your bike should run with the carbs this way. When I used the 76 carbs I had I was up one on the pilots That would be 27.5. Two up on the mains. That would be 127.5. Either would be a good place to start.
Have you read the carb guide? If not you should. www.amckayltd.com/carbguide.pdf
It has a tuning section in it. It tells how to test and what to do according to the test results.
Read the carb guide.
Leo
 
Cool, thanks. Ill read it cover to cover. Already started skimming it.


Any ideas about brake master cylinders? I have a 72 with stock brakes. That's a 16mm piston I guess In the master cylinder. Do I have to use 16mm or can I use a 13mm? If I make that switch then what else do I need to change? Caliper? Disc? Or just brake lines? Or all three?
 
Yes, your master cylinder is a 16 mm. The 13 mm will work well. It will make your brake stronger. Your stock caliper and rotor/disc will be fine.
If you search for caliper rebuilds You will find a lot of good advice on tearing your caliper apart, inspecting the parts and how to clean it. Often just the tear down, ispect and clean is all they need. The rubber parts are fairly robust and can be reused if not damaged. The pistons if rusty may need replacing. You won't know till they are apart.
With a new master cylinder, clean caliper and new lines your brake will be very good.
On your 72 the line is rubber from the M/C to the junction on the lower tree and from that junction down to just before the caliper. Where it has a short steel line.
If you go with a braided stainless line Take this steel line, the caliper and the braided line to a parts store. Show them what you have and want to hook the braided line to the caliper with out the steel line. They should have an adapter that threads into the caliper that your line can thread onto. If I still had the one of my 75 I could measure the threads on the line and caliper, find the right adapter and tell you the catalog number at a parts seller like J&P Cycle. I sold all those parts because I converted from the 34 mm forks and old style brake for the later 35 mm forks and brakes.
A more modern caliper can be fitted but adapters to get it to fit the forks will have to be made to get it spaced so it will work with a more modern rotor. That may need to have adapters made to space it to work with the caliper so nothing hits your spokes.
A bit of research on those options and you will find lots of ideas on that.
Leo
 
Hello to everyone out there! I'm back with an update. I finally got everything hooked up to where I could start the bike. After a few kicks and then realizing I didn't have the choke on it fire up! :D I was excited.

Today I am going to take apart and clean the caliper, measure for steel lines, and maybe play with the handle bars trying to get them nice and tight. I bought new rubbers for the handle bars so hopefully that does the trick.

The next most important thing, behind the brakes, is mufflers. I have been looking around and I wanted the shortys but after some research found that they aren't that great for sound cancellation or performance. I am thinking either stock or reverse cone... any thoughts or suggestions on that?

Finally Leo in your last post you said something about an adapter for the steel lines. Were you talking about a banjo fitting and a banjo bolt? something like this:

http://www.jpcycles.com/product/240-760

8717960418
 
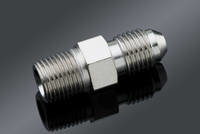
No, a banjo fitting won't work. You need a coupler that has a tread to screw into your caliper, then the AN-3 end of the braided line screws onto the other end.
Like this pic. The end with the taper on it is the AN-3, the other end needs threads to match your caliper.
Leo
 

Attachments

  • 240-785_A.jpg
    240-785_A.jpg
    3.1 KB · Views: 93
Hey everyone! A quick update is that everything seems to be on track. Just got some more money and I'm going to buy a master cylinder. I got the brake lines and fittings and am ready to go on that. Now I'm looking at mufflers. Trying to get a stock pair but obviously have no luck.

I like the look of the emgo shorty but have read that it's not much of a muffler. I have someone who I can buy a stock pair from but they aren't from a 72 and I'm worried ill have trouble getting them to fit.

So.... Will any mufflers fit? What will I need to adapt an later year muffler to my xs2? Thanks!
 
Back
Top