Forks get stuck

I pulled that fork tube apart "again". The tube is straight using my cast table saw top, roll test. The aluminum tapered bushing (part #8, taper spindle in the diagram above) that gets sandwiched between the damper rod and the bottom of the lower seems to be where the "bottoming stickiness" comes from. Inspecting a few of the taper spindles shows some wear on one side from the inside of the fork tube rubbing on it. On my third try tightening the bottom bolt with the fork tube fully pushed in to hold and center the taper spindle the tube will now bottom in any position without binding, so I am going on the theory that centering the spindle with the tube collapsed during final bolt tightening is "good practice". With a proper damping rod holding tool this isn't too hard to achieve. Unless I miss my guess the function of this piece is the final cushion before bottoming out the fork as the oil is forced through a rapidly closing taper it slows the last few mm of travel reducing that awful slam stop you you would otherwise get.

Before and after pics of the damper rod drilling.
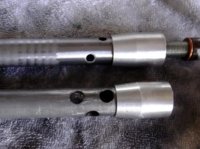
XS650 fork mods.jpg

You can see the wear marks on the taper spindle from the "sticky" fork tube.
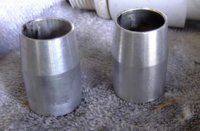
taper spindles.jpg


This section has been amended above.
On the tube stick the bottom of the tubes is machined and some of the unmachined tube ends is still there It might be just how things line up and "jam" a part of the end machining inside the lower?? That's my current theory anyways. I'll double check for tube straightness because you got me wondering. I am "rather sure" these tubes are straight though.
 
I have a good way of checking them, but my wife does not appreciate motorcycle parts on the kitchen granite! Gotta plan that wisely!
 
I got the bike on the street with the MikesXS cartridge emulators installed and have a few questions. Per Mikes instructions I used 77 caps with no pre-load adjustment. I still have the factory springs which are at "new" spec for length. I am getting 2 1/4" of sag with my 175 lb on the seat. That seems like quite a bit? I have late model caps I can put on and increase the preload. I currently have the factory 169cc of 15 weight oil in the tubes. The mikes instructions say adjust to 6" from the top compressed, but doesn't say whether or not the springs should be in it.
I guess I can do some math and make a suction tube for vacuum pump to set the level to????
Damping action "seems fine".
 
That should be oil with no spring inside. Sounds like a lot of air space, but that's probably because I'm accustomed to a larger fork diameter (41-43MM) so the level is higher for the same amount of air volume. I use a syringe and a chunk of vinyl tubing taped to a chunk of wire hanger rod for the height adjustment. Works just like the Progressive setup, just bend a 160 degree in the wire so it hangs over the top of the tube good, and cut the downhill end to somewhere close, and adjust the end of the tube for the 6 inch figure. I imagine that the caps with adjusters protrude down into the tube farther, effectively increasing the preload on installation? Measure up and see, but regardless, run the adjusters to the high side before installation. At your weight it might not be bad, but with stock spring rates, you might want the adjustability, just in case. I always like to have it, even if I get it set and never touch it, like on my SV. Your 2 1/4 is from topped out, correct? if so, that's about 40% or so, which ain't terrible for a stock setup and average riding. You might try it out first, or go ahead and add the adjustable caps, just in case you want to stiffen the front up.

You might try the laden vs unladen check, where the difference between sag is typically about 25MM or a round an inch more with rider on board vs just the bike, and see how close you are there. Most racy types prefer this method, but 38-42% of full travel has always been a pretty good street ride for me. Can't remember where I first picked it up, but it's working, so I stick with it.
 
Took it out for a spin and the damping spring feels fine. I find it is easy to induce an oscillation in the forks. It is mildly negative, self damping after about 3 decreasing oscillations. New tire that "balanced" without weights. Stock rear shocks with the preload at the lowest (least) setting. The old dented ball races would have effectively stopped any notice of the weave the new roller bearing do no such thing!

One more issue I put on a MikesXS floating rotor and notice a couple of "clicks" as it comes to a stop, probably feel them in the brake lever more than anywhere else, is that normal "floating rotor" stuff? Still some used pads of unknown ancestry but dry and the fork seals weren't leaking, in the calipers, will probably get some "performance pads" just because. Having done a full brake overhaul recently, before the rotor install, I think I can say the rotor offers no "stopping performance" change. Normal brakes is two finger but a tire howler is a 4 finger affair.

Thanks for the reply 750 I wus hopin' you'd chime in. Uh by the way.... 60 year old airplane re-engineer you can't just leave THAT hanging!
 
my floating rotors will "click" on intitial bite, and sometimes with an easy stop, they will kinda clunk when you release the brakes. Can hear them over bumps sometimes too. Reminds me of 1980's Lincoln Town Cars with floating rotors. Sounds normal. If you get too much front end dive, you can bump that fork oil up about 10CC at a time. It will eventually speed up the damping onset, till small bumps become a little more noticed thru the bars, but sounds like it's doing pretty good. Did you go with the standard caps, or switch to the preload type?

As far as the airplane goes, here's a shot from earlier this year.
 

Attachments

  • forward fuselage restoration2.jpg
    forward fuselage restoration2.jpg
    216.5 KB · Views: 183
Lockheed 1649A S/N 1018 1 of 44 built. Delivered to TWA in 1958. Currently being restored by Lufthansa Technik North America (my bosses!)
I am working the horizontal and vertical tail surfaces right now. The tail is 50 ft wide, and 18 feet tall. Couple of shots of the wing attach fittings. 2 of these were actually cracked all the way through the bolt holes!

11,600 pounds of drawings to build one of these. This was the last and largest of the breed. Only 4 left, none fly. Our parts bird outside!
 

Attachments

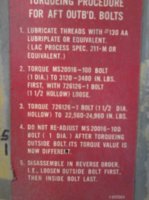
  • wing attach bolt torque.jpg
    wing attach bolt torque.jpg
    145.4 KB · Views: 166
  • wing attach 1 0f 4 locations.jpg
    wing attach 1 0f 4 locations.jpg
    143.7 KB · Views: 160
  • DSCN8451.jpg
    DSCN8451.jpg
    111.6 KB · Views: 182
  • IMG_20120629_122719.jpg
    IMG_20120629_122719.jpg
    80.2 KB · Views: 181
Hey guys here’s the update to my dilemma.

When taking the forks of the bike I found that one was compressing freely while the other was binding and getting stuck when compressed. I decided to tear that one down to see if I had maybe done something wrong… in a nut shell I didn’t see anything, the lowers seemed ok, and the tubes were for the most part pretty strait (rolling them on the table). I then went to my second pair of forks that came off the 74 (yes they are 35mm); both seemed to work ok. I then decided to take the tube from one of them and swap it with the one I as having issues with.

Things went ok until it came time to insert the large allen in the fork tube to disassemble. I at that point realized there was no allen to engage. Using a flashlight I could see the top of the dampening was not like the later model – it had a bar in the middle of it. Great a tool I didn’t have!!! After a few attempts I ended up having success with a 3/16” steel rod folded in half and wedged into the two sides of the rod. I held it with a large screwdriver and placed the whole fork in a large vice. I knew it would twist and I hoped it wouldn’t brake. With a little prying on both ends it finally came loose! (see photos on flicker if this isn’t clear).

http://www.flickr.com/photos/gqt1970/sets/72157630814626264/with/7674208974/

I then took the tube from this fork (74) and tried it in the original lower fork (79) – to my surprise it also got stuck – I then realized that the real problem resided with the lower fork. That sucks... I had this lower shave and polished. I ended up just resembling the older tube and fork but swapped the dampening word with the later model (the one with the allen head) for ease of assembly.

Well the bikes finished for the most part. Road to Malibu and the rock store – got a lot of compliments and what is it’s???

Anyway thanks for the help!
 
Last edited:
Back
Top