Getting the ‘57 beetle back on the road in 2024

bosco659

XS650 Guru
Top Contributor
XS650.com Supporter
Messages
3,097
Reaction score
10,090
Points
513
Location
Oakville, Ontario
At long last I’m starting to work on my ‘57 beetle with plans to have it on the road by late spring, early summer of next year. The engine has been in my basement for close to a year and each time I go down and lift the cover, it’s in the same state of disassembly as last time I looked. I’ll probably go at that when the real cold weather hits us. I think I have most of the bits needed to get the motor put back together. The chassis is a different story. It has remained untouched for over 20 years in my garage.

I rearranged the garage a few weeks ago and put my Supra sideways at the rear of the garage. I brought the beetle forward to give me more space to work on it. Turned it 90 degrees too. Added the diesel heater and now there aren’t many excuses for not working on it.

I jacked it up at the back and decided to tackle the rear brakes. The rear drums are held on with a 36mm nut. Legend has it they are torqued upwards of 300 ft lbs and the only way to get them off is a 3/4” breaker bar and a 6 ft pipe. I didn’t want to mess with all that and put my cordless impact on it and it came off pretty easily. The brake drum is splined to mate with the axle shaft. I’m guessing the last time is was off was probably 30+ years ago. I beat it into submission with a 3 lb maul and it came loose - it was a tough battle. I thought I was going to have to make a special puller.

With the drum off I found everything under it was frozen solid. Lots of penetrating oil and a big screwdriver and hammer got most bits apart. Not so for the brake shoe adjusters though. They were stuck really good. Lucky for me I didn’t ham fist them too much because, as I found out later they are made of bronze or brass and something tells me replacements are unobtainium. Good news is the backing plate is in good shape. That’s important because replacements aren’t to be found. Other good news is the parking brake cable is free and the brake lines appear to be in usable shape, other than the rubber flex line. That’s all for today. I may try to remove the flex line tomorrow. I need to start a shopping list for parts. I think it’s gonna be a long one. ☹️

IMG_2849.jpeg
IMG_2852.jpeg
IMG_2850.jpeg
IMG_2964.jpeg
IMG_2970.jpeg
IMG_2972.jpeg
IMG_2974.jpeg
IMG_2975.jpeg
IMG_2976.jpeg
IMG_2978.jpeg
IMG_2979.jpeg
IMG_2980.jpeg
 
and the brake lines appear to be in usable shape, other than the rubber flex line.
I'll make a suggestion....

Ages ago I restored a '59 Karmann Ghia. Pretty much the same car mechanically... jus' in a fancy dress. :wink2: Looked at the brake lines an' gave 'em my ol' okie dokie. About a month after I got it back on the road, the brakes failed on me.... in traffic... a story for another day.
Anyway.....
When I slammed on the brakes hard, one of them metal lines ruptured... split completely open. Brake fluid holds water.... it was rusting from the inside out.

Do yourself a favor... replace all the lines, not just the rubber ones.
 
I'll make a suggestion....

Ages ago I restored a '59 Karmann Ghia. Pretty much the same car mechanically... jus' in a fancy dress. :wink2: Looked at the brake lines an' gave 'em my ol' okie dokie. About a month after I got it back on the road, the brakes failed on me.... in traffic... a story for another day.
Anyway.....
When I slammed on the brakes hard, one of them metal lines ruptured... split completely open. Brake fluid holds water.... it was rusting from the inside out.

Do yourself a favor... replace all the lines, not just the rubber ones.
Probably good advice - will do. I’m thinking about a front brake conversion to disc too, for safety’s sake.
 
Looks to be a nice, solid Bug. Well worth the time and effort to restore that piece of history.
Q-"How do you eat an elephant?"
A-"One piece at a time."
It took me thirteen years and retirement to finally "finish" my old Chevrolet.
 
Looks to be a nice, solid Bug. Well worth the time and effort to restore that piece of history.
Q-"How do you eat an elephant?"
A-"One piece at a time."
It took me thirteen years and retirement to finally "finish" my old Chevrolet.
Plan is not a complete restoration. It will have a completely rebuilt motor, new brakes, tires. Seats have been recovered already but not in a period correct material. Mice did that to the seat.

IMG_6531.jpeg
IMG_6529.jpeg
IMG_2048.jpeg
IMG_2049.jpeg
 
Last edited:
Plan is not a complete restoration. It will have a completely rebuilt motor, new brakes, tires. Seat have been recovered already but not in a period correct material.

It's still a lot of work. Really helps to have an understanding mate. I was not so lucky.
She really hated that car and wanted it gone. I still have the car....:laugh:
 
In all honesty, those drums will work really well when freshened and adjusted properly. Just my 2 cents.
You’re probably right, so to keep costs down I should probably get it rolling with 4 wheel drums. Not as if the 36 hp will get it up to any hair raising speeds anyway. Lol. I have new wheel cylinders for the front or rear, can’t recall which. I started the shopping list and will place an order this weekend to take advantage of some Black Friday discounts.
 
Now that looks like a project I could really get into right there. Love that vintage stuff.

Looking at the way things used to be done....always interesting. :thumbsup:
I’m still not sure how to approach this. Normally I’d take everything apart, clean and paint all the bits. That would however require investing in a sand blaster and digging out my now buried air compressor OR I could just wire brush the components to make them functional and put it back together (with new bits too). Maybe a bit of flat black Tremclad? Making it look pretty behind the drums may be a waste of time since I plan to retain its original patina with all the scrapes, dents and surface rust. I’ll see how things clean up tomorrow.

As I take things apart it’s amazing the quality of the components. Thick gauge steel, cotter pins you can barely bend with pliers…
 
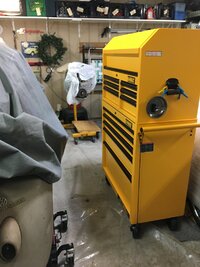
After my cottage robbery, I brought home this roller cab and top chest. As I start working on the bug, it’s easier finding tools in this bigger box. All my good and specialized tools are in my basement so there will be a lot of walking ahead. Thinking I should dig out my oxy acetylene torches sooner than later.

IMG_2855.jpeg
 
You’re probably right, so to keep costs down I should probably get it rolling with 4 wheel drums. Not as if the 36 hp will get it up to any hair raising speeds anyway. Lol. I have new wheel cylinders for the front or rear, can’t recall which. I started the shopping list and will place an order this weekend to take advantage of some Black Friday discounts.
As per @Jim, replace those steel lines. I would replace/refurbish every piece of the system. It's fairly inexpensive, you'll never have to do it again and it's far cheaper than the front end damage and damage to you.
 
I’m still not sure how to approach this. Normally I’d take everything apart, clean and paint all the bits. That would however require investing in a sand blaster and digging out my now buried air compressor OR I could just wire brush the components to make them functional and put it back together (with new bits too). Maybe a bit of flat black Tremclad? Making it look pretty behind the drums may be a waste of time since I plan to retain its original patina with all the scrapes, dents and surface rust. I’ll see how things clean up tomorrow.

As I take things apart it’s amazing the quality of the components. Thick gauge steel, cotter pins you can barely bend with pliers…
They were a high quality car. I lived and breathed air cooled Vee Dub's in my mis-spent youth.
 
They were a high quality car.
Very true! My semi-grouchy Granddad loved his '74 Super Beetle and drove it until he passed.
Lots of good memories with Pap in that car. I learned how to drive a stick and the Facts of Life when Grandma wasn't around. :laugh2:
RIP Kltty.
 
Day 2. Not much progress other than removing the wheel cylinder. That was definitely on there since ‘57. Broke the bleeder screw off and will hopefully be able to get the piece out. It’s a very small diameter and I’m hoping my smallest extractor and some heat will get it out. The cylinder itself was seized but I managed to pus the pistons in withdrawal the vise. Now I have to figure out how to get them out again. I’m thinking a grease fitting attached to a brake fitting? I’ll try compressed air but don't think it will be enough.
 
Back
Top