I think these are BS38's...right?

August

XS650 Member
Messages
24
Reaction score
1
Points
1
Location
Eau Claire, WI
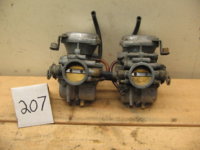
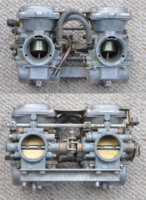
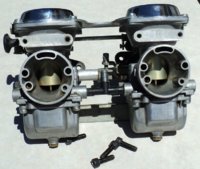
Been looking around on the site and other places and I seem to come across different pictures for what some people call a BS38.


DSC_0021 by Hachi Gatsu, on Flickr


DSC_0022 by Hachi Gatsu, on Flickr

I can't seem to find any definitive numbers to help me out, the only ones I have found are pictured below (and I think it reads 2I 4XI...but not sure. Click on the link to make the photo bigger should it be needed).


DSC_0019 by Hachi Gatsu, on Flickr

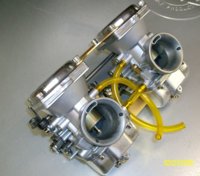
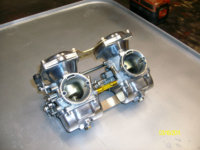
And that only shows up on one of the two, I can't find any number on the other one. Otherwise, I found a number on the butterfly,


DSC_0012 by Hachi Gatsu, on Flickr

But that's all I got on these. I really want to make sure what I got before I finalize my order for a rebuild kit and accessories. I have checked out the Tech section thanks to the help of gggGary and have saved the rebuild PDF's.

If you need any more pics, I'd be glad to post'm.
 
Those are BS38s They look right for your 75. The later linked BS38 carbs are considered to be easier - better but those look to be in decent shape and should work fine if the diaphragms are good. IIRC there is only one choke on the 75s and a tube carried the rich mixture over to the other carb so don't worry if you find one choke "missing".
You did good and are correct there are at least 3 (more I think) versions of BS38s just on the XS650 and they were used on other bikes as well. Be sure the jets are correct for your model there is a chart in the guide showing model/ jet sizes.
 
Yeah, I noticed the "missing" choke on one side but I did happen to see the corresponding shared tube between the two so I figured that was what it was for.

Thanks for the conformation gggGary! As for the diaphragms, I popped the tops open and the material is (from what I can see) in great shape, but the slides won't move at all. Jet's look to be correct for the bike though.

Currently have the slides soaking in a liberal spraying of PB Blaster, we'll see how they look after that (if they budge).

The floats have a bit of varnish on them though...anyway to clean that off properly? Or is 20 year old varnish not an issue so long as everything is in working order?
 
The varnish is a big issue, modern gasoline with ethanol dissolves varnish so the carbs will plug up again if all the varnish in the WHOLE fuel system is not removed. Spray carb cleaner and a tooth brush works for me for floats and carb parts. New fuel lines of course and several rinse cycles for the gas tank.
edit 6-2020 LOL
A bit of pressure with a wood pry device may go straight to the hair dryer, works every time to free the slides. the heat softens the varnish that has them stuck. I am a big PB blaster fan. A hair dryer or other heat may help loosen the slides. Careful using electric heat near carb cleaner of course.

650carbspecsreducedsizeey7.png
 
Last edited:
Here's a copy of "that chart" that Gary is referring to I think. That first column of notations lists the type of Mikuni CV BS Series carburetors....ie "256" etc. Your "447"'s are the last in the series that were not hard linked and joined to each other mechanically so that dual throttle control cables were required.

Some of the other following "linked" set examples are shown below as well. 584, 2FO, 3G1 BS 34's eg for your reference. Don't miss the carb guide info. on site. Blue
 

Attachments

  • Scan_Doc0011.pdf
    681.7 KB · Views: 311
  • 447 BS 38 I 74,75 unlinked.jpg
    447 BS 38 I 74,75 unlinked.jpg
    28.9 KB · Views: 109
  • 584 BS 38 I perspective.jpg
    584 BS 38 I perspective.jpg
    158.4 KB · Views: 120
  • 2F0 BS 38 perspective.jpg
    2F0 BS 38 perspective.jpg
    80.2 KB · Views: 122
  • 584 BS 38 I front - rear.jpg
    584 BS 38 I front - rear.jpg
    54.9 KB · Views: 123
  • BS34 3G1.jpg
    BS34 3G1.jpg
    87.1 KB · Views: 111
Last edited:
Here's a link to a good read on carb cleaning. I have used this method several times since I first read it with very good results.

http://cycles.evanfell.com/2008/09/how-to-clean-a-motorcycle-carburetor-the-right-way/

I'm a believer now. I tried a 48 hour soaking of PB Blaster on those slides and they refused to move an inch (or millimeter, which is unusual since I've always had good luck with PB).

I read the bottom part of that link about boiling your carburetor in hot water to ease a stuck slide and thought "Really? Chemicals didn't do it, so how the hell is water going to help? But hey, what do I got to lose? All else fails there's the lemon juice method." :shrug:

So I boiled some water in a big-ass pot and dropped them in once the water heated up. Ran off to do something else and about two minutes later decided to test poke one...it slid, right out actually. :yikes:

And so I stood there for a good minute thinking :wtf:

Tried the other one, it too slid out like it was nothing. Amazing...just amazing. I might do the lemon juice method to make sure these things are clean inside and out, my #2 carb. looks really gunky and there are only so many spots my fingers or a tooth brush can reach. If I can give it a home made acid bath then why not?
 
I was sceptic when I first read it as well. Had some old Honda carbs sitting under the bench and a few beer and thought WTF.... 40 minutes later I was dumbstruck. Doesn't mess up the rubber and wow, nice and clean... jets too!

Since then all my carbs and a few of my buds "Barn Finds" have been given "The Juice". Also an 1984 Evinrude 85HP outboard motor.

Whoda thunk it?
 
Last edited:
Back
Top