Is it ok to discuss GR650 motor mods here?

barncat

XS650 Addict
Messages
359
Reaction score
69
Points
28
Location
Candor NY
It's a close cousin and mentioned elsewhere on site... not much on Suz forums about it.

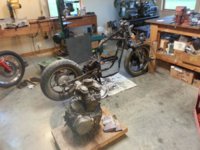
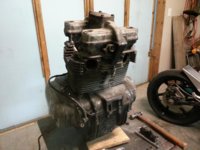
Pulled motor yesterday- yes you can do it solo- it's only about 125 lbs. Compact and light without kick start but ya gotta run a battery.

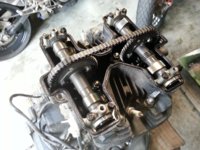
Has unusual "secondary" fuel injection tube in intakes. I have to replace a cracked valve guide, so I'm going to grind and seal those off while porting the head and will switch to 34mm VM's. This thing should really perform with dohc, more modern port design, stock electronic ignition, and custom exhaust.
 

Attachments

  • 20160506_195820.jpg
    20160506_195820.jpg
    222.1 KB · Views: 1,209
  • 20160508_074216.jpg
    20160508_074216.jpg
    214.3 KB · Views: 1,012
The GR650 ("Tempter") was made only in 1983 and 1984, I believe.
My cousin actually has one, and I have worked a little bit on it, as well as ridden it a little. It feels like a "softer and smoother" version of an XS Special, and has some more modern touches, compared to any XS:

- DOHC engine, obviously
-"Full Floater" single shock rear suspension
- A proper oil filter (paper cartridge) located at the front of the engine
- 3-phase PMA alternator and electronic ignition
- A driving light, immediately below the main headlight
- And the most unique feature on this engine: A "dual mass" flywheel with a centrifugal clutch that disengages above 3000 rpm. So light flywheel above 3 k for good acceleration, and heavy flywheel below 3 k for steady idle and smooth low speed running.

The styling is maybe the worst feature of this bike, I personally find Suzuki's custom bikes from the 80's really awkward looking. The XS Specials look better, but I prefer the look of the standards myself.
 
Yes it's an '83. Frame crudely prehacked by PO but similar to where I'd take the build anyway. Lot of weld repair and cleanup to do but will not be posting build pics here, just a couple when it's done. This is an XS forum.

Interesting to know Arctic that it's a PMA. Still have to use a battery though with no kick start. Need to look up a wiring diagram soon as I'll be doing that from scratch.

I already know how i'm going to port it. Mostly valve guide boss work. What i'd be interested in is any opinions on those intake injection tubes and the unique carbs that feed them. I hate diaphragm carbs so the whole system will be altered to VM's or possibly flat slides unless i hear from experienced GR guys who say carbs are best thing ever...
 
You may want to look for a copy of the factory workshop manual, as far as I am aware, neither Haynes nor Clymer has a manual for the GR. Most likely due to the short time on the market.
Also, I am not sure if all parts are available. Service items like filters and spark plugs are, but more specific parts may be trickier. I got an OEM alternator cover gasket on Ebay. Pattern gaskets seem to be available only as complete kits (Vesrah or Athena, can't remember which).
Electrex in the UK have repro electrical parts like alternator stator, regulator/rectifier and possibly also ignition box and coils. And the prices are quite reasonable as well.

Regarding the extra bor in the inlet ports, I do not have any experience. But it sounds somewhat similar to Yamaha's "YICS" or whatever it was called, used on the Seca 700/750. Some sort of swirl inducing device I believe. Definitely a stopgap measure while developing 4-valve engines....
 
Will need head and base gaskets at minimum. Have made numerous other gaskets in the past. Fortunately the intake valve guides are still available. Tricky repair needed on one messed up exhaust stud. No idea yet on ring/cyl tolerances though I believe these are Nikasil liners... motor spins very smoothly by hand. Hope tranny stays in gears- was not running. Will very likely go with Plan A re carb swap. Probably won't need a manual, just wiring schematic...
 
"Everybody has some trick to induce swirling of the intake mixture. Suzuki is using a sub intake port. It's a small tube connecting the carburetor throat to the intake port just above the valve head. This tube is canted at an angle, so that when the valve is open, a stream of air from the tube is aimed at the edge of the cylinder, swirling the mixture. Suzuki claims this air induction enables the GR650 to operate with much leaner air-fuel mixtures, improving economy. "

Cycle World, July 1983

Sounds exactly like YICS, without the extra port along the back of the block.
 
finally getting back to GR motor rehab.

cleaning off the usual baked on greasy crud on cases... countershaft sprocket nut refused to come loose so may hit nut with TIG welder to heat the hell out of it, or cut it off with Dremel.

both intake valve guides are cracked. i think it's safe to say that's due to over lean mix with the ill advised air injection system.

cam lobes and valve shims etc all look brand new at least. nice beefy cam chain, which fortunately does not need to be separated to remove cams and cylinders.

tricky repair to do first on broken exhaust stud that appears to have broken screw extractor stuck in place. will have to grind that out to fix, otherwise head is toast.
 

Attachments

  • 20160608_093720.jpg
    20160608_093720.jpg
    190 KB · Views: 607
  • 20160608_093853.jpg
    20160608_093853.jpg
    229.4 KB · Views: 1,567
turns out it was a piece of broken drill bit. with a combination of grinding with the Dremel and then punching it the fragment dropped into what was left of the tapped recess. cleaned it out and drilled a bit deeper. will tap tomorrow for 8mm stud that will also be JB welded in place to fill in ground area.

must order a couple valve guides, so that will be days away... will post a pic or two after porting is done.

opted not to pull the cylinders as walls were in excellent condition. put a couple pieces of tubing on studs and secured with crown nuts to keep jugs seated. laid motor on its front and scraped the carbon off the piston tops and brass brushed them, being careful to keep debris out of case and cylinders, shop vac at hand. this design has the 4 inner head studs exposed to the elements which means they rust, so crap tries to fall into your motor when you pull the head... other than that and the underbuilt exhaust stud bosses, this is a well designed motor.

on to frame and chassis work.
 
Last edited:
got back on motor and head work after a week delay waiting for intake valve guides, plus my Dremel crapped out. the switch and brushes on those are poorly designed. i will not buy another one. picked up a WEN 2305 for the ridiculous price of 21 bucks shipped. seems to work quite well so far, even the flex shaft, and it has separate on/off and speed switches.

swapped out the intake guides by the usual method- heat head to 275F for an hour and freeze the new guides overnight. made a special 7mm punch driver out of a large 1/2" grade 8 bolt, an absolute must, and the business end has to be a bit under 7mm. they still drove out/in pretty hard, and there's a tiny circlip on these to set the depth. the guides had necked down about .003" diameter, so i carefully drilled them out with a letter "I" drill then followed up with a 7mm drill and plenty of cutting oil
20160623_134154.jpg
20160623_134341.jpg
20160623_134234.jpg
20160623_134242.jpg
. didn't feel like spending 60 bucks for 7mm reamer. worked fine.

did a fair amount of porting, including cutting off the unusual brass air injection nozzles and JB welding over same to smooth intake ports out. also lapped valves back in and modified the margins in the IN valves.

still need to paint the head, rest of motor is painted, plus made a couple new handmade gaskets for R and L side covers. will post a pic when it's reassembled.
 
well, the head has been wire brushed, bottle brushed, scraped and detail picked here and there, and hot soapy washed several times with air blast follow up... that's my general process for cleaning motors, with PB Blaster and/or gas used to cut baked on case grime. then a rubbing alcohol wipe down as much as possible.

rattle can Rustoleum 500* Engine Enamel is like magic, although if you spill much gas on it later it eats through. i also like Rustoleum Industrial Enamel in Dove Gray, which was used on this motor. i think i'm going to use Aluminum on the head. sometimes i try to coordinate that with gas tank color, but i'm using a vintage Suz tank that's burgundy with white/black stripes that i think i can clean up and re-clearcoat.
20160624_081622.jpg
 
Motor looks good and should run as good as it looks. I can appreciate the work you have done so far. Not knowing the GR 650 existed until now makes this a learning experience. Glad you are posting this build.
 
all done.

had to wait 4 or 5 days for a thinner valve shim. swapped the other 3 around. had to cut the countershaft sprocket nut off with a rotary tool with 2 cuts 180* apart. that sucker would not come off by any other process, including heating with TIG torch. modded the suspect "automatic" cam chain tensioner to a manual one by cutting it apart then welding in an aluminum slug and threading for a 3/8 x 4 carriage bolt, with the head ground down a bit.

a way to go yet on build but rolling chassis should be done in a few days.
20160707_155315.jpg
20160707_155443.jpg
 
as with some other bikes like the late model Honda Superhawk (used to own one) they are apparently known to fail occasionally. if that happens your motor top end is toast of course. frankly, i don't even understand how they work, and don't like the idea of a trusting fragile spring controlling a complicated mechanism. a double nutted manual bolt could not possibly be simpler, and they need very little adjustment over time.
 
Back
Top