Yup - it sounds like your supplier muffed it.
Dang!
Dang!


Should you find the Flexoid gasket paper becomes too brittle at engine temperatures then there is a UK alternative for high temperatures. It looks and feels similar to the material that Athena uses:
https://www.ebay.co.uk/itm/HIGH-TEM...hash=item3d7d5054cb:m:m73PGjv9SA6-cyPD6N5AtTQ
I have used this for the valve adjustment covers and it worked well.
When it comes to bearings then there are a couple of bearing suppliers with shops on Ebay and they are selling the Koyo bearings for the front and back wheels for half the price of the motorcycle suppliers.

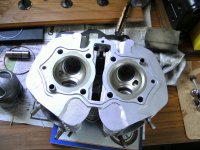
The head looks nice!oday, just back from Duns, after a very pleasant ride on the Honda NX to collect the aqua-blasted cylinder head from Mark Paxton:
It's a great process.


New valve guide seals I hope? I don't see any cross hatching in your cylinder pic.
Only set the oven to 180°C 'coz I'm a coward and din't want to find a pool of melted alloy . . .