Miss November XS2 tribute

Not enough up and down or too much drill speed? You marks look like almost horizontal rings, a drill press is very useful here.
 
Last edited:
Geeeezzzz....I might be wrong but as he is in the US, I suspect that Gary meant 180 deg. F - not 180 deg. C!

....even so, the melting point of aluminium is over 650 deg. C so you’d be OK at 180 on either measurement scale.

Phew - either way, it’s hot in here.

Pete
I am so american centric, sorry about that, didn't even think about a temperature conversion!
 
Last edited:
I am NOT an engine rebuilder; but a couple of pics
First; these look like they are WAY too coarse but it shows a good cross hatch pattern
cylinder hone pattern.jpg


This is more of what I think the hone should look like using a ball hone. But the pattern isn't as easy to see.
fine hone.jpg
 
It’s OK Gary - most Europeans would have no idea about Fahrenheit while Americans would not likely be familiar with Celsius - but we here in the Middle Kingdom speak both.

The weather here is always in Celsius, but most people cook in Fahrenheit. Similarly, road speeds and distances are in SI but lumber yard materials are normally quoted in the Imperial system
 
Last edited:
It’s OK Gary - most Europeans would have no idea about Fahrenheit while Americans would understand Celsius - but we here in the Middle Kingdom speak both.

The weather is always in Celsius, but most people cook in Fahrenheit. Similarly, road speeds and distances are in SI but lumber yard materials are normally quoted in the Imperial system
How many 2x4's to the Kilometer?
 
Discussing this with JRP1 last night: get out a pan of hot soapy water and scrub those cylinders GOOD before the final oil and piston/ring install.
 
We're supposed to be metric in Britain. But I grew up under the old system and I can't hear a distance in kilometres without converting to miles. Or a height in metres without converting to feet.

But to get back to the XS, Gary, I don't have a drill press, so I was using a hand drill and trying to pull the honing tool up and down quickly, while it kept falling out of the chuck, also trying not to move too far so the spinning bits get out top or bottom and thrash about. Not quite ideal . . .

Might have another go but first going to carry the barrels along to the village m/c engineer and see if he has an opinion. Or may take them elsewhere. But my feeling is they might already be suitably 'roughed up'.

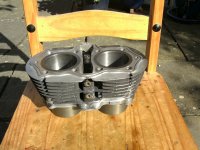
Then, as you suggest, good thorough wash with soapy and water. Then mask them up and spray some black over to hide the welded repair. The guy did a good job of repairing a broken fin - it's the lowest one just above the 653cc:


PICT1875.JPG


By the time they are painted and back on the bike, won't be noticed.

Don't know why the block is black. Not a Yamaha finish? Part of POs Triumph Thunderbird look?

Not a big issue.
 
Thanks Skull.

Well, the easiest way for mine was a quick 'refresh' with the black:


PICT1877.JPG


That can of matt black has been hanging about in my products cupboard for about twenty years. Other matt black paint is available.

Very pleased with the repair the welder has done.
 
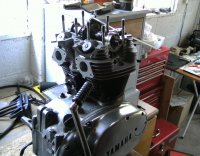
Today, you're getting progress almost as it happens. Can you tell I'm excited to see the engine going back together?

Used Jim's method - fitted the rings to pistons, then into the barrels, then lowered over the studs and onto wooden blocks, then gudgeon pins, circlips, etc.
And as hoped found this approach less stressful


PICT1878.JPG


Apart from pausing to reflect on the progress already made, I also stopped because not looking forward to the next step.

Which involves riveting the cam chain. However, I think the round-tipped riveting pin might be the only one not previously fubar.

Onwards and upwards.
 
A tip for the riveting - tap a small "X" cut into the ends of the pins with a small chisel. This helps keep the riveter tool pin on and centered on the chain pin. It tends to want to walk off the side of the pin as you tighten the tool down otherwise .....

af0HUWQ.jpg


After applying the riveter tool, you should end up with something like this .....

7LhkYqQ.jpg


I "final finish" the pin ends by peening them over some more using a small ball-peen hammer .....

IJz0fLZ.jpg
 
Back
Top