My Project: Underway

rick1956

Just a regular guy.
Messages
67
Reaction score
107
Points
33
Location
Edgewood, Washington
I finally had some time to rip into the new project yesterday. It's really the first I've been able to do anything of any real value since I brought it home other than a little tire kicking. Now that my Harley is back together I was able to spend a little time with it.

Things I found so far:
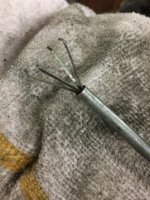
The throttle cable had been wearing on the underside of the tank for quite a while... it had worn a nicely-garfed groove halfway into the cable:

Photo Nov 24, 2 14 28 PM.jpg

The exhaust came off in a shower of rust (from the crossover pipe. There are definitely issues with it, from missing metal to rust holes:

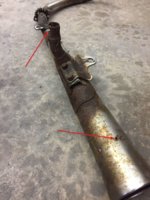
Photo Nov 24, 3 47 26 PM.jpg Photo Nov 24, 3 48 31 PM.jpg

I found out why I had to use levers and inclined planes (like the Egyptians) just to get the damn thing up onto the center stand:

Photo Nov 24, 2 43 11 PM.jpg
No, that's not a railroad spike (but it looks damn near like it)

I was amazed at the lack of quality on the factory frame welds. Horrible! Like this weld on the front side reflector mount that missed the mount entirely. The other side was the same way:

Photo Nov 24, 3 05 00 PM.jpg

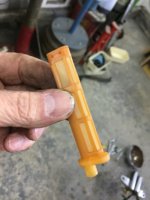
The old, crusty fuel filter was so wasted it broke off at both ends with just me bumping it slightly while removing the carbs:
Photo Nov 24, 2 14 43 PM.jpg

It's just as well... It needed to replaced anyway:

Photo Nov 24, 2 19 19 PM.jpg

It looks like carb cleaning is the immediate order of the day, so they're both on the bench. The fenders, the tank, the seat, and a few other things have all been removed so I can evaluate what I actually have on hand. It will be slow going until after Christmas, but I'm at least off to a small start.

I love two-wheel resurrection!
 
Looks like a resurrection project for sure. Comment; period Japanese welding can be pretty bad but that weld on the front downtube isn't for the reflector mount, the outer tube is slotted, the weld ties the inner and outer tubes together.
 
Well, these are all typical issues Rick, but stick with it. The XS650 is a really nice bike to ride and once you’ve gotten it sorted out, you’ll love it as much as the rest of us.

Looks like you’ve got yourself a ballgame there!

Pete
 
Even though your "custom" centerstand tang probably isn't helping matters, the Special model is difficult to get on the stand even with a fully intact stock stand. The problem is that Yamaha lowered the rear of the bike with the 16" wheel and more inclined shock angle but didn't bother to change the stand (make it shorter). It's still the same long stand that was used on the earlier models with 18" rear wheels and more upright rear shocks.

There are a couple things you can do besides cutting the stand shorter that may help. I can pretty much guarantee you need new rear shocks (originals were shit even when new) so get some slightly longer than stock, about 13.5". I don't know what direction this build is going but swapping in an 18" rear wheel would help some too.

Getting another good stock stand should be easy and cheap. Many guys take them off, don't ask me why. There are some things you should do though, even to a good original stand. First, add a brace to the tang. I consider this a required mod or else the tang will eventually break off (like your current stand has). But, besides keeping the tang from breaking off, it also makes the stand work better. When you step on that braced tang, it won't deflect so all of the force you're putting on it will transmit into getting the bike up on the stand. The second required mod is adding grease fitting to the pivots. It's pretty amazing how much easier the bike will go up on the stand with well greased pivots. The pivots and pivot bolts are usually all rusty. They bind up big time under load, like when trying to deploy the stand.

QOF59xn.jpg


ay3RJMa.jpg
 
Later center stands had the tang gusset already there, so if you try hard you can find one. The tangs are hollow. Amazing.

I originally had longer shocks. It was easy to get on the stand. They started leaking. I got a pair of cheap originals from ebay -- after I picked them up was riding about 60mph with them strapped on and they fell off and flew down the road. Put them on anyway and they leaked pretty bad. Got another pair of originals off ebay and put them on and they're holding up real well for the last few years. But yeah, with the original shocks being shorter I usually roll the front wheel up on a brick or something to make it easier to get it on the center stand.
 
On my 1980, the stock shocks had "shrunk" to 12.5" from eye to eye. From what I gather, they should be 13". Almost impossible to get up on the center stand. Got some new 13.5" shocks and getting the the bike up on the center stand is now a breeze. Oh, and the shocks actually work!
 
Looks like a resurrection project for sure. Comment; period Japanese welding can be pretty bad but that weld on the front downtube isn't for the reflector mount, the outer tube is slotted, the weld ties the inner and outer tubes together.

Aha! That makes sense after looking at it again. It just seemed a little too weird to have such flagrantly bad workmanship like a misaligned robo-weld in the manufacturing world.
 
Even though your "custom" centerstand tang probably isn't helping matters, the Special model is difficult to get on the stand even with a fully intact stock stand. The problem is that Yamaha lowered the rear of the bike with the 16" wheel and more inclined shock angle but didn't bother to change the stand (make it shorter). It's still the same long stand that was used on the earlier models with 18" rear wheels and more upright rear shocks.

There are a couple things you can do besides cutting the stand shorter that may help. I can pretty much guarantee you need new rear shocks (originals were shit even when new) so get some slightly longer than stock, about 13.5". I don't know what direction this build is going but swapping in an 18" rear wheel would help some too.

Getting another good stock stand should be easy and cheap. Many guys take them off, don't ask me why. There are some things you should do though, even to a good original stand. First, add a brace to the tang. I consider this a required mod or else the tang will eventually break off (like your current stand has). But, besides keeping the tang from breaking off, it also makes the stand work better. When you step on that braced tang, it won't deflect so all of the force you're putting on it will transmit into getting the bike up on the stand. The second required mod is adding grease fitting to the pivots. It's pretty amazing how much easier the bike will go up on the stand with well greased pivots. The pivots and pivot bolts are usually all rusty. They bind up big time under load, like when trying to deploy the stand.

QOF59xn.jpg


ay3RJMa.jpg

Thanks for the info and pictures. That center stand with the gussets looks sweet and stout both. I'll keep my eyes peeled for one, and when I find it I'll be looking into zerkanizing it for my greasing enjoyment!
 
I’m going to be looking for a centrestand for my new bike (modern bikes don’t come with them) - once it arrives in the spring.....so, if you’ve got a spare stand, I might need it once I’ve had a chance to make some measurements on the frame of this thing.
 
Hey old guy. I have a 1980 center stand i dont need. Yours for the cost of a 6pack of beer. I can meet you in fife if you like.

That's a pretty sweet offer there, Angus! I don't feel that I really "need" one though. After all, I already have a usable one (crappy as it is) so I'd hate to take it if somebody would need it more than I would.
 
I should expand a little on the grease fitting install. The pivot tube by itself isn't thick enough for the fitting. It will stick through and hit the pivot bolt. You want to put it through the weld at the very top of where the leg attaches to the pivot tube. But even that spot can be a little too thin sometimes so what I do is build it up with a blob of weld first. Then I grind a flat spot on it, drill, tap, and install the fitting .....

z2VPnkx.jpg


hLILAWX.jpg


OGiZMeY.jpg


yp4htGH.jpg
 
I should expand a little on the grease fitting install. The pivot tube by itself isn't thick enough for the fitting. It will stick through and hit the pivot bolt. You want to put it through the weld at the very top of where the leg attaches to the pivot tube. But even that spot can be a little too thin sometimes so what I do is build it up with a blob of weld first. Then I grind a flat spot on it, drill, tap, and install the fitting .....
Hi 5twins,
there's a simpler way for those who don't have welding equipment, angle grinders or tap & die sets.
MikesXS part #32-0001 is a stainless steel centerstand pivot bolt with a grease fitting in it.
~US$20 each.
And how to put an XS650 centerstand back on again. Put that super-powerful spring on FIRST.
Then align one side's pivot bolt holes with a tapered pin, pull t'other side's holes into line, insert the first pivot bolt and finally insert the second pivot bolt
 
Last edited:
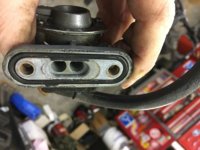
I spent a little more time out in the shop a couple days ago. You know how sometimes it takes a while of puttering to find your groove? That was sorta the way that day went. About when I was starting to roll it was time to call it a day. It was still a little productive though--I took most of the front end apart. Headlight bucket, front wheel, forks all removed. The headlight was where I uncovered this wiring cob job after unwrapping a black tape blister. This sort of archaeological stuff I find on a new bike is my favorite. It's investigative research coupled with various mutterings of disbelief and questioning the mental competency of a previous owner. Haha!

Photo Nov 26, 3 58 56 PM.jpg

The front forks will get drained and new seals of course. One of them has a nice trail of drainage (eww, I hate that word) down the inside that's been there a while. Not much wiring up front will need to be repaired other than the above picture because it will get a new right side handlebar switch.

Today, I dug into the carbs a little. I found neglect and age everywhere I looked. I spent a little time with my razor knife and removed all the external rubber off the "T" fitting because it was cracked and hard as a rock. Upon cracking the carbs open found this sort of thing:

Photo Nov 29, 4 58 22 PM.jpg

Everywhere are signs of age. I think I'm just glad it's not sludge and rotten gas. At least all the other parts of the carbs seem to be in good shape. At least, nothing more than the usual expired rubber syndrome. After getting the carbs ready for cleaning I switched my attention over to the petcock. The tank is ugly as hell, but I figure it will work fine while I'm get everything up and running and can assess what I'm sitting on. I knew, however, that if the carbs needed attention the petcock would too. When I flipped the tank over to start in on it I was greeted by the sound of something rattling around in the tank. I unscrewed the petcock and found this. I said to myself, "Great, no reserve chimney sticking into the tank."

Photo Nov 29, 5 21 40 PM.jpg

After shaking around and doing various rain dances to try to get the offending rattle near enough to the filler neck to grab, I switched over to the petcock opening and used one of my handy-dandy nut-grabbers to go at it:

Photo Nov 29, 5 25 06 PM.jpg

I don't know why I was surprised (and happy of course) to find that the rattle was my missing reserve snout! Good to know it was still nearby, ready to be put back into service.

Photo Nov 29, 5 21 59 PM.jpg

Good times! It might be a productive weekend... Carb kits and some other goodies from Mike'sXS is due to show up tomorrow!
 
Those chrome hanging brackets on the mufflers look exactly like mine did Rick. I dropped them in a bucket and covered them with white vinegar, look like new again after a couple of days soaking and a scrub with an old toothbrush.
 
Keep in mind that the rubber coating on that carb "T" was what sealed it into the carb body, along with the carbs being gently pressed together tight enough so the "T" doesn't easily rotate. Although I haven't tried it, I was thinking that a layer or two of shrink wrap on the ends may work as a repair.

Then, as I mentioned, the carbs need to be clamped together tight enough so the "T" fitting barely rotates by hand. Install the top and bottom brackets loosely, apply the clamp, then finish tightening the bracket screws to hold the carbs tight on the "T" .....

e70CRqV.jpg
 
Hi rick,
I wonder how many XS650 operators are happily riding around not knowing that their reserve/filter towers are unplugged and laying on the bottom of the gas tank?
So long as the operator watches the trip odometer and fills up every 80 miles or so, it could be years of riding with no reserve and no filtration.
It was perhaps 5 years after I swapped a Standard tank onto my Heritage Special that it happened to me.
Bike ran onto reserve way out in the country except that because (Gawd knows when) the reserve/filter tower had fallen out there was no reserve.
Except in the 2-gallon jerrycan in the sidecar. And to think that I was mocked for adding a jerrycan holder to the sidecar.
 
Back
Top