Supermax vertical mill renovation

Mike G

Mike G
Top Contributor
Messages
274
Reaction score
1,116
Points
143
Location
Cleveland, OH
For those not interested in all the gory details of how this came about, skip directly to post #2 for the Readers Digest version. For those folks interested in ALL the gory details, read on…and consider yourself warned!

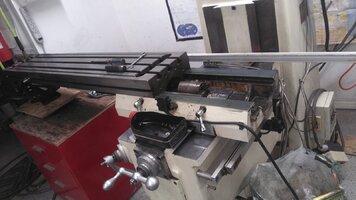
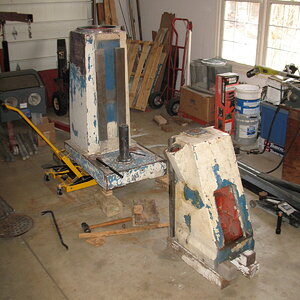
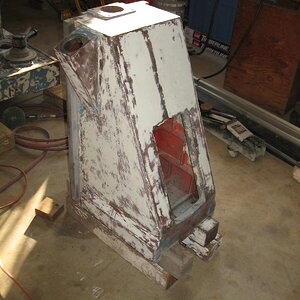
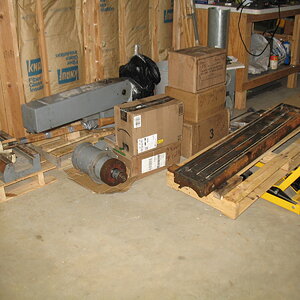
The backstory is that my longtime friend had, over the years, acquired three vertical mills. Mill #1 was a small benchtop mill that, while useful as a starter machine, had limited abilities. Next came mill #2, a full size Bridgeport clone to replace #1 with something more capable. Shortly after completing the disassembly of mill #2, a deal for mill #3, a CNC machine came up that he couldn’t pass on. Fast forward a few years (Ok, 10 years) and my friend needs room in his workshop and mentions a few times that he is considering getting rid of the disassembled mill. I have wanted a mill for a long time but never really considered it as realistic given my lack of space, lack of means of transport and lack of willingness to part with the cash it would take to purchase, transport and tool-up one, not to mention I have ZERO experience using one. So this is waaay outside my wheelhouse in my mind.

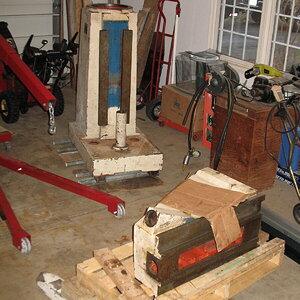
I called on Christmas Day to wish my friend and his wife a Merry Christmas and I hear his wife in the background talking to him. He says, “She wants to know why you won’t take a mill?” My friend adds, “So why won’t you take a mill?” I tell him my outbuilding has plenty of room but no power and I don’t think it will fit in the basement. While we’re talking he emails me the installation pages from the manual with dimensions and asks that I check. After some measurements and mentally removing the Parts Bike, rearranging some shelves and throwing out some disused stuff it seems it DOES fit and reasonably well at that. (excuse #1…eliminated) I then tell him I can’t transport it or afford to transport it 300 miles. He says he will bring it as he has a large trailer and diesel pickup. (excuse #2…eliminated) I tell him I have no means to unload it or get it in the basement. (It’s a walkout for those thinking I’ve totally lost my marbles.) Then he offers to bring his new tractor to help unload. I’m now completely out of excuses and have to agree, still with some lingering trepidation. The thought of such a large, heavy machine in the basement and assembling it while having ZERO experience running it, let alone assembling such a beast from a big pile of parts is intimidating to say the least. Next I ask him how much such a project will cost me. He says, “You come to my (presumably distant) funeral and feed me and we’re good.” I won’t bore you with the details but after much negotiating he allows that I can pay his fuel and tolls AND he will take an old 70’s Williams Dealers Choice pinball machine project I have had for 20+ years. The deal is done!
 
Last edited:
So here’s the starting point. It’s a 1986 Supermax YCM-16VS build-it-yourself mill kit. Most of it is in the basement…


And the base and knee are in the garage patiently waiting cleanup and paint stripping before also making the trip into the basement…


And last, but not least, the quill housing mounted on a convenient engine stand...


For those hoping this will be a speedy project with many weekly updates culminating in a steady stream of chips and numerous motorcycle parts issuing forth a couple of months from now, I picture a somewhat more lengthy process punctuated by much research and many hours of YouTube videos before each major step is completed.
 
I finished the disassembly of the quill housing yesterday. Now I can mask it off so I can wire wheel all the many layers of old paint and get it a fresh coat in preparation for starting assembly.


It went surprisingly well with the help of the H&W videos on YouTube and the book shown below I purchased. Both have their uses. The videos are great for having the laptop on the workbench next to the part I'm working on, and even with greasy hands, I can start and stop it while I complete each step. The book is good for looking forward to what I'm going to be working on and also helps to have a guide to what all the parts look like as I rummage through all the boxes and bags that came with the mill. Did I mention it is a basket case?


These are all the parts that came out, most related to the power quill feed and clutch system.


and the quill.

 
I did try stripping some of the paint from the base and found that under the layers of paint, there is a layer of what looks like Bondo but is MUCH harder. When stripping paint from the lathe, a wire brush made quick work of stripping off all the paint. I pictured the same on this machine but, even with a 7-inch grinder and a knotted wire wheel it comes off much slower and makes a TON of dust. I tried a 5-inch air grinder with 24 grit disk but it worked about the same. Under the Bondo it doesn't have the typical surface of a sand cast iron surface so I see why the factory used the Bondo to levelit out, if you zoom into the picture you can see it. I'm still pondering the best way to move forward.

 
:twocents:
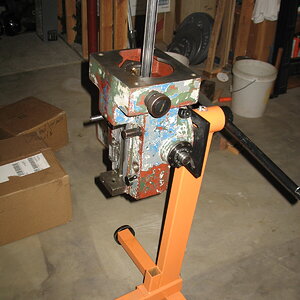
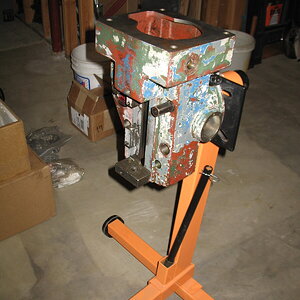
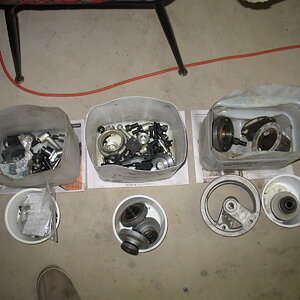
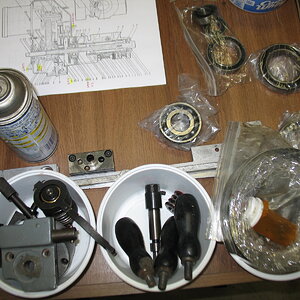
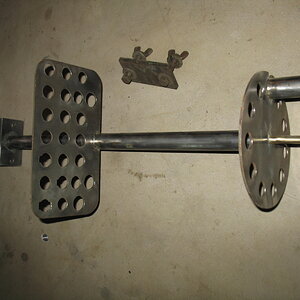
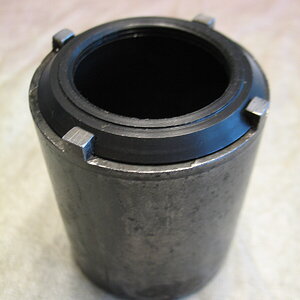
Pay particular attention to the brake shoes. They are WAY buried once the head is assembled and a common wear area.
Assume the half nuts need to be replaced? also done before the table goes back on.
 

Attachments

  • KIMG0584.JPG
    KIMG0584.JPG
    218.7 KB · Views: 24
I'm don't know about the nuts, not even sure which box they're in but wouldn't be surprised if they are toast. I did find the brake shoes while looking for other parts and they look good.
 
I haven't heard the white lead thing before, have to look into that. At least I was wearing a good mask for the little bit I did. One of the options I'm considering is just leveling out the paint with a DA and painting over. The only thing I don't like about that is the layers underneath peeling due to poor prep by PO. Considering the crummy brush paint job, it's likely it had equally poor prep.
 
I was lucky and the factory paint was good enough that touch up with enamel was acceptable to me and seems to be holding up well.
KIMG5820.JPG
Surprisingly, it didn't take much to clear off "the heaviest, most expensive, parts collecting table in the shop" to snap a pic.............
Have you found a manual specific to your machine? I was able to find an Acer manual for my exact machine.
OK I'll quit barging, and just follow along now!
salon-cozy-fireplace.jpg
 
Last edited:
Yes, my friend gave me a paper copy of the manual and I found the pdf online. It's not great but more information is better than less.

Please barge away! I need all the help I can get.
 
if you zoom into the picture you can see it. I'm still pondering the best way to move forward.
I think if it were me, I'd use a scraper (chisel maybe?) to knock off the loose/scaly/flakey bits, give it a coarse sand and fill it with 2 part epoxy fill primer. Sand that out, call it good and topcoat it.
 
Gary, you were correct, the table nuts are toast. Now added to the shopping list...

With all the parts I will have to clean, I decided it was time to drain the parts washer, clean the sludge out of the bottom and get the pump working again. I got about a pound and a half of sludge out and after removing the front of the pump and spinning the impeller by hand a few revs, it's up and running like new again.


Yummy...

Then I started cleaning up parts in preparation for paint. This one looked like it had a scratch in the paint. Closer examination showed the scratch was really a deep crack. I put the point of a knife in the crack and pried on the edge and...


The whole layer came off. Apparently the factory did little to no prep on the aluminum so the layer of Bondo popped off, nearly in one piece. I spent the rest of that day stripping paint from some of the smaller parts, concentrating on all the parts for the head which will require painting. My plan is to assemble the head first as it has about half the total parts count for the entire mill and so will empty the most boxes. It's also the most likely to require replacement parts or have small parts that have gone AWOL over the years so I can see what is needed sooner rather than later.

After stripping off all the old paint, it was time to actually make something look better in preparation for starting the quill assembly.


A small step forward. Tomorrow will be top coating and then letting it cure for at least a week to let it harden while I prep more head parts for paint.
 
Since the last post, I have been putting the parts washer to good use...


... and while checking the condition of the bearings, I found two that spun a little free but otherwise felt good. For those, I popped the seals out, cleaned out the old grease and repacked with fresh. When repacking like this, I finish up by spinning the outside race using the outside of the jackshaft V-belt on the drill press to get the grease out of the ball track to see how they really feel and make sure there is nothing "funky" about them. They feel good as new now. A third bearing was completely fried! Thankfully, of the three bearings this was the cheapest at $14 for "Jen-you-wine" SKF and should be here midweek.

I also primed and painted all the small parts (that is unless I run across some stragglers.)


The two on the right are indeed currently painted but the only picture I had still shows them in primer...rest assured all "smalls" are painted.


The next big project/s that will be done in parallel (as weather and mood dictate) are assembling the head and doing the bodywork and painting on the "big" parts, the base and the knee. In order to get more room to work and access to all painted sides for stripping off the old paint, doing Bondo/bodywork and painting, I tipped the knee up using the engine hoist and got the pallet out of the way and then got the base up high enough to get the HF hydraulic motorcycle lift underneath. This worked surprisingly well and made it easy to move into the middle of the garage floor.


All it took was the "LFP" (Little "Fine" Prybar) in the foreground, a bunch of assorted wood scraps and the motorcycle lift. The lift worked better than expected as the base was surprisingly stable during the move and resulted in little to no drama.

Since I added a NG radiant heater last year this should allow for prep and painting unhindered by the vagaries of NE Ohio weather. I'm not set-up for spray painting so it's going to be a roller job. Based on the results I got on the other parts using a paint brush and "stippling" to get rid of the brush marks, it should meet my somewhat liberal paint finish standards.

Since I was doing frequent stripping (of paint, nothing weird...) I decided to get another long stagnant project off my list. When I got the old Logan lathe, it had a tool holder that never got the paint stripped in preparation for painting. It was the last part that needed stripping when my angle grinder decided to self-destruct and I never got back to finishing it.


This part was old enough that instead of being welded together as I expected, it was brazed.
 
Today the paint was hard enough to pull off the masking tape and clean-up the edges and any overruns. I also put the quill housing back on the engine stand so assembly can commence when the paint is hard enough.


I couldn't waste such a nice day working on anything inside so I opened the garage up and did some more paint removal. I used the 5" air grinder and now have about 80%-90% of the paint removed from the base and knee, what's left is mostly Bondo that seems to still be holding up well. The rest will have to be removed manually from all the nooks and crannies. As soon as that's done, I plan on putting a skim coat of Bondo on and do some...MORE sanding.


I'm thinking about going to HF tomorrow to get a cheap needle scaler and see how that does on the "nooks and crannies". Decisions, decisions.
 
Last edited:
The weather here hasn't been the best so instead of working on the base and knee, I sorted through more of the parts for the head. Specifically, the parts for the bull gear and variable speed pulleys. After watching some videos and doing some reading, I had a good handle on how they go together and confirmed I have all the major parts. I did find another questionable bearing, this one on the large bull gear. I tried cleaning and regreasing, but it still didn't feel quite right, not bad but not great either, so I added that to the parts list too. From my research, I found I would need two tools for assembling the head. The first is a sleeve for pressing the bearings onto the large bull gear. It just happens that a 1-1/2" pipe nipple was the perfect size, so I cut the threads off and faced both ends in the lathe, total cost $5 and about 20 minutes time. I also found my old Bondo mixing board was waaay past its prime. The cheapest I could find one online was $9. My cost-conscious ethos kicked-in and a 12 x 12 sheet of 1/16" HDPE was about $4.50 at McMaster so another 20 minutes to trace the old one onto the sheet, cut out using tin snips and a little edge smoothing had another (future) needed item taken care of.


I also found that the bearing nut for the large bull gear is buried down in the housing so that I couldn't get a punch or chisel into the notches so I would need a socket that fit the bearing nut when it's time to reassemble. A little research showed that the socket for the bearing nut for Dana 44 axles (think 4WD Bronco, etc.) would fit if the ID were opened up about 0.030" and the "teeth" shortened 0.040". A search of eBay had a used one on the way for the princely sum of $14 delivered. Upon arrival, another 20 minutes or so had it fitting the nut perfectly.

 
I don't know a better place to put this one, so I'll park it here.

The lathe came with most of an old work light, missing the cord and lamp shade, attached to a bracket on the motor/drive housing. As long as I was stripping paint off of mill parts, I stripped this one too, enough to read the manufacturer's name, which was O.C. White. (didn't mean anything to me.) I searched on Ebay for a shade and couldn't believe the prices of this stuff. Apparently vintage industrial is now an interior decorating style and the price of this stuff is ridiculous! I found an old timey shade that looked like it belonged on my style of light, which arrived yesterday, so I took a break from the mill to mount the shade to the light and, after rummaging through my collection of old power cords, found one that fit the bill and brought the light back to life. It's now back where it belongs, on the lathe providing illumination to those seeking machining enlightenment.


If you want a laugh, search "O.C. White lamp" on eBay. I guess part of the draw is that the company is one of, if not the oldest lamp manufacturer in the states. I sincerely hope nobody is actually paying those asking prices...

Oh yeah, I thought the shade, which is supposedly also O.C. White (maybe yes, maybe no, as there's no makers name on it) was painted steel but it's brass which was kind of cool. Don't make 'em like that anymore.
 
Back
Top