Supermax vertical mill renovation

You might check Acer parts, a Taiwan maker of clone Bridgeports. I've got my old nuts in a drawer ;) can check some dimensions for yah.
I lucked out and got an "as new" set from a machine that had been converted to ball nuts, from flea bay.
I wouldn't be so sure the Bridgeport will be a direct fit. Vaguely think I looked in to that. One of the machinist's forums might find you the info you need.
 
I suspect Bridgeport nuts and such will be direct replacements.

From talking to the rebuilders and reading on forums, interchange is hit and miss. The early import mills were near exact copies of a series one Bridgeport and almost everything interchanges. The later ones like mine are hit and miss. Like the lead screws, Bridgeport screws are 1-1/4" - 5 TPI Acme screws. I thought that's what mine are, and they sort of are. I measured them and they are 32mm (0.260") - 5 TPI and, I think, Acme. (I don't have thread form gauges.) I wouldn't think that ten thou. would make a difference. A guy on one forum said he tried Bridgeport nuts and they went on tight bud did fit his dogbone (nut mount) and another said they didn't fit. We'll see. If not, I can make some potential modifications on the lathe depending on what needs changed.
 
OK went down and shot things up.
Screw OD 1.255
yeah REAL close to 5 TPI My thread gauge only goes to 8 TPI
KIMG5990.JPG

KIMG5991.JPG

KIMG5994.JPG

KIMG5995.JPG

KIMG5996.JPG

KIMG5997.JPG

Be happy to get anything else you need.
Couple remaining neurons say the slotted flange to set backlash is different than the bridgeports?
Set back lash near the end of the screw not the center or it will bind when you get out to the seldom used areas.
 
Last edited:
Maybe that should be amended to "Where there's a mill, there's a way." Hmmm...

Yeah, back when I was doing my apprenticeship in the 70's and had to run a Sunnen hone for a while. To relieve the boredom had to come up with puns and quips to make the day go.
Hone, Hone on the Range
Be it ever so humble.........
Hone is where the heart is
and so on
 
I set it down on the hoist legs today and it is very stable and is easy to roll around so that's where it stays until it's on the trailer.


Then I picked it up to a little over 24" high, which is high enough to get onto the trailer and set down on 4x4's.


The seals for the trailer hubs are now supposed to be here by Friday. After the trailer is back together, I just need the ground by the walkout to de-squishify and it will be moving day. A drier spring would be a big help.
 
Not very glamorous but very satisfying to me...just more rigging stuff to improve the lift.

There were a couple things I didn't like about lifting the base yesterday that were bugging me. One was the base would twist as soon as it lifted (Notice the blue strap in the picture in the previous post?) and no way to rig the chain to get it straight, it was just a function the lifting chain being in the hoist hook at a right angle. The other was the twist was pushing on the hook down by the tube and trying to unhook it. With the weight on the hook, it is unlikely it actually could, but I still didn't like it.

So, I went to my favorite hardware store (McMaster) and got a double clevis swivel. I got the biggest one that would fit in 1/4" chain and it was rated for 1 ton, so should be good. Chain twist eliminated, no more fighting to keep it straight and now I can twist the base anyway I need to when setting it down by the basement.


It also allowed me to rig the chain shorter so I don't have to raise the boom as high which also means it will reach a couple inches closer to the trailer axle, so less counterweight needed. Also, the lower hook is now pulled in tight so no way it's coming out.

And finally, I played with rigging the chain around the tube and got it to lift like this...


The first is front to back and the second is side to side.

Then I had to do another full lift just to make sure I didn't mess anything else up.


Everything was good so I duct taped the chain around the tube so it doesn't move, that way it will lift straight when taking it off the trailer down by the basement without having to mess with re-locating the chain on the tube.

I can rest easier now...
 
So yesterday the bull gear bearing arrived, which is the last piece (that I know of) that I need to assemble the head. The only other parts that I know for sure I need are the lead screw nuts, so I decided to tackle that issue. I had called around to all of the shops that were recommended on the machining forums for supplying import mill parts. Most didn't want to talk about anything to do with a Supermax other than to say they were a good machine and the company (actually the importer) went out of business and nothing would fit because all the parts were unique. In other words, "go away kid, you bother me". There is a shop, High Quality Tool in Eastlake, about 45 minutes away that manufactures and stocks a lot of Bridgeport parts and were willing to work with me on finding trying/compatible nuts.

I brought all the relevant parts, lead screws, dogbone and lead screw nuts from the original machine for reference and to try different parts on. The guys there were very helpful and had a fair bit of experience with import parts. We tried both the inch and metric Bridgeport nuts on my lead screws and neither even came close to threading on, let alone fitting in the dogbone. Looking at the threads in the nuts, it seemed likely that my lead screws were some sort of hybrid, the thread form looked like the metric nuts but the pitch was definitely inch. The guys said that import manufacturers were famous for changing small details in order to keep the parts business in-house and often changed suppliers so that two mills of the same model but several years apart had different replacement parts. While I was out fetching more parts from my car, one of the guys had rummaged around some old parts and found a used dogbone assembly from an HQT branded import mill they had sold years ago. As best they could recollect, the machine had been converted to CNC and the lead screws replaced with ball screws. Lo and behold, my lead screws threaded into both of those nuts! I measured the ID of the dogbone and it was either the same or within a thou. or two at the most so there was a good possibility I could make them work in my dogbone or, failing that, use the other dogbone provided the centerline distances were the same.

When I got it home, I removed the nuts and cleaned them up and to my absolute delight there was virtually ZERO wear on the threads!!! All my measurements suggested the nuts SHOULD fit in my old dogbone but they didn’t want to go in. After much massaging and cajoling and a small amount of swearing, to both the nuts and the dogbone they fit perfectly without any modification. All I needed to do was to hacksaw them at the split line and face the cut ends in the lathe to make them like the original two-piece nuts.


This is the used dogbone with the one-piece nuts and early Bridgeport style backlash adjustment.


This is the original dogbone with the nuts split and faced but still not quite fitting.


And after a couple hours fiddling, SUCCESS! Everything fits and it's good as new!
 
Last edited:
You're prolly a member in good standing but; https://www.hobby-machinist.com

Them Chinese are masters at copying other peoples shit. I suspect Bridgeport nuts and such will be direct replacements.
Copying the APPEARANCE of other peoples designs. :sneaky:
It's getting there but in the race to the bottom they need to stop at the landing.
We forget the US had a phalanx of el cheapo, fail on first use manufacturers "back in the day" The importers beat them at their own game starting with Japanese low quality manufacturers in the 60's.
How long before Africa takes the business away from China, Vietnam, India, etc.?
 
You're prolly a member in good standing but; https://www.hobby-machinist.com
Yep, have been for a long time but I'm not very active there. Usually when I'm googling something and get a hit on the forum. Interestingly, that's where I found the post that Bridgeport leadscrew nuts fit the Supermax. They may have fit his mill but, not even close on mine.

Yep, every dog has his day. If that's the case, in another 50-100 years it should be the USA's turn again.:thumbsup:
 
I don't have any progress worth showing today. I've been cleaning parts and watching YouTube videos on putting the head back together, there's a fair number of parts in there...
 
I have progress WITH pictures to show today. Unfortunately, it's negative progress.

This is the bull gear bearing sleeve (it's the inner part) mounted in the gear housing.


It's been sitting on the bench since starting this project and, so far, the only thing I've done with it is to remove the bearings to check their condition (one was iffy). After watching the videos on assembling the head, I decided to assemble the big and little bull gears in preparation for starting the head assembly. The sleeve carries the large bull gear and its bearings and is supposed to move from the lowest (backgear or slow spindle speed) up into neutral and last, all the way up for direct drive (high speed). Now understanding how it was supposed to work, it is a simple matter of pulling the sleeve out of the housing. Nope, didn't want to move. After turning a piece to fit the sleeve, I pressed it out with a little help from the hydraulic press.

After I got the parts out for a look, it seemed obvious why it didn't come out easily.


There was a rather large burr in the gear teeth that move the sleeve. I hadn't noticed previously but there was an equally impressive ding in the mating gear.


The sleeve is hard chrome plated so it took a diamond sharpening stone to dress the burrs below the OD. I figured this would allow the sleeve to move like it's supposed to, but NOPE! It would go in further, but nowhere near enough to engage the bull gears. Hmmm... I took measurements of the OD of the sleeve and the ID of the housing and there was between a half thou and one thousandths clearance, which seems awfully small to me for a sleeve that's nearly 3 inches OD and doesn't do anything all that precise.

After playing around with it for a while I decided to go to HQT as they had three different versions in stock to try, Bridgeport, Millport and one of the other imports (forget the name).

None of them fit! Although interestingly, the Bridgeport version went in about halfway before getting stuck, just like the original. After talking to their service guy, he said that Bridgeport allows up to 0.003-0.004" clearance and that I should be able to work with the parts I have. He also said he's had a number of machines do the same thing and to clean the parts up, assemble them (forcibly) and start working down the high spots until it slides up and down easily. He also suggested doing the bulk of the material removal on the sleeve (didn't say why) which will be slow going due to the hard chrome plating. I'm tempted to buy a spring-loaded cylinder hone of the appropriate size to at least knock down the high spots in the housing ID since a brand-new Bridgeport sleeve is also too big to slide in easily. I'll be interested to see how quickly it can remove material and if it's fast enough, I may just concentrate on the housing.

I was going to chuck the sleeve in the lathe to speed up the polishing/material removal but the three-jaw chuck is pretty gritty/grungy so I've pulled the chuck off for a good cleaning and lube before I can start working with the sleeve.
 
Last edited:
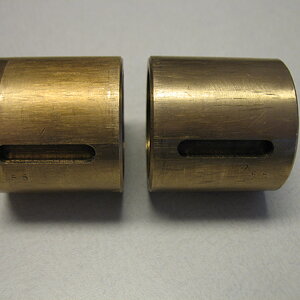
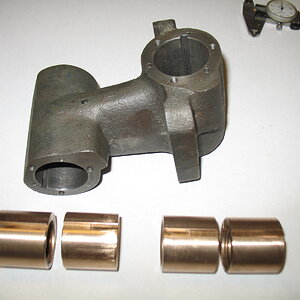
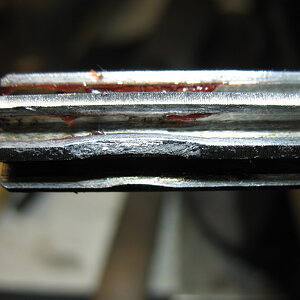
Well, I took some more careful measurements of the housing and sleeve, and I can see why it stuck halfway down. The housing is tapered and is 0.001" smaller at the bottom and there is only nominally 0.001" clearance at the top, which means at the bottom there is less than zero clearance if you allow for any ovality or high spots in either part. My guess is this was put together from mismatched parts and either never run that way or never had to shift into low for whatever job(s) they were running. With this more complete picture of the parts, I decided to concentrate on the sleeve and only take the high spots off the housing.

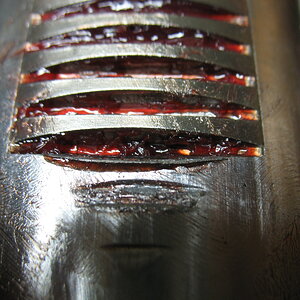
After I got the lathe chuck back together, the polishing/material removal began on the lathe alternating between 240 grit abrasive cloth strips backed by a 1" wide steel bar and a cheapie diamond knife sharpener from Harbor Freight, both lubricated with the same 50/50 ATF/mineral spirits mix I used for rust removal. Why you ask? Cuz it was handy, and it worked. I can't really say whether the diamond or abrasive was faster at material removal, but neither was fast. It took hours of "sanding" and checking (rinse and repeat at least 20-30 times) until the sleeve went in using reasonable hand pressure and then checking with the springs installed to confirm they were strong enough that the sleeve would fully return to the raised position. Boys and girls, chrome is REALLY hard to sand down and remember I was only taking off a total of about 0.001"!


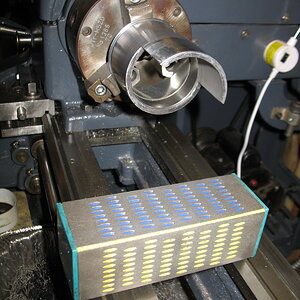
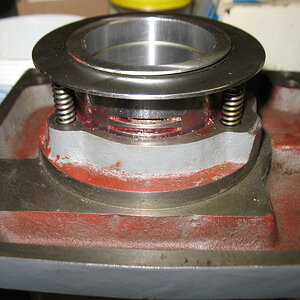
Note: those are bearing surfaces on the ID I'm chucking on, so if you look closely, you can see a piece of aluminum flashing between the jaws and the sleeve to protect them. I'm not as dumb as I look! (Not that you can see me, but I know you're think'nit.)

I'd like to say everything was fully functional at this point, but it took a lot more fiddling around, with the brass keys that guide the bottom of the sleeve and hunting down high spots until it moved smoothly with reasonable hand pressure on the gear shift lever. Even with all the fiddling, it still had a bit of a "hitch" in the gear lever movement, just before going fully into the backgear position, it worked but took more lever effort than I liked. A couple of hundred actuations (by foot!) soon had the hitch down by about half but not gone entirely.

At this point, it works, (spoiler alert, there's more to the story) it was easy to shift and the remaining hitch adds "character" to the machine.


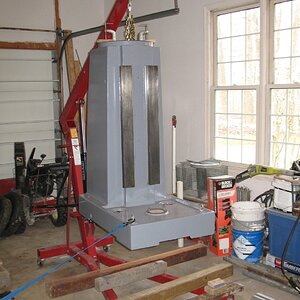
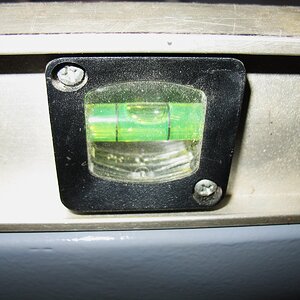
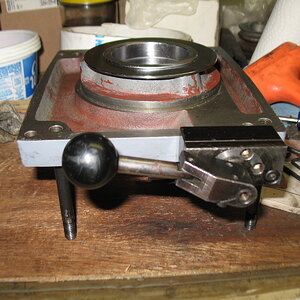
This is in backgear position or low speed.


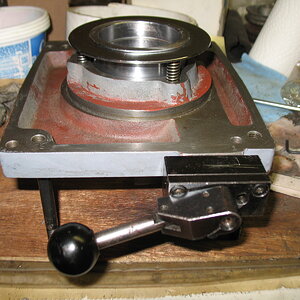
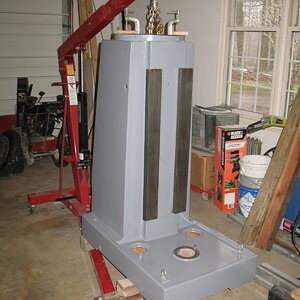
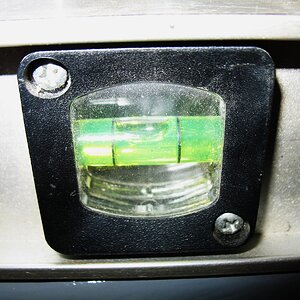
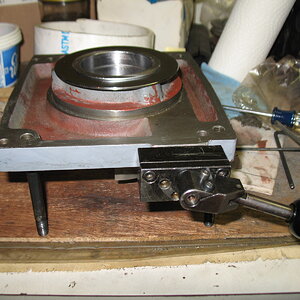
This is in direct drive or high speed.

I thought I was done but while adding the detent subplate and the detent plate, the lever moves harder, hard enough the lever effort is too high for my liking. I hadn't been using these pieces up to this point to save time adding and removing them 20 or 30 times. There is some sort of alignment issue between the actuating gear shaft and the plates. :banghead:

More fiddling required, but at least I have it worried at this point. I know it CAN (WILL!) work, I'm just not there yet. The saga continues...
 
Well, it's working now! :thumbsup: Highly technical and amazingly subtle problem, but simple fix. Put simply...I had it upside down! I was watching videos on assembling Bridgeports and the Supermax is rotated 180 degrees from that. Works fine now and I can move forward with the backgear assembly.

 
Last edited:
Back
Top