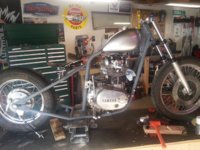
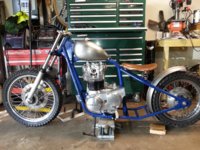
The long haul

Looking good Toast! The welds look fine, they'll on the bottom anyway. That's one hell of a wife you got there. Cool sign man.
 
Yeah...I wouldn't trade her for anything =)

Progress to date then:

Finished up the seat pan, picked out some leather for the covering, and turned my attention back to welding.

Ended up welding a gusset between the two top legs of the hardtail so I could mount the seat pivot (pic) then welded up the spring mounts on the cross member.

I also re-purposed the old exhaust mounts, tacked them to the frame, and put footpegs on them. (I want to pull the motor to get good access to them to finish weld them).

And with that I have a SEAT and a place to put my feet! my ergonomics are a little sport bike-esque given the mid mounts and the low seat height...but DAMN!!!! She's coming along!:thumbsup:
 

Attachments

  • 30 Aug 13 Seat Gusset.jpg
    30 Aug 13 Seat Gusset.jpg
    137.3 KB · Views: 132
  • 30 Aug 13 tank and seat profile.jpg
    30 Aug 13 tank and seat profile.jpg
    239.1 KB · Views: 145
holy cow..just realized it has been way to long since an update here...

Things have been more than a little busy at work, so this has taken a bit of a back seat. BUT....Reached out to my upholstery guy (Nate at Nates Custom Sewing. WOW. love the work he does. Great guy, great prices, and top notch work!!) and gots me a SEAT!!!!!! between that, final welding up some tank mounting bungs (thanks Hugh!) and locating a rear fender, not much as been going on. My neighbor is chopping a '30 ford pickup, and just happened to have a spare tire ring that he had cut a section out of already. He was about to toss the rest in the garbage before I snagged the remaining sections. SCORE!

Halloween obviously came and went, and I also just picked up a set of valve covers off of a 1960 buick nailhead motor: sandblast them down so it is the same finish as the tank and fender...then the plan is to cut 10 or so inches out of the middle of them to shorten them up, weld a hinge on 'em and make kind of a clam-shell type do-fabber to hold all the electronics (maybe a battery too if I can score a good price on one of those mini ones). Nate (upholster guy) is going to make some leather straps to hold the whole thing together out of the same leather that the seat was done with. When finished, it will be a nice leather and raw steel thing going on....

Slowly but surely!

Last but not least, I picked up another project bike :shrug:. why? 'Cause!
Actually it was my father in laws, and he didn't want to mess with it anymore. needs a lot of love. but hey 1983 GL1100!!! funny how most other peoples problematic shit seems to find it's way into my garage:thumbsup:

I almost need a bigger garage.
 

Attachments

  • TSS 2.jpg
    TSS 2.jpg
    6.3 KB · Views: 99
  • Taking Shape.jpg
    Taking Shape.jpg
    11 KB · Views: 124
  • PUMKINS.jpg
    PUMKINS.jpg
    5.7 KB · Views: 105
  • Nailhead.jpg
    Nailhead.jpg
    4 KB · Views: 109
  • GL1100.jpg
    GL1100.jpg
    11 KB · Views: 125
Winter sucks in an unheated garage. needless to say...I did Nothing on the bike accept stare at it every time I pulled in. Gotta love Minnesota though...6 inches of snow on friday, and it's 60 degrees out two days later!

Here is a pic of where I currently sit. Got my seat back, put on, and the tires are on. Friend down the street gave me a spare tire cover off of a model A in exchange for some other parts =) worked out well. So thats my rear fender! now to mount it:wink2:

Did I mention that I had valve covers off of a buick nailhead??:D

Yeah...insta-fun with those. little cutting, section out the middle, welding and a stainless bolt gives a nice little electronics bag. I'm going to run a lithium battery, which will fit inside. super clean install is what I am going for.
YEAH!!!!!
 

Attachments

  • Taking Shape.jpg
    Taking Shape.jpg
    11 KB · Views: 114
  • Nailhead.jpg
    Nailhead.jpg
    4 KB · Views: 112
  • cut covers.jpg
    cut covers.jpg
    228.1 KB · Views: 100
  • electronics bag.jpg
    electronics bag.jpg
    237.3 KB · Views: 121
On the TCI being on the bottom of the battery box; yeah it's hard to get to and the phillips screws were a not so great idea. But it's a vibration thing, the battery box is rubber mounted and the mass of the battery damps the shaking. A few have hard bolted the TCI behind the engine only to have it quickly die of busted internal solder connections. While we are talking TCI do not weld with the TCI on the bike, the magnetic fields and voltages can destroy the electronics.
 
we instituted a new policy at work...use your vacation by May 1 or lose it. Apparently I am a workaholic because I have two weeks to burn :thumbsup:. SOOOO...onto the XS!

Yesterday was spent getting the motor out of the bike again, welding up an engine stand, and starting disassembly such that I can rephase it and replace every oil seal (I swear it was leaking from every single one).

It's funny...a number of friends have been trying to talk me OUT of splitting the cases on this thing (you want to do WHAT? they ask :eek: ). Darn good thing I did, as the plastic from the front cam chain guide was sitting at the bottom of the crank ready to get chewed up the secont she started. the good news is that other than some new guides...everything else actually looks pretty damn decent.

Today was finishing the tear down and actually splitting the cases. Baked the cases in front of a torpedo heater for 20 minutes, rotating every 5, add a little salt, pepper, and oregano for a little flavor, and a half a pump from a McGyver'd cherry lift and BAM! cases split in under 30 min.

Cleaning in K1 begins...NOW.
 
Looks good what you have done so far. Not many cam chain guides that don't need replaced. Good that you looked saves pulling apart later.
 
Pics...Like I mentioned...a little oregano would go a long way on these motors :laugh:
 

Attachments

  • Crusty head.jpg
    Crusty head.jpg
    228.9 KB · Views: 108
  • Start of the tear down.jpg
    Start of the tear down.jpg
    260.8 KB · Views: 107
  • Baking the motor.jpg
    Baking the motor.jpg
    264.7 KB · Views: 92
  • POP.jpg
    POP.jpg
    280.7 KB · Views: 100
  • CRANK.jpg
    CRANK.jpg
    272.9 KB · Views: 94
  • All layed out.jpg
    All layed out.jpg
    228.7 KB · Views: 101
  • GEARS.jpg
    GEARS.jpg
    257.1 KB · Views: 97
Just realized it has been a few months...
Motor is super clean (just a soda blast) I WISH I had the cash to refinish it with vapor blasting.

Hugh also worked his magic on my crank and cam (thanks Hugh!!!!!!!) and while I await more parts, I got busy:

I worked with a local company to custom punch some of the raw materials, and then utilized a whiskey throttle from Biltwell, some raw aluminum, and VOILA!!!!! Kick ASS stacked leather washer grips with silver dollar ends!!! :D 1 of 1!! I even got the color right so the grips match the leather on the seat I made.

OK..so the silver dollars are concho's i found for a buck....but still despite that and my bias...these gotta be the coolest grips I've ever seen :thumbsup:
 

Attachments

  • 20140630_204507.jpg
    20140630_204507.jpg
    194.4 KB · Views: 103
  • 20140630_204459.jpg
    20140630_204459.jpg
    151.6 KB · Views: 99
Hey CO....unfortunately no. you need to use a Harley Cable, or modify the stock one. the cable end on the stock cable fits inside the throttle housing perfectly, but the retaining method is different. The stock cable uses a little clip that is held down by the throttle/switch housing screw to keep the cable in place, whereas the Whiskey Throttle uses a threaded adapter (harley style). I figured I would just dial up Barnet, or modify the stock one =-)
 
WHOOOO!!!!!!!!

Mocked up!!!!!!!

still gotta install Hughs lowering kit in the front so it sits level...but yer also looking at the final paint job (will be clear powder coated)!
 

Attachments

  • Mock up.jpg
    Mock up.jpg
    302.2 KB · Views: 123
Wow....
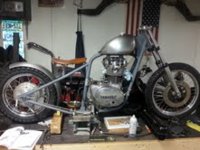
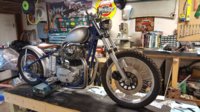
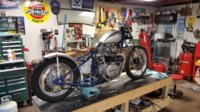
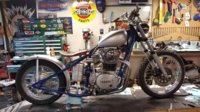
Three years, five months, 29 days. couple of busted knuckles, lots of beer, 4 surgeries on my end, and it lives!!!!!!!!!!!!!:D:thumbsup:

I did not rebuild the starter...I should have...it went bad after a few turns.
So I kicked it over (had to a few times), but she roared to life about 9:30 last night!

today i'll start breaking in the motor =-)

Highlights include:
Ardcore hardtail
Rear fender is made (by me) from a spare tire cover off of a 1929 ford (Real Henry Ford Steel)
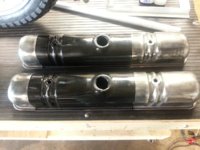
Battery/Electronics box is handmade (by me) from a set of valve covers from a 1961 Buick Nailhead
Rearview mirror is an original 1932 Ford mirror which has been adapted to fit.
Handmade (by me) seat
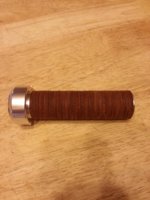
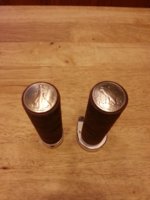
Handmade (by me) stacked leather washer Grips with coin end caps
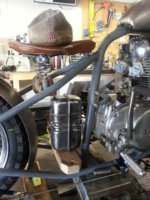
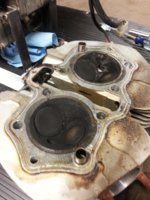
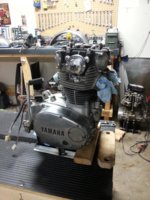
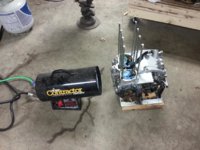
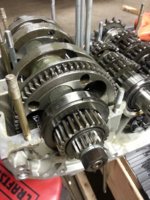
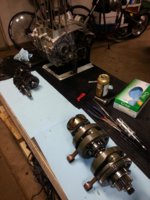
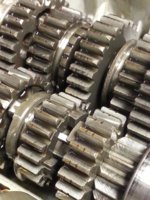
Complete engine & carb rebuild
Hugh's Handbuilt did the rephase ont the Crank/cam (THANK YOU HUGH!)
Pamco ignition
Hoos Racing exhaust
Paint was done by one of my best friends
Pinstriping by Lenny at Krazy Kolors
+ a $hit ton of little stuff from Mikes, Lowbrow, Monster, and Dime City that couldn't be found anywhere else.
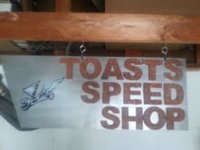
+ most importantly: a ton more stuff from my Local, Dr Mudspringer in Spring Lake Park, mn...SUPPORT YOUR LOCAL!


All in all...Not bad for a first build! with any luck I'll make the calendar. :laugh:

Also...not to sound too cheesy, but I can't thank everyone enough for their guidance. I may not have always been posting, but you all have provided a wealth of information that has been invaluable along the way.
 

Attachments

  • Bike F1-4.jpg
    Bike F1-4.jpg
    277 KB · Views: 140
  • Bike R1-4.jpg
    Bike R1-4.jpg
    267.4 KB · Views: 120
  • Bike Right.jpg
    Bike Right.jpg
    293 KB · Views: 120
  • Bike R.jpg
    Bike R.jpg
    207.7 KB · Views: 108
nice! I love the repurposed nail head valve covers. Ive thought the same with chevy v6 covers. would be just short enuf to fit back there.
Now for the 1100!!
 
Back
Top