Tips on Valve Keeper (Collet) Installation

YL82

Perpetual Restorationist
Messages
851
Reaction score
8
Points
16
Location
Goose Creek, SC
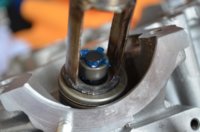
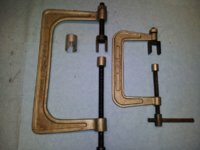
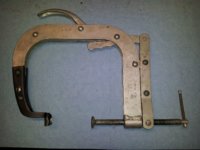
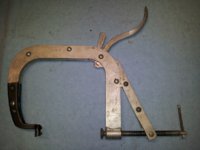
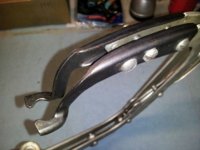
I'm using a 6" c-clamp and a spring compression tool that I had fabricated for me. It's doing its job, but could perhaps use some minor modification (like removing metal at the bottom of each "window" to give me more room).

My technique thus far...well, actually I don't fucking have one, so I need some tips on how to get these bastards installed. I've been using a magnet tool, tweezers, small screwdriver, etc.

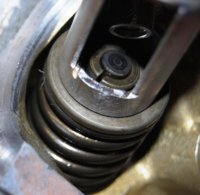
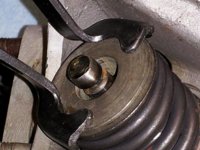
How much do I need to compress the springs to get them in? I think I've tried too little compression since a slight move of the clamp has jettisoned parts all over my garage and those keepers can really travel a long ways.

Can both keepers be installed into the retainer and then pressed down onto the stem or do the collets need to installed one at a time after the springs are compressed (like the reverse process of how they were removed)?

DSC_0002_zps85d0a355.jpg
 
Yeah, like reverse of disassembly. Compress the collet/spring enuff to get the keepers in there, then put a little dab of grease on the inside of the keeper (holds it on the valve stem), and a little dab of grease on the tip of a small flat-blade screwdriver, touch that to the outside of the keeper, it'll stick to the screwdriver, then press the keeper onto the valve stem, slide-out the screwdriver. The keeper stays put while you do the other one...
 
I'll try those pointers. Thanks, 2Many.

Oftentimes, it helps just to walk away and try again later with renewed resolve and determination.
 
If you compress the spring enough, the keepers will drop right in. Many times, the spring cocks to one side when you tighten it down. I drop one keeper in the loose side then work it around to the tight side by rocking the spring compressor and spring over a bit. That lets me spin the keeper around to the tight side (now looser) with a pick of some sort. It gets trapped in place when I release the side pressure on the compressor. Then I drop the second keeper in the loose side. You have to get the spring compression amount just right so the keepers go in enough to catch and lock into that groove in the valve stem.

This is why I like that c-clamp style spring compressor from Mike's in the red box. It's infinitely adjustable so you can get just the right setting you need. Since all the parts snap together, stuff doesn't go flying all over the shop if you move it or rock it a little.
 
Thanks, 5twins. Yes, it is the cocking to one side that caused me to try to reposition the clamp a little which launched the aerial attacks of valve part shrapnel.

I believe I need to tighten the clamp quite a bit more than I have - one effect should be to minimize the ability of the clamp to move & slip off my adapter. I just need to figure out that sweet spot in the amount of compression that I need. I had my compressor adapter modified so the side openings allow for improved access to the stem while also affording better visibility.
 
Your adapter should attach to the clamp so it won't go flying. I would remove the foot from the c-clamp screw and weld a washer on top of the adapter with a hole big enough to just slip over the ball end remaining on the c-clamp screw.
 
That's a good idea. I had thought of that early on when I had the adapter thing made up months ago, but never had that done. I have recently befriended a Metal Fabricator who lives just down the road from me who can do that welding.

It just occurred to me that for keeper re-install, I acutally was using the C-Clamp the opposite way. So the adapter was up against the paint-slick top foot of the c-clamp rather than the swivel head thing (which was pressing into the intake valve). Irrespective, I still need to weld the adapter to the c-clamp as you suggest.
 
I found compressing a little past the point I wanted and then installing one side to help guide the depth helped. There is really no easy way I have found, just takes practice and lots of patients!
 
Yeah, like reverse of disassembly. Compress the collet/spring enuff to get the keepers in there, then put a little dab of grease on the inside of the keeper (holds it on the valve stem), and a little dab of grease on the tip of a small flat-blade screwdriver, touch that to the outside of the keeper, it'll stick to the screwdriver, then press the keeper onto the valve stem, slide-out screwdriver. The keeper stays put while you do the other one...

Success!!

After adequately compressing the springs to expose the valve stem groove, I dabbed a schtickle of grease on each collet with a Q-Tip and pressed them in place around the stem. While decompressing, I held the collets in place with a finger. This technique worked like a charm and I had them all done in just a few minutes.

I also had my tool modified to open up the windows for better visibility and access. See after and before images.
 

Attachments

  • Collet_Reinstall_1.jpg
    Collet_Reinstall_1.jpg
    125.6 KB · Views: 454
  • Compression_Tool.jpg
    Compression_Tool.jpg
    65.3 KB · Views: 334
Last edited:
Alright, YamaLovin76! Learned that tip 42 years ago, using factory valve compressors, similar to yours, c-clamp style, but without the reinforcing ring. I still have them...
 

Attachments

  • ValveCompr-1.jpg
    ValveCompr-1.jpg
    89.3 KB · Views: 277
But in a shop environment, they took too long to use, so I acquired a Snap-on JT-18 valve spring compressor. Once you get the jaw width set, and the depth set, you operate it like a visegrip. It levers down to close very easily, and snaps open easily. The jaws contain the spring cap, doesn't want to slip off. Makes quick work on 4-cylinder heads.
 

Attachments

  • ValveCompr-2.jpg
    ValveCompr-2.jpg
    79.2 KB · Views: 261
  • ValveCompr-3.jpg
    ValveCompr-3.jpg
    105.5 KB · Views: 267
  • ValveCompr-4.jpg
    ValveCompr-4.jpg
    73.9 KB · Views: 295
You can see how the jaws stay to the side, allowing clear access to the valve stem, and installing the keepers is much easier, no longer need to use the 'schtickle' of grease trick...
 

Attachments

  • ValveCompr-5.jpg
    ValveCompr-5.jpg
    61.9 KB · Views: 270
  • ValveCompr-6.jpg
    ValveCompr-6.jpg
    195.5 KB · Views: 350
That is a very sweet tool! I really like the way it holds around the spring cap and how it affords easy access to keepers.

Thanks for the pics!

One thing I dislike about the c-clamp is that I have to mount it at specific angles on the head and it invariably wants to abrade the sides of the head, which is bad. I have yet to have my compressor tool welded onto the clamp, but may consider having my metal fab guy also modify the clamp (see pic) - hopefully w/o compromising strength of c-clamp.
 

Attachments

  • Mod_C_Clamp.jpg
    Mod_C_Clamp.jpg
    21.4 KB · Views: 320
Back
Top