Trouble building pressure with new master cylinder

Jay Estes

XS650 Member
Messages
11
Reaction score
9
Points
3
Location
Near Houston, TX
We recently bought a new master cylinder for the front brake. We have cleaned both lines, rebuilt the caliper, and I have verified fluid will flow from master cylinder thru to the caliper and will run out the bleeder.

With the new master cylinder however, I get ZERO feeling of "grip" or resistance as if the cylinder is pressuring the lines. If I break the lines at the ends of the hoses, I can squirt fluid at each interface, and when I close the system and leave the bleeder a little open, I can push fluid thru with each pull of the handle, however, I cannot get the system to build pressure when I close the bleeder. Not even a little bit. I can't even get a squishy feel on the lever as I would expect with a system that has air in the lines. it's very weird.

Anybody got any idea what I am doing wrong? The master cylinder didn't come with any instructions so if it needs to be primed or something, I don't know how to do that.
 
Are you sure the cups are turned the right way? Did you put the new stuff in going by the way the old stuff came out? Sure you got the right kit?
 
Are you sure the cups are turned the right way? Did you put the new stuff in going by the way the old stuff came out? Sure you got the right kit?

Yep, that's not it because we bought a brand new Master cylinder and hand brake. Whole thing. Unless they assembled it wrong at factory, it should work correct?
 
I don't read these, I just kind of skim them :) I would say if you can get all the bubbles out of the bleeder but you don't feel any resistance with the bleeder closed, something's wrong with it. What kind did you buy?
 
Every time I bleed mine, there is air trapped in the MC, behind the piston. I have to bleed the MC at the banjo, otherwise I have zero resistance at the lever.
I wrap a towel around it, pull lever in, crack the banjo bolt and usually get a sputtering noise, then close the banjo and release the lever. It takes about 10 repetitions of this to get the air out the bore, you can usually tell if this is the case by removing the MC cap and looking for tiny bubbles when slowly pulling the lever back. You want a jet of fluid to shoot up (messy I know).

Then I tie the lever back to the grip overnight.
 
Last edited:
Thanks for opening this thread Jay! You can be the poster boy for a BRAND NEW brake technique I am VERY exited about.
Wow expectations are sky high now.
One of the boyo's here was on this track, but I think I have gone a step further and found the holy grail. So far this applies only to 77-84 single piston, single caliper brake systems.
You can get rock hard brake lever with (drum roll please) NO BLEEDING needed.
Impossible you say!
But tested and proven!
OK will follow up with pics but I did this for the first time this week on a 79 special that was through the shop on a quick flip (yeah I'm a shameless Yankee Trader) sue me LOL
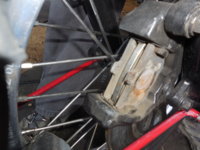
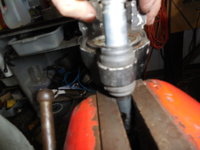
MC piston was stuck in, Zero brake action. I stripped and cleaned caliper and MC. (I don't advocate this part) but it was a special with rototiller bars and I didn't have a long enough brake line, so I flushed the existing lines with brake cleaner and air pressure. Caliper piston was rusty, so replaced with new piston. There's threads on the overhauls in tech.
First note; there is no need to remove the caliper bracket from the fork for an overhaul, Use a screwdriver to back out the pad retaining screw from the rear, remove the one bolt that holds the caliper to the bracket, remove caliper from bracket. If you have removed the bracket for cleaning it can be reinstalled to the fork leg with the two bolts washers and lock washers, the pads should be installed on the bracket now.
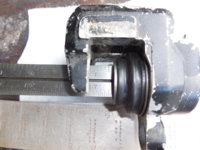
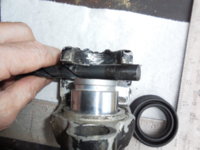
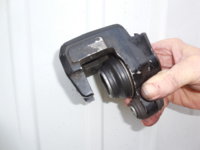
Caliper back together, mounting sleeve lubricated, OP: that sleeve inside the rubber grommet must be lightly greased and move freely.
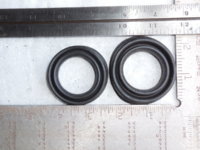
To assemble; the piston is inserted fully, you need it pushed in all the way in to get the dust seal and retaining ring back in place. Doing that is sure fiddly, and it's a pain to get it back together without a loop of dust seal rubber at the ring gap isn't it? Install the pad tensioning spring bracket, tighten the pad retaining screw just enough to keep the bracket in place.

OK here's gggGary's "secret" (about time?)
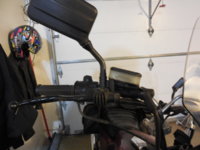
Mc is on the handle bar turned so the path from caliper to reservoir is all uphill, no low spots to trap air. On the side stand bars full left usually is enough, on specials with the angled Mc you may need to rotate the MC on the bar a bit or even rotate the bars forward in the risers so the path is ALL uphill.
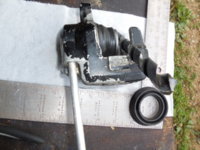
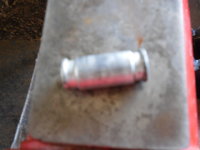
Next; You are holding the assembled caliper in your hand. no brake line or banjo attached. Just the caliper. You need to be very careful now, don't want any fingers removed or holes in the shop walls. Bleeder in and tightened. (you won't need to use it). Use a BIT of compressed air, don't try to seal your air gun to the brake line opening. and carefully use the air to extend the piston to it's outer limit. the rubber boot will be smooth no folds left. (will add pics, and a measurement later) A C-clamp to limit how far the piston extends would be smart. So now you have a caliper with a BIG reservoir behind the piston (but just full of air). Now, turn and hold the caliper so the hole where the brake line attaches is pointed straight up and slowly dribble fresh brake fluid into the caliper until it is filled. Do not attach the caliper to the bracket yet. Attach the brake line, banjo bolt, and two copper washers. Get the banjo bolt as snug as you can with the 12mm wrench. A light smack on the wrench with rubber mallet will help.
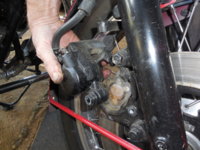
Finally the core "trick". With the brake line bolt pointed up so it's at the high point of the caliper, caliper held low so the fluid path to the MC is all uphill, slowly squeeze the piston in. If you have done a good job of cleaning and assembly this can be done easily with your thumbs. Brake fluid will go up the line through the MC and into the reservoir. You now have the piston fully retracted and can install the caliper to the bracket and pads with the bolt through the sleeve, With the caliper installed, finish tightening the pad retaining screw, the banjo bolt, and bleeder.
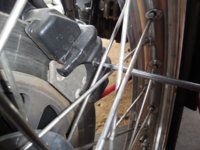
Add a bit of brake fluid to the reservoir, use the lever and pump the piston out so the pads contact the rotor, because the reservoir is at an angle keep a close watch on fluid level, it will go down as you pump out the piston. Go ahead and give a quick squeeze, release of the lever a time or two, this gets any little air bubbles hiding in the MC bore out to the reservoir. you will see the bubbles rising in the reservoir. now straighten the bars, and finish filling the reservoir, done!
A bit later and the next day repeat the side stand bars left squeeze release a time or two. I do this on a semi regular basis on all my brake systems, it keeps best lever feel. Do it with hydraulic clutch levers also. Tilt and turn to the right for the clutch.
To the OP even if you have your system assembled this is a worthwhile technique, yes it will be painful to open it up again, but this really works. The all uphill path is critical.

Last winter I did an overhaul with NO bleeding just by setting up the all uphill path and squeezing, releasing the lever waiting and repeating, it took a while 100 squeezes? but I got full hard lever, only cracking the bleeder to remove the small air pocket that sits in the top of the caliper that can't go up the line when the caliper is assembled on the fork. But the technique above is MUCH better, faster, easier.
 
Last edited:
Now those are some good suggestions. I like the originality of the reverse bleed by using a full caliper cylinder, but I wonder would this solve my problem - since I suspect my problem is back in the MC itself. I may try highboy's method first, to see if I can get SOME kind of lever on this brake. The lack of lever on this thing is quite disturbing, but yet I can push fluid thru it, IDK, not making a lot of sense.

We will give these things a try today, and report back. If I can't get lever with one of these methods, then I think maybe this MC is going back to the vendor.

Jay
 
Jay what you describe is common. The rubber seal grips the caliper piston. the MC moves the piston a small amount but the rubber seal just bulges a bit doesn't slide on the piston, when you release the lever the rubber pulls the piston right back where it was, you gained nothing, the piston never pushes the pads to the rotor it just wobbles back and forth a bit. For this reason I pre-lube the piston and seal with a bit of brake fluid when assembling. Also why it's so important to remove the rubber piston seal and clean out the gunk behind it.
 
Yeah, starting with clean parts helps to rule out that when troubleshooting.
Remember if you have an air bubble in the bore of the MC, you are just pushing fluid around it (this is why you can push fluid out at the caliper nipple and it seems clear ), you either have to reverse bleed like gggGary suggests, or get the air out at the MC like I have had to!
 
Here's the core "trick". With the brake line bolt pointed up so it's at the high point of the caliper, slowly squeeze the piston in.
So... instead of using a pressure pot to back flush the air from the system, you let the caliper piston act as a pressure pot. Well Gary..... that's just f%cking brilliant!!! :D
I'm bettin' that would even work on a Piper or Cessna brake (which are even harder to bleed than our XS's). Pure genius dude!!!
 
Alright guys after some distractions with work, we are back at this problem this weekend. Haven't tried it yet, but will soon.

I read thru gggGary's procedure several times, and decided I liked the concept here - it makes a lot of sense. I'm a bit pf a process guy, and I'm also a bit of a simpleton, so I like stuff written down step-by-step so I can follow it easily. So, what I have done is re-write gggGary's reverse-bleed procedure in a multi-step procedure that I can follow. I took the liberty of changing/shortening some words sentences, so, it's not verbatim, but I basically am trying to get the process down gggGary is advocating, and put it in a simple process. So, this is an effort to regurgitate the plan back at you, to get it correct. We will try to get some pics of the process as we do it, so we can add them to the procedure.

My version of it is attached as a PDF. gggGary - please review, and if you have comments on it, please let me know.
 

Attachments

  • gggGary's MC brake "reverse bleed" procedure.pdf
    39.6 KB · Views: 351
That's AWESOME! looks great! Thank you. I'll see if I can snap some pics but feel free to do it!
 
pics, details later, got go to the Great Baraboo Circus Parade now. Allison is "leading" it!
 

Attachments

  • DSCN9637.JPG
    DSCN9637.JPG
    182.9 KB · Views: 315
  • DSCN9635.JPG
    DSCN9635.JPG
    193.7 KB · Views: 276
  • DSCN9636.JPG
    DSCN9636.JPG
    156.1 KB · Views: 303
  • DSCN9630.JPG
    DSCN9630.JPG
    176.4 KB · Views: 286
  • DSCN9656.JPG
    DSCN9656.JPG
    168 KB · Views: 290
  • DSCN9629.JPG
    DSCN9629.JPG
    126.4 KB · Views: 291
  • DSCN9641.JPG
    DSCN9641.JPG
    99 KB · Views: 295
  • DSCN9638.JPG
    DSCN9638.JPG
    206.9 KB · Views: 294
  • DSCN9644.JPG
    DSCN9644.JPG
    122.4 KB · Views: 293
  • DSCN9651.JPG
    DSCN9651.JPG
    102.4 KB · Views: 307
  • DSCN9655.JPG
    DSCN9655.JPG
    232.3 KB · Views: 304
  • DSCN9653.JPG
    DSCN9653.JPG
    183.5 KB · Views: 302
Awesome - thx for pics. I got the MC working using this procedure. Not convinced it is giving the hard feel I wanted yet, but I had a complicating factor that could have let air in the lines, so, could be on me. It squeezes pads now, and doesn't collapse everytime I squeeze it, so... Progress. Pics and updates later.
 
Park it on side stand bars left, give the lever a pump or two before you straighten up the bike, for a day or two, the hard lever will be there. Not rare for old lines to get soft and result in soft lever no matter what you do.
 
Wouldn't hurt to just crack the bleeder for a second or two a paper towel to catch any drool would be all you need, there is probably a small bubble of air in the bleeder port.
 
Wouldn't hurt to just crack the bleeder for a second or two a paper towel to catch any drool would be all you need, there is probably a small bubble of air in the bleeder port.
..... while squeezing the brake lever.....:whistle:
 
Reverse bleeding a MC system has always been my friend.
And that's what Gary is describing. Instead of using a back bleeder (pressure pot) he's using the caliper to supply the pressure.


I tole' ya Gary.... :rolleyes:
 
Back
Top