I wasn't specifically saying that you have an ignition problem, only that many others blame the carbs for their problems when it's not really the cause. I wish I knew what was wrong with your bike, lol.
-
Enjoy XS650.com? Consider making a donation to help support the site.
XS650.com receives a small share of sales from some links on this page, but direct donations have a much greater impact on keeping this site going.
You are using an out of date browser. It may not display this or other websites correctly.
You should upgrade or use an alternative browser.
You should upgrade or use an alternative browser.
Weak Midrange RPMs. Loss of "Pull".....goes flat...
- Thread starter EvenmoreXS
- Start date
-
- Tags
- carburetors
EvenmoreXS
1981 XS650
"Well, if you measure the difference from the battery positive terminal to the coil, then even 1 Volt would be a good number due to all the potential losses, like the fuse, the ignition switch, the kill switch and various connections. .26 might be just the draw for the PAMCO which only draws about 20 ma.
The drawing you posted seems to show a 90 degree rotor. Newer PAMCO's have a 60 degree rotor and the dwell area where the coil is on is in between either set of magnets that are 60 degrees apart.
Connect your voltmeter as you rotate the PAMCO rotor and you will see a sequence of very low voltage drop followed by what I think should be about 1 Volt. "
Order Number: 127120
Date Ordered: Wednesday 21 November, 2012
Detailed Invoice:
https://www.mikesxs.net/cart/index.php?main_page=account_history_info&order_id=127120
Products
------------------------------------------------------
1 x Pamco Electronic Ignition Kit (14-0902) = $219.00
------------------------------------------------------
Sub-Total: $219.00
Free Shipping (Order Over $150) (Free Shipping (Shipped UPS or USPS)): $0.00
FL TAX 7%: $15.33
Total: $234.33
Im pretty sure it has 4 magnets, hence 90 degree. I dont even remember noticing but I remember from when I installed it. Great product from day 1. I'll double check. Maybe the date helps. November of 2012 purchase date.
I will run the test again. Maybe use my other voltmeter. The "Dwell" area is the area between the magnets and should show low voltage...correct... ? The magnet meeting the sensor will show about a volt....correct?
Gonna run the test and just see what happens. Also gonna check the advance again. Also got some new spark plugs. Also may go down on the jets to 1 up pilot and 2 up main as suggested earlier. Also going to test for an air leak with carb cleaner or propane, or both. May try to run no fuel filter tomorrow.
EvenmoreXS
1981 XS650
I wasn't specifically saying that you have an ignition problem, only that many others blame the carbs for their problems when it's not really the cause. I wish I knew what was wrong with your bike, lol.
I know you do 5.

If I can find it I can fix it. Absolutely NO doubt in that.
Just gotta find it.
pamcopete
Ride.Enjoy.Life is Simple
evenmorexs,
With that date of sale, you have a 60 degree rotor which we have been shipping for about 4 years. So, the dwell area is in between the magnets 60 degree arc. During that dwell time, the coil is turned on by the transistor, so the voltage as measured from the battery positive terminal to the coil + terminal (red wire from PAMCO, red / white wire from the kill switch) will be at its highest and that is the Voltage of interest.
With that date of sale, you have a 60 degree rotor which we have been shipping for about 4 years. So, the dwell area is in between the magnets 60 degree arc. During that dwell time, the coil is turned on by the transistor, so the voltage as measured from the battery positive terminal to the coil + terminal (red wire from PAMCO, red / white wire from the kill switch) will be at its highest and that is the Voltage of interest.
EvenmoreXS
1981 XS650
evenmorexs,
With that date of sale, you have a 60 degree rotor which we have been shipping for about 4 years. So, the dwell area is in between the magnets 60 degree arc. During that dwell time, the coil is turned on by the transistor, so the voltage as measured from the battery positive terminal to the coil + terminal (red wire from PAMCO, red / white wire from the kill switch) will be at its highest and that is the Voltage of interest.
How does .623 v sound? Measured in the dwell. Here is a short vid of me rotating the rotor, just so your sure I set it up right.
Batt voltage was 12.20 after riding home. Id like to see higher than that but its charging.
After fiddling with it, installing a speedo bulb, and idling while checking for a vacuum leak the voltage was closer to 12.05 v.
Could not find a vacuum leak. But I still think I have one somewhere. Pfftt Pfftt from somewhere. Maybe Im hearing things, been listing too hard.
NEXT TEST:
Starting test batt voltage was 12.05 at the battery with the switch on.
11.65 at the kill switch but BEFORE the kill switch....ignition on
11.45 at the coil after the kill switch....ignition on
NEXT:
Cleaned carbs again. Carb cleaner through and blew out jets, including removing the enrichers and making sure I have cleaner through there and out the shaft in the bowl. Blew out fuel line through carb and back out. Seat screens are clean. Removed mix screws and blew that out...carb cleaner... New filter, not the best ever but its brand new and let more air through than the other.....i blew through em to see which had more resistance.
Pilot jet now 45.0 1 up..
Main is now 137.5 2 up..
Floats at 22.10 mm
Mix screws out 3.5 turns
New spark plugs BP6ES 1 step hotter than stock 7es
Gonna check the spark plugs as soon as I can today.
Going to rent a compression tester tonight and check that out. Maybe even find a way to do a leak down test.
Ride to work was ok. Didnt push too hard but she didnt stutter.
Idle problem still about the same.
I think its either a problem with air, spark, or fuel....or the combination of any 2 or all three.
I think a good tune and sync will help but I havent been able to get it to idle consistantly for long enough to do it myself. I hesitate to pay someone else to do it.
Thanks for your help everyone.

pamcopete
Ride.Enjoy.Life is Simple
How does .623 v sound? Measured in the dwell. Here is a short vid of me rotating the rotor, just so your sure I set it up right.
OK. That's a very good but believable number. Other ignition issues to check:
1. Measure the resistance from cap to cap.
2. If you have resistor caps, like 5 K, then that adds up to 10K plus the secondary resistance of perhaps 12K to 15K for a total of 22K to 25K ohms.
3. The purpose of the cap to cap test is to ensure that one of the caps is not open. If one cap is open, it affects both spark plugs because they are effectively in series. The high voltage can jump the open, but the result is a weak spark delivered to the spark plug gaps.
EvenmoreXS
1981 XS650
OK. That's a very good but believable number. Other ignition issues to check:
1. Measure the resistance from cap to cap.
2. If you have resistor caps, like 5 K, then that adds up to 10K plus the secondary resistance of perhaps 12K to 15K for a total of 22K to 25K ohms.
3. The purpose of the cap to cap test is to ensure that one of the caps is not open. If one cap is open, it affects both spark plugs because they are effectively in series. The high voltage can jump the open, but the result is a weak spark delivered to the spark plug gaps.
Test was from red lead to positive terminal on battery .....and black lead to hot terminal for coil. Ignition and kill switch on.
Did it with the leads reversed but got funny numbers. I think the first way was right. If I did it wrong I can do it again tonight no problem.
I will test the caps asap. Havnet done that yet. They are new too. 5k's.
So 10k plus whatever the ohms resistance is equals the number Im looking for.
Thanks pete.
P.S. Advance springs are springy, firm and feel even. Seem just right.
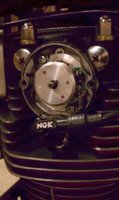
Here is the grease I used on the shaft.
Here is also the position where I measured the "dwell"
I also oiled my uni filters. Hadnt gotten to it until now.
Attachments

Last edited:
EvenmoreXS
1981 XS650
Here is a video I just shot. I went for a short ride and warmed her up. So, at a stop....Upon giving throttle,first gear boggs down before catching and then revving hard and High and pulling all at once. Seems better if I try to rocket off the line....just riding normal and she boggs in first....With the idle screw out as far as needed to keep idle she revs high between shifting gears but will die when I stop. Idle is set too high for riding. Bump the throttle and Its off to the races...rps straight up.... enricher on 1 slot, not much change...drops a second and comes back up, full enricher and she tries to die, enricher back off and she screams back up in the rpms. Idle screw seems to have very little effect on controling the idle, whether its low or high. It either does nothing or you go from one extreme to the other with a slight touch. Not predictable. For instance, High rpms at idle,,,,turn idle screw back, nothing, turn, nothing, turn, nothing, turn, nothing , turn, dieing dieing dieing, bump throttle, turn screw up, dieing, turn screw up, dieing, turn screw up, dieing, turn screw up...rpms run away.
Yes, these are little turns...adjusments really...when she does idle properly the idle screw works.
Its inside my parking garage and the sound is shitty. .... sorry. Im trying to let you guys see a little of what Im dealing with. Maybe that will help.
I am going to re ground the ignition system tonight. Remove, regrind, replace. Had a bad ground for my reg/rec, maybe I have a bad ignition ground. Cant imagine it causing different symptoms inconsistanly, but I dont know. Running out of options. If I cant get it soon I will pay the guy to try to get her synced and tuned. If that doesnt work I may put her on the block. Really going to be pissed and dissapointed if I have to do that. Very depressed. I've tried so hard. Maybe it was never meant to be. I wanted this bike so bad. I may have got got by the po. My turn to lose I guess.
pamcopete
Ride.Enjoy.Life is Simple
Evenmore,
Wait...you can't do that! What about the rest of us who are trying to help? You can't just leave us here! LOL
Give it a rest. Go have a beer or two. Go to the movie with your lady. Relax...
Wait...you can't do that! What about the rest of us who are trying to help?
You can't just leave us here! LOLGive it a rest. Go have a beer or two. Go to the movie with your lady. Relax...
EvenmoreXS
1981 XS650
Evenmore,
Wait...you can't do that! What about the rest of us who are trying to help?
Give it a rest. Go have a beer or two. Go to the movie with your lady. Relax...
Only place im goin is nutz
Hope there's beer when I get there......There is an answer to this problem. We'll get it. It seems like im doing the right things, just havent found it yet.
I still think it is fuel, spark, or air related to carburation...just my opinion.
NO back fireing at all, and NO kickback. Timing seems fine other than the occasional misfire like I posted before.
I have a few more tricks up my sleve before I let someone else have a hack at it. I do wish I had some of you guys a little closer to me. You all do a great job of helping us rookies via the internet, but sometines I think if you rode it for 20 mins it would help.
Thanks everyone.
When the idle starts racing, can you push down on the cable arm where the cable connects and get the RPMs to drop back down? If so and you recently replaced your butterfly shaft seals, then maybe the butterfly plates are not centered properly in the main bores and they are binding.
EvenmoreXS
1981 XS650
When the idle starts racing, can you push down on the cable arm where the cable connects and get the RPMs to drop back down? If so and you recently replaced your butterfly shaft seals, then maybe the butterfly plates are not centered properly in the main bores and they are binding.
Will do Twins, thanks. Its Doubtful, but I will check it out. When doing the plates I left the screws just a bit loose and did the throttle open and release thingy several times to get them to center before I tightned em down. You understand? Open em and let em slap back a bit a few times to seat em.... then tighten em down.
Cable arm??? Could you be a bit more specific? Im assuming you mean where the cable meets the carb? Right before the cable fits to the throttle arm?
Or are you referring to the actural throttle arm?
Sorry if its a stupid question. Just wanna make sure.
And the throttle isnt closing because of where I have to have it to idle. Its open.
In the vid I posted earlier the first thing I tried to show was my idle screw position.
Look too open to you?
When she was running good the idle wasnt open that much.
Look at the beginning of your video. Press down on where the cable ball end hooks into the arm. You could also lift the other end, where the idle speed adjustment screw contacts the arm. You're attempting to close the throttle plates back up if they are indeed hanging open. You could also look at the cable arm where it meets the adjusting screw. Is there a space there when the RPMs hang? If so then the plates are not closing fully.
You've checked the advance and it snaps back closed smartly when you twist it open by hand? Because if your advance is sticking in the advanced position, that's going to make the revs climb. If your idle speed is set too high, that can start the ignition advancing, which raises the revs, which advances the ignition more, etc. It's sort of a "self feeding" problem.
It almost seems like the bike doesn't want to idle at all. That would point to problems with the pilot circuit (like it's plugged). When you screw the idle speed adjustment in enough, it opens the butterfly plate so much that you're running more off the needle and that's just too fast. Then the advance gets going, adding to the problem.
EvenmoreXS
1981 XS650
Look at the beginning of your video. Press down on where the cable ball end hooks into the arm. You could also lift the other end, where the idle speed adjustment screw contacts the arm. You're attempting to close the throttle plates back up if they are indeed hanging open. You could also look at the cable arm where it meets the adjusting screw. Is there a space there when the RPMs hang? If so then the plates are not closing fully.
You've checked the advance and it snaps back closed smartly when you twist it open by hand? Because if your advance is sticking in the advanced position, that's going to make the revs climb. If your idle speed is set too high, that can start the ignition advancing, which raises the revs, which advances the ignition more, etc. It's sort of a "self feeding" problem.
It almost seems like the bike doesn't want to idle at all. That would point to problems with the pilot circuit (like it's plugged). When you screw the idle speed adjustment in enough, it opens the butterfly plate so much that you're running more off the needle and that's just too fast. Then the advance gets going, adding to the problem.
THIS RANT HAS BEEN EDITED. IT WASNT HELPFUL. SHE DID NOT RUN VERY GOOD AT ALL AFTER THE CARB CHANGES.
Left side is a bit leaner than the right . I'll post pics of the plugs when Im not so frustrated.
The springs are springy and have a nice even feel and response on both. I will post a vid and see if that helps any.
the advance makes sense because the idle is more open than it should be im certain. But thats not the advances problem, its another problem causing the need to open the idle that much that would cause the advance to do that.
I dont want to talk about it right now.
Last edited:
EvenmoreXS
1981 XS650
*** ***
***
***
Last edited:
EvenmoreXS
1981 XS650
Going to be starting another thread for the rebuild.
95 psi in the left cyl. 115 in the right.
Leak down test shows exhaust valve leaks on both sides. Maybe a small leak on the intake side on the right cylinder. I could also hear a girgling sound just slightly maybe coming from my breather check valve. Air getting past the rings.
Planed to get the engine out and apart tonight, but that didnt happen. So tomorrow night I will pull the engine and take the cylinders to the machine shop tuesday morning to be mic'd. I should be able to order parts by tuesday afternoon from mikes, sooner if I dont wait for the mic and just go 1up. Parts will be in by thursday. Reassemble engine thursday and friday night and retorque and reinstall on saturday and ride on sunday maybe.
Athena head gasket and no base gasket.
Sure would love to do a high output coil but I dont think I can a this point.
PARTS NEEDED
PART: PART # PRICE
Gasket - Cylinder Head Part #18-0852 24.50
Gasket - LH Crankcase Cover Part #18-0869 8.50
Gasket - Sump oil filter Part #18-0858 4.50
Copper Drain Plug Crush Gaskets Part #17-3802 3.50
Gasket - Filter Element Base Part #18-0857 2.00
Headpipe Exhaust Gaskets Part #18-0675 3.50
Gasket (Pk./2.) - Intake Spigot Part #18-0865 6.50
Shift Shaft Seal Part #01-9026 7.00
Engine Oil Seal - Starter motor Part #01-9022 9.00
Cam Chain Part #52-5003 49.50
Cam Chain Master link Breaker Pin Part #35-0117 6.50
Piston Ring Set – 1st Oversize Part #05-0016 x2 32.00 ea
Piston Set 1st Oversize Part #05-0017 x2 59.00 ea
Cylinder Bore and Hone Buddys Garage 100.00
Valve Stem Seals EBAY 14.00
Bottom end Copper Sealing Washer Kit Part #18-0871 7.70
$428.70
You're at almost $55 for gaskets. Another $10 will get you the complete engine kit. It has other things you'll need that you didn't list like the cylinder base gasket and the various o-rings. Adding them to your individual list would put it above the cost of the kit. Buy the kit.
You really don't need the copper washer kit. You can reuse the old ones. You can save nearly $100 by getting one of those cheap piston kits off eBay.
Yep, pretty hard to tune a bike and get it running well when the motor's shot.
You really don't need the copper washer kit. You can reuse the old ones. You can save nearly $100 by getting one of those cheap piston kits off eBay.
Yep, pretty hard to tune a bike and get it running well when the motor's shot.
pamcopete
Ride.Enjoy.Life is Simple
Well, I've gone thorough this process twice now and in both instances I elected to either buy a new bike or a new engine. (New meaning different.)
When my faithful '78/E started to gasp for air after 80,000 miles I looked into the cost of rebuilding and instead bought a new '81/H with 7,000 miles for $900. Not only did I get a new low mileage engine but I also got everything else new as well. The engine was strong with great compression and remains so 5 years later.

The seller even threw in a perfectly good spare set of forks with the deal which I subsequently installed on my '74 CB750F-4 (SOHC) along with the rest of a XS650 front end.

Then, when my '81 CB750C timing chains ran out of adjustment at 40,000 miles I researched the time and expense to replace the chains and looked on EBay for a replacement engine instead. I found one up in Illinois for $150 plus $250 shipping to South Carolina that the seller was selling as "for parts only" with 12,000 miles on the clock. The picture showed the engine still in the bike and the bike itself didn't look too bad either. The story was that the bike was put into heated storage back in '95, so it had not been exposed to the elements. I asked the seller to see if he could turn the engine over with a wrench on the crank and he obliged with a video showing same, so I bought the engine and the speedo from the bike so I could legitimately lower my odometer reading from 40,000 to 12,000.
The engine arrived in a crate complete with the alternator, starter motor, clutch and all covers. I did a leak down test before installing it and checked the valve clearances. All was good, so I installed it and she fired up immediately and has run perfectly for the past two years. All for $375 and a lot less work, plus the bonus of spare parts.

When my faithful '78/E started to gasp for air after 80,000 miles I looked into the cost of rebuilding and instead bought a new '81/H with 7,000 miles for $900. Not only did I get a new low mileage engine but I also got everything else new as well. The engine was strong with great compression and remains so 5 years later.
The seller even threw in a perfectly good spare set of forks with the deal which I subsequently installed on my '74 CB750F-4 (SOHC) along with the rest of a XS650 front end.
Then, when my '81 CB750C timing chains ran out of adjustment at 40,000 miles I researched the time and expense to replace the chains and looked on EBay for a replacement engine instead. I found one up in Illinois for $150 plus $250 shipping to South Carolina that the seller was selling as "for parts only" with 12,000 miles on the clock. The picture showed the engine still in the bike and the bike itself didn't look too bad either. The story was that the bike was put into heated storage back in '95, so it had not been exposed to the elements. I asked the seller to see if he could turn the engine over with a wrench on the crank and he obliged with a video showing same, so I bought the engine and the speedo from the bike so I could legitimately lower my odometer reading from 40,000 to 12,000.
The engine arrived in a crate complete with the alternator, starter motor, clutch and all covers. I did a leak down test before installing it and checked the valve clearances. All was good, so I installed it and she fired up immediately and has run perfectly for the past two years. All for $375 and a lot less work, plus the bonus of spare parts.
Last edited:
EvenmoreXS
1981 XS650
If anyone has a beat on a good used engine Im ok with it. But they are not as easily available, and I could buy one with all the same problems I have now. I have no way of verifying anything with a used engine, until I get it. I'll look around. That would be fine, but i have my doubts I'll be able to find an engine for less than a repair. But I'll look.
I'll look around. 400 or so is in the budget. $900 kinda isnt. The cheapest fix is the answer in my case i think.
I'll put the money from the case washers into the gasket kit if I do this.
Pistons and rings from mikes $182
Ebay+ $158 or $189 and a week or more of shipping. Mikes is next day.
http://www.ebay.com/itm/Yamaha-XS65...Parts_Accessories&hash=item4d0d892fea&vxp=mtr
Plus Id have to pay extra for the extra 3 bores.
Unless there are some other pistons people are talking about.
I was going to run no base gasket if I do this.
Thanks everyone.
Last edited: