What have you done to your XS today?

Good progress. Those slightly longer shocks will probably give marginally better stance and marginally quicker turning.
Also make it slightly easier to pop up on the centre stand.
Also, the bike will lean further on the side-stand, which could be a problem on soft ground. I keep meaning to extend the stand on my Kawasaki W800 to compensate for longer shocks but have not found an easy way so sometimes take a small block of wood to pop under the stand.
 
Last edited:
Also, the bike will lean further on the side-stand, which could be a problem on soft ground. I keep meaning to extend the stand on my Kawasaki W800 to compensate for longer shocks but have not found an easy way so sometimes take a small block of wood to pop under the stand.
I have the Hagon shocks on minimum setting for spring preload so I think some of the extra 2cm length might be absorbed in the suspension sag once I roll it off the centre stand. I'll certainly look at whether the bike leans too far on it's sidestand though.
 
Just stopped for a cup of tea. The rain has finally stopped for a while so a bit more progress this morning.

More cleaning, more new rubber mounts. I am running low on them now. Shouldn't need many more though. I've replaced all the ones I've found.

Hagon shocks mounted and looking good.

Next job after the tea is drop the front wheel ready for the new tyres tomorrow. And more cleaning.

1000001677.jpg


1000001679.jpg


1000001680.jpg
 
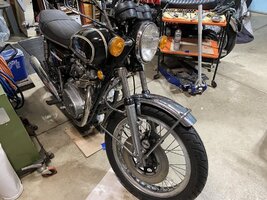
Front wheel reinstalled. Rear shocks being a bit longer made fitting the front wheel a little more tricky as it doesn't rock as far back now on the centre stand. A job for four hands but it's done. That's the front of the bike declared finished. Everything new that needs to be new. Front Brake is a bit spongy so that'll need another bleed before I'm done :)
 
. . . shocks being a bit longer made fitting the front wheel a little more tricky as it doesn't rock as far back now on the centre stand . . .
Probably quickest bodge for that situation is place a thin plank or wood, half-inch is ideal, under where the centre stand will go, slight extra heave to bring 'er up, space under rear wheel is restored.

I find thin planks, wood blocks, wedges come in handy for jobs like that, similarly for getting rear wheel at the height you want for a job. The wedges and blocks can support the weight of the rear wheel so you're not straining to lift the wheel one-handed, attempting to line up chain adjusters, spacers and the wheel spindle with the other hand and rehearsing your favourite litany of cusses as you realise you're gonna have to put it all down again coz you need the mallet and it's just out of reach . . .
Thanks for the suggestions. Snag this morning was I had both wheels out but had already fitted the longer shocks. So a piece of wood under the stand would have been a good idea before fitting the shocks but I didn't think that far ahead! I hadn't even thought about fitting the Hagon shocks when I dropped the wheels. Lesson learned. But the new chrome dome nuts on the top of the rear shocks look nice and shiny in place of the chewed up rusty originals :)

Some more cleaning, rust treatment and paint touch up now while the rear wheel isn't in the way.

Next on the agenda, remove and short the reserve lighting unit.

I think the bike has a light bulb checker according to the wiring diagram. I would like to get rid of that but I don't know where it is on the bike yet.

The indicator self cancelling unit and probably the starter safety relay are for the chop too eventually. But I know where they are.

I don't want 47 year old non essential electronics to be the cause of being left by the road sometime ;)
 
ROAD TEST DAY:When I bought my bike it was equiped with some of ther right sized BS38 carburettors but they dont appear to have originated from the XS650 The needle jet holder and the needle itself appears to be entirely different and those carbs also used a single cable operation as the later XS650s had.I bought a cheap pair of BS38s and swapped the good bits from my existing carbs combining them with the right sized new jets for the XS650B and I also fitted some inlet manifolds with vacuum spigots so I could ballance the carbs. I also , now have two throttle cables. I did all this in the garage over the winter time and today is the first 30 mile ride on the new set up. Its amazing. I hadnt expected that my garage set up would translate into a good road set up since in the garage, the air isn't moving, the oil never gets hot enough and the air cooled engine gets a bit too hot et.c. Its brilliant! Tick over is a steady 1000 rpm, pick up is instant, acceleration from any speed is seamless and pick up from any speed is also seamless...its hard to believe that this bike isnt fuel injected.
Like a lot of places, the inhabitants of some of the local villages think that limiting speed to 20mph makes everything safer ( safer? for them to dash across the road in front of the traffic whilst the people who used to do 60 in a 30 limit now do 60 in a 20 limit! Yeah, right !) I discovered that the bike will handle 20mph in second and will easily pull all the way up to 60 in the same gear. During the winter, I also deturmined that a previous owner had fitted my bike with 17/31sprockets...so its fairly tall gearing.
 
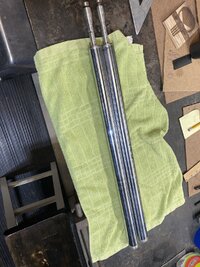
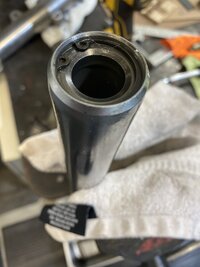
When I rebuilt my ‘75 the right fork tube had some pitting from sitting outside for years but I was hoping it was high enough on the tube to not plunge past the seal. Well it was too low and everytime the forks compressed those pits were like an oil reservoir everytime they came up. I’ve had a pair I sourced from a parts bike sitting on the shelf for awhile and due to a shoulder injury I can’t ride right now but with the weather being nice in the garage I decided to get to it. IMG_7071.jpeg It was an easy swap since I had internals as well. I just pulled everything apart and cleaned it.IMG_7072.jpeg. I could at least test it rolling forward and hitting the brake. Everything appears A-OK.IMG_7076.jpeg
 
Some sympathetic paint retouching this morning. Mostly on the battery box that's been badly corroded by battery acid fume. Also front engine mount where it's been blasted by road gravel. The Jenolite rust converter works extremely well and gives a nice base to take a coat of black hammerite (smooth) paint.

While the paint dries, new HT leads made ready to fit later with a set of new Daiichi points. NGK plug caps, 7mm copper wire. New condensers were fitted while I had the top engine mount off. Only the coils haven't been changed, but they test OK.

The points fitted look new/unused but are Chinese made. I like the Daiichi made in Japan ones better. Probably last the duration of my ownership. (What a morbid thought). :(

1000001724.jpg
 
Last edited:
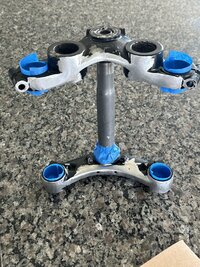
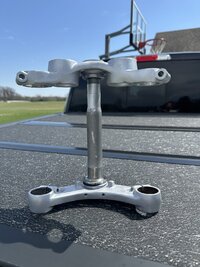
My xs hasn’t seen much love in a while so I picked up an extra set of trees to try and clean up the front of my 77 project. As much as I’d love some billet trees I think I’m going to give a shot at shaving down some stock trees. The bottom tree was easy, it’s steel so I just used a 4” grinder to cut off the headlight mount bosses with a cutoff and flap wheel. I smoothed everything out and finished with my palm sander and 320 grit to even it all out. There are still some threaded holes that I’ll likely just fill with JB Weld and paint over.

The top required quite a bit more work. The gauge mounts are quite a bit beefier. Once I hacked them off I used the grinder and flap wheel to smooth it out. It was a little tougher to get the lines right, but I’m happy with the results. I washed them down and hit them with a coat of silver paint just as a protectant layer. Still need more work but happy with the start.

1713124220432.jpeg
 

Attachments

  • IMG_0674.jpeg
    IMG_0674.jpeg
    545.4 KB · Views: 29
  • IMG_0675.jpeg
    IMG_0675.jpeg
    315.5 KB · Views: 29
Had a good ride with the '78 xs650
Took it out with friend on his '76 BMW 75/6
I rode the BMW for the 2nd half of the ride and he took out my Bonneville for the first time.

I have a cheap battery in my XS650. Who makes a good quality AGM that won't drop voltage as much when starting?
Battery in this one drops to well below 10V making the starter clutch clatter. Jumping with a spare auto battery it sounds much better.
IMG_9837.jpg
 
Last edited:
Had a good ride with the '78 xs650
Took it out with friend on his '76 BMW 75/6
I rode the BMW for the 2nd half of the ride and he took out my Bonneville for the first time.

I have a cheap battery in my XS650. Who makes a good quality AGM that won't drop voltage as much when starting?
Battery in this one drops to well below 10V making the starter clutch clatter. Jumping with a spare auto battery it sounds much better.
View attachment 323276
Yuasa has long been my go to battery brand. I have used Motobatt too but they're getting very expensive now. Look out for the highest CCA (cold cranking amps) for the best electric starting capabilities.
 
Back
Top