Where did you guys mount your upgraded fuse block?

cmyoch

XS650 Junkie
Messages
647
Reaction score
23
Points
18
Location
Smithton, IL
I am updating from glass fuses to the blade style and the fuse block is too tall to mount under the seat in the stock position on top of the battery cover. I'm curious where you guys mounted yours? My bike is pretty well stock so I won't have an oil can or anything similar like the choppers to hide my wiring in. Suggestions?
 
i bolted mine (still glass fuses, just new holders, what can i say, i like 'em) to the front outside of my battery box, i'm running pods so the lack of air box leaves plenty of room of room to get to 'em easily, as well as to connect the wiring.
 
I mounted the fuse block on one side of the battery box, the Chrysler reg on the other, the Radio Shack rec on the bottom of the box.
 

Attachments

  • LostFile_JPG_65100440.jpg
    LostFile_JPG_65100440.jpg
    241.8 KB · Views: 226
  • LostFile_JPG_65101064.jpg
    LostFile_JPG_65101064.jpg
    189.8 KB · Views: 207
cmyoch;

I didn't see any easy location to mount a fuse block. I just used 4 of the individual in line blade type fuse holders. A couple tuck down behind the battery cover and the other 2 just lay on top of the battery cover.
 
rg; looks like that may be my only option. I could mount it under my battery box but I want ease of access to it plus I don't want to take the chance of getting it wet.
 
Do you still have the reserve lighting unit? If not, it may fit there?

+1 Retiredgentleman the inline single fuse units can just lay on top of the battery cover.
I used an inner tube skirt to cover them.

Sidebar: RG those resoldered clips for the glass tube type are still holding up. 2 yrs now.
Even though the solder job wasn't up to Trucker Jimmy's standards. Cheap DIY fix.
 

Attachments

  • 09-15-08_2157.jpg
    09-15-08_2157.jpg
    52.3 KB · Views: 186
I still have my reserve lighting unit otherwise it would be mounted there. Quoting rg that the Special's wiring is complex, I don't want to open a new can of worms by removing the unit.
 
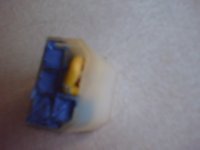
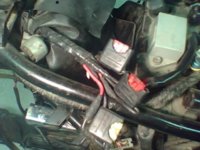
Lots of people remove the reserve lighting unit. They jumper some of the wires where it plugs into the harness. I'm just not sure which ones, from looking at a diagram I think it's the yellow/blue to the blue/black.
In the diagram the headlight on/off switch gets power from the key switch on the red/yellow. It feeds the dash and tail lights on the blue wire. It feeds the reserve lighting unit on the blue/black wire.
On the RLU the Black wire is ground. the green wire goes up to the indicator light on the dash. The yellow/blue feeds one side of the dimmer switch. The blue/green feeds the other side of the dimmer switch.
The blue/green side of the dimmer switch is what works with the RLU to feed power thruough the resistor to power the unblown element of the headlight when the other element blows.
A some what useless function. Most people can see when the headlight isn't working right.
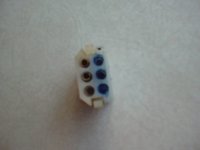
By hooking the Yellow/blue wire to the Blue/black wire. Power coming in on the Blue/black goes wire back out on the Yello/blue wire to power the dimmer switch.
Others that have removed the RLU can tell us if I'm right or wrong.
I have an 81 and everthing is working ok. I could test out the jumper, But without the on/off switch which they did away with in 80, I'm not sure it will work the same.
On the 81 the RLU has an extra wire, a yellow one.
With a bit of studying of the diagram I think the jumper will work on the later no on/off switch bikes to. The RLU gets it power on a Blue/black wire same as the earlier RLU's, It just gets it from the safety relay instead of an on/off switch.
I'll go out and try it and report back.
Leo
 
I was just out on the bike. They way the connector is down in by the fender I couldn't get to it.
So I guess My test will have to wait.
Leo
 
They have them right on the rack at Advanced Auto $8.95 last time I looked. Up at the top in the electrical stuff. connectors, wire, fuses stuff like that not in the lighting stuff.
If you look at the pic, just to the right of the fuses is where power gets fed to the fuses.
I have power flowing from the battary through a 20 amp fuse to the key switch, from the switch to the power in on the fuse block.
The yellow wire is coming from the key switch and hooks under a nut on the side of the fuse block. The nut hooks to the strip that goes through the middle of the block feeding one end of the fuse. The outputs of the fuses are across the top and bottom.
Anything that gets power gets a fuse and just plug a wire on the fuse output and run the wire. Pretty easy.
Leo
 
Thanks a bunch. I was gonna ask how the wire-thru-fuse worked. I really like that. Very, very clean. And omits the inline block.

Oh, I hate Advance Auto website. You have to put in what type of vehicle you have to look at anything. You can't just browse.
 
Leo, I agree with your post on jumpering the RLU. The colour code for the wires is correct.

I also agree that the RLU has no real value................. a case of Yamaha engineers with too much time on their hands:) However, having said that, I still have the RLU on my bike. It doesn't bother me so I just leave it there.

Another device that I should remove now is the Light Checker. It is a useful device when you still have the original 1157 bulb, but of no use now that I'm using an LED tail/brake light. As soon as I hooked up the LED's, the Light Checker said "that current flow is so low you must have a burnt out bulb", and promptly lid up the red light between the speedo and tach. So, I quickly removed the bulb from the "Light Failure", and said, "I'm smarter than you dumb ass Light Checker circuit Ha Ha!"
 
Nobody mentions the reproduction 78-84 Fuse panel mikesxs sells Part #10-2006.
I installed mine about 6 years ago and am absolutly pleased with every aspect of it.
And as a lover of "keeping it stock" it doesen't get any better.It is bang on the original!
I am always puzzled when the topic of fuse holders comes up and nobody ever mentions this item.And the price is even good!
 
Skip, If it used the blade type fuses maybe, the glass fuses are crap. Spent to much time in the wee hours of the morning on a lonely back road trying to get them to work.
Littlebill I don't like the website much either. I just go to one of the stores. The closest is 25 miles away. A good excuse to ride. The 50 to 200 mile round trip can be an enjoyable diversion.
Leo
 
I still have glass fuses, though somebody replaced the conectors, I think. The problem with glass fuses is that over the years the glass will separate from the metal ends. :yikes: I just keep an eye on them. Glass fuses are hard to find these days compared to modern fuses, I've noticed. Hard to find a dial telephone too :) If you're going to switch to modern fuses, use a common physical size (form factor) so you'll get the full benefit. No 'ultra-minis' or whatever.
 
Skip, I can relate to your "keep it stock" mode, but glass fuses just have too many potential problems for me. I don't think they are rugged enough for these vibrating beasts, and I don't trust those clips.

I like the very positive way the blade fuse fits into the fuse holder. The best part of the blade fuses is the fact that every automotive supply store carries them.
 
Mine use the standard ATC fuses.
Mike's has inline fuse holders now, they use the mini blade fuses.
Leo
 
It took about an hour to get rid of the RLU and still leave a stock plug in the harness.
 

Attachments

  • RLU jumped block.jpg
    RLU jumped block.jpg
    30.9 KB · Views: 103
  • RLU jumpered block.jpg
    RLU jumpered block.jpg
    33.4 KB · Views: 89
Back
Top