member3480
RICH
This is the VOODOO that most guys won't even try and its not a dieing art its a great way to make side money if you do it right and take your time.
I have been doing wiring harnesses since the early 70's and all bike are different but very close to the same. They all have to charge have lights and have electronics to run.
So let me give you the hint on how to do it and not have 100' of wire on the floor.
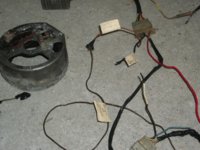
Take a stock xs650 harness and hook up your charging system to the harness on the bench. Now cut back all the tape and bullshit and you end up with 1/4 of your harness. YES there are going to be wires to cut to remove that section but they are 12 volts ground and blue neutral light Brown for charge and DONE!!! If you run TCI Black box coil and wire from ALT for pickup hook them up and cut away again DONE! Now you got the complete setup for charging and ignition THAT WAS EASY HUH!! Now you are half way there ...
Now the fun part LIGHTS/BRAKE LIGHT/STARTER/TURN SIGNALS/KILL SWITCH
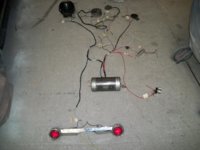
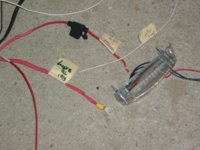
Trick is lay out your parts on bench HEADLIGHT on the left TAIL/BRAKE on RIGHT STARTER SOLINOID and BRAKE SWITCH in middle. I make all my harnesses to run the ground BLACK to go to battery Ground ALL GROUNDS TOGETHER. I split up my 12 Volts into three fuses off STARTER SWITCH 1 for charging 1 for Coil/TCI 1 for lights
Lights blow all the time but I want to get home so if it blows you still can ride.
Now with your layout you need 3 wires for Headlight HIGH/LOW/GROUND 3 for tail light BRAKE/RUN/GROUND .... Headlight is easy 3 position switch center off (RADIO SHACK) just make sure you jump the 12V for tail light off switch. Tail light again 12V from light switch for tail ground back to battery and Brake light wire to brake light switch then the other side of brake switch to 12v DONE!!!
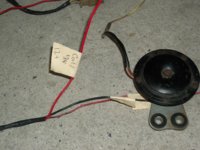
Starter solenoid 12volts from switch and ground other side hook heavy black wire to starter and other side goes to battery DONE!!! Horn install button 1 side to 12v to horn other side of horn Ground DONE!!!!
That wasn't hard do it in steps. When guys come to my garage and want to wire that's how I teach them and after bike fires up everyone says that was easy.
I just did a couple for guys and the one in picture has it all STARTER/LIGHTS/TURN SIGNALS/NEUTRAL LIGHT/HORN Complete and ready to install with plugs so you can take fake take off if you get into a problem.
Anyone that wants to do there own and wants to see a complete one on video email me at DADDYGCYCLES@YAHOO.COM won't load on here and its FREE to pick my BRAIN. I would like to see more young guys getting into the bare bones of wiring and engine building then just buy a done part. YOU YOUNG guys got too much time and money us old asses had to build and make things HAHA
KEEP CHOPPIN
Rich
I have been doing wiring harnesses since the early 70's and all bike are different but very close to the same. They all have to charge have lights and have electronics to run.
So let me give you the hint on how to do it and not have 100' of wire on the floor.
Take a stock xs650 harness and hook up your charging system to the harness on the bench. Now cut back all the tape and bullshit and you end up with 1/4 of your harness. YES there are going to be wires to cut to remove that section but they are 12 volts ground and blue neutral light Brown for charge and DONE!!! If you run TCI Black box coil and wire from ALT for pickup hook them up and cut away again DONE! Now you got the complete setup for charging and ignition THAT WAS EASY HUH!! Now you are half way there ...
Now the fun part LIGHTS/BRAKE LIGHT/STARTER/TURN SIGNALS/KILL SWITCH
Trick is lay out your parts on bench HEADLIGHT on the left TAIL/BRAKE on RIGHT STARTER SOLINOID and BRAKE SWITCH in middle. I make all my harnesses to run the ground BLACK to go to battery Ground ALL GROUNDS TOGETHER. I split up my 12 Volts into three fuses off STARTER SWITCH 1 for charging 1 for Coil/TCI 1 for lights
Lights blow all the time but I want to get home so if it blows you still can ride.
Now with your layout you need 3 wires for Headlight HIGH/LOW/GROUND 3 for tail light BRAKE/RUN/GROUND .... Headlight is easy 3 position switch center off (RADIO SHACK) just make sure you jump the 12V for tail light off switch. Tail light again 12V from light switch for tail ground back to battery and Brake light wire to brake light switch then the other side of brake switch to 12v DONE!!!
Starter solenoid 12volts from switch and ground other side hook heavy black wire to starter and other side goes to battery DONE!!! Horn install button 1 side to 12v to horn other side of horn Ground DONE!!!!
That wasn't hard do it in steps. When guys come to my garage and want to wire that's how I teach them and after bike fires up everyone says that was easy.
I just did a couple for guys and the one in picture has it all STARTER/LIGHTS/TURN SIGNALS/NEUTRAL LIGHT/HORN Complete and ready to install with plugs so you can take fake take off if you get into a problem.
Anyone that wants to do there own and wants to see a complete one on video email me at DADDYGCYCLES@YAHOO.COM won't load on here and its FREE to pick my BRAIN. I would like to see more young guys getting into the bare bones of wiring and engine building then just buy a done part. YOU YOUNG guys got too much time and money us old asses had to build and make things HAHA
KEEP CHOPPIN
Rich


 By the way that bike sold for $6200.00 with NO FENDERS

