Yam_Tech314's official build thread

I am guessing that without the plastic coating the metal ties might wear the paint away on the frame?? No way, not enough vibration from these classics...
 
I received my head, and rocker cover from the machine shop late lastnight. With new valves, and seats being cut, I'm ready to order parts for final reassembly.

My list includes some tools as well to make my life easier for next time.

Please feel free to help me in the event that I missed anything on the list.

New valve springs.
New rocker arm bearings.
Valve spring compressor.
Cam chain rivet tool.
New piston rings.
New piston circlips.
New needle bearings for piston/wrist pin.
(I don't remember removing them but it HAS to have them, right??? How else would it not seize)

I already have a gasket set that's been sitting on a shelf waiting to be used. I'm not sure if it includes the new o-rings for the valve covers, rocker shaft plugs, or anything like that... But that's stuff I can do after main assembly.

What else should I prepare to buy guys? All critics welcome.
 
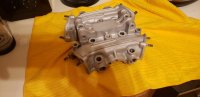
Here's the final products by the way!

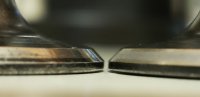
The valves that have the same side rim height are exhaust valves, which I found interesting that he didn't need to cut them more, considering it's usually exhaust that pits more.

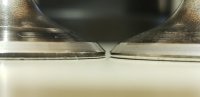
The side by side valve angle shots are just for my records, I wanted to see how much he cut out of the surface. Seems kinda thin, but he told me he picked the best valves out of the eight that I gave him. I believe it, because I labeled the head# on each valve from the motor they came from, he seemed to have used a mix of each. The side by side is also a cut valve beside a non cut valve. Really just wanted to compare angles.

I have everything a dawn dish soap bath, and boiled water to pour over them to release as much media from blasting as I could. They're clean, but need a good pressure was, and maybe another hot water rinse to really make me feel comfortable.

Altogether, I'm happy with how it all came out. I may clear coat the motor when it's assembled to retain the factory appearance without it oxidizing too much.
 

Attachments

  • 20210313_234603.jpg
    20210313_234603.jpg
    119.6 KB · Views: 111
  • 20210314_003127.jpg
    20210314_003127.jpg
    121.8 KB · Views: 105
  • 20210314_002936.jpg
    20210314_002936.jpg
    41.6 KB · Views: 111
  • 20210314_002458.jpg
    20210314_002458.jpg
    72.9 KB · Views: 110
  • 20210314_002910.jpg
    20210314_002910.jpg
    61.2 KB · Views: 110
Valve spring compressors: There are plenty on Ebay at £12 or less, but they often do not have the 32/33mm adaptor for the XS650. I got caught out on this but luckily was able to make a simple Aluminum adaptor from the 30mm to 32/33mm:
Valve.JPG
Dimensons 7mm think, OD 35mm, ID 23mm then partially bored through from each side 30mm and 33mm. The 33mm gives a comfortable fit over the XS valve which is in the region 32/33mm.

The XS does not have needle bearings for the conrod. Instead the small end is lined with a very fine bearing material. I do not know much/anything about it but you should check to see if it is worn and needs replacing. I have never had to deal with one on an XS. Perhaps someone else can advise on how to check the bearing.

Do you have a fine file for setting the piston ring end gaps? A set of needle files is OK. The compression rings usually have a chrome type plating on the outside. This can be accidentally chipped off when filing the gaps. Only file in towards the center of the rings to avoid chipping.

Maybe some engine assembly oil??

Good recommendation! I was going to coat parts in a light coating of engine oil, but if assembly oil makes a big difference then I'll try to grab some.

As far as a file, I don't have one. I'll have to get one, or maybe see if my new friend the machinist can help with my piston ring end gaps... I'm glad you mentioned something because I wasn't sure how to resolve that issue without just investing in a ring grinder. Interesting that they don't have needle bearings...
 
What are you going to clear coat the motor with? I am interested to know and have been looking for a product for sometime because I have a Virago engine that keeps developing white corrosion powder in the damp of Winter and I'd like to sort this next Summer. Does it have to be a self-etching and heat resistant clear coat?

Thank you.
 
Good recommendation! I was going to coat parts in a light coating of engine oil, but if assembly oil makes a big difference then I'll try to grab some.

I always just use engine oil, the same as will be lobbed in to the completed engine. In fact, I didn't know assembly oil was a thing . . .
 
Maybe "assembly oil" is the wrong term, but it clings to the metal during the initial startup. It is just brushed or squirted on the parts as you assemble the engine and does not replace the normal engine oil. If running in an engine after rebore there are also special oils for filling the engine with and they have a very high Zinc/Sulfur additive package and they only stay in the engine from about 50 to 150 miles: In the UK Westway Oils make one.

Example:
s-l225.webp
 
Last edited:
What are you going to clear coat the motor with?

I haven't gotten that far yet... I want to look into high heat applications and see what I think looks like the best option. I've learned that prep work is important so I'll likely use a paint prep cleaner, then clear it with what I decide, I'll surely let you know.

What kind of temps should I expect to see this motor make?
 
For me the down side on many HT products is the instruction say heat the coated item to 160 Celsius or higher. Not a lot of parts on the engine will get that hot on an assembled engine.
 
I'll likely heat the parts before painting. Just to ensure a good stick. Painted an exhaust like that once... Used a hair dryer, just plugged the exhaust with the dryer and waited for it to hear up the other end. Paint dried fast, stuck well, and didn't have time to run so it was applied heavier than usual. I'm a terrible painter. I'll let you know how it goes when the time comes haha
 
So do you guys think I missed anything in my list?? I feel like it covers the main rebuild pretty well... I just wanna get all the parts first try so I'm not waiting a week in anticipation haha
 
Personally, I never replaced valve springs, never found the need to. There are no rocker arm bearings, just maybe bushings pressed into the top cover. Never heard of anyone replacing them, or needing to for that matter. The rocker shaft doesn't spin or turn, the rocker rotates on it.
 
Is the visible scoring something I should even worry about? Not needing new shafts will save me some change.

I remember hearing waaaaaay back somewhere on this thread that I might wanna replace them... It's been too long to know if these were even the topic of discussion and that would be A LOT of reading...

Seems to me that the wear marks could just be the surface that the rocker rides on.
 

Attachments

  • 20210314_201459.jpg
    20210314_201459.jpg
    101.3 KB · Views: 104
I typically agree. My ONLY hesitation in doing that is cost. It's a hard bullet to bite.
11 bucks shipped. You'd want to verify it's the correct P/N, but that's pretty cheap for NOS.
There's a lot of 'em on Ebay.... pretty reasonably priced.
 
Back
Top