More clutch pushrod bushing discussion

Pat D

XS650 Addict
Messages
177
Reaction score
39
Points
28
Location
Joppa, MD
So I've been following the various threads running on the clutch pushrod bushing/seal topic as I prepare to do that very exercise shortly. The parts are ordered, so I pulled the seal this evening to see what what was what inside there. A couple things of note got my attention.

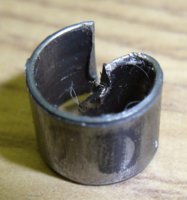
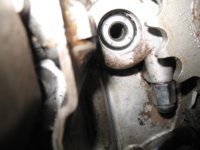
First- the bushing is further inside the tube than I anticipated. I expected it to be flush with the end, but it is 1/4"-3/8" from the end. That got me to wondering- rather than pulling the old bushing, what would the down side be of just pushing it further in to allow the new one to fit flush with the end of the tube? Will it cover an oil passage opening? As far as the next servicing of the seal and bushing 10-15k down the road, I don't see the extra bushing causing any issues, but y'all have the experience to know for sure.

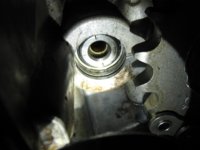
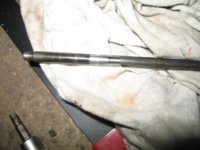
2nd-the pushrod itself has wear at the point that it bears on the bushing. I don't have a mic, but I can feel it w/my fingernail. The bushing, I assume, should be bronze or some other relatively soft material, not sure why the steel pushrod is wearing like that. The tube is certainly getting plenty of oil, based on the amount leaking out of the seal. I was a little irritated to discover this after I ordered the seals and bushing, I would have gone ahead and grabbed a new pushrod.

But- if I install the new bushing flush with the end of the tube, rather than set in like the current one, it will bear on an un-worn section of the pushrod, saving me $8 shipping on a 4 oz. part.

Any and all commentary on these observations is welcome and appreciated! Some pics are attached showing the scenario.
 

Attachments

  • IMG_0143.jpg
    IMG_0143.jpg
    137.2 KB · Views: 572
  • IMG_0141.jpg
    IMG_0141.jpg
    157.3 KB · Views: 457
  • IMG_0148.jpg
    IMG_0148.jpg
    201.8 KB · Views: 400
The old bushing will not push in any further. It is hitting a raised lip. I am pretty sure there is not enough space for two bushings. Yours does seem to be in there pretty deep, however, not sure, but I don't think I've ever seen one that deep in, but maybe I'm just not remembering right.
The new seal will still work well even with your worn push rod. Just resign yourself to the fact that you will have to replace the seal again in a couple or several years, depending on how much you ride.
 
Remove the old bushing, it's not that hard to do, especially if using peanut's pry/collapse procedure.
Chuck-up the pushrod in a power-drill and polish the shaft using steel wool or 400-600 grit sandpaper.
While spinning the pushrod, see if it's bent. Straighten so it rolls smooth on a flat surface.
 
To the best of my recollection the bushing will go in until it's about flush at least. You don't want to drive it in though you want to get it out and put a new one in, if it's worn. It looks like you could just grab yours with a vice grip and pull it out. It is steel btw, not bronze.

Regarding replacing your worn push rod, it depends on whether the replacement is any better. Ppl seem to be satisfied with Mike's one piece rod. I have read the original is steel on the ends and aluminum in the middle! Not sure. I would reuse the rod you have unless there's a definite problem that you know it's causing.
 
My first thought after viewing your images is that we may be looking at the backstop where a bushing would rest against. In other words, do you actually have a bushing installed?

After bushing removed (before cleaning):

DSC_0017_zps64bf47fd.jpg


After bushing removed (after cleaning):

DSC_0023_zps1ce595fd.jpg


Removed bushing (per instructions found on MikesXS FAQ page):

DSC_0021_zps39aa928e.jpg


New Bushing Installed:

NewBushingInstalled_zpseffa1a62.jpg


If I am correct, then the wear on the pushrod would have come from the seal itself.
 
Last edited:
I got the bushing out this morning, no real issue using the drill method. A quick measurement shows that my countersink is almost 2cm deep into the shaft. Not sure if that is typical or an anomaly. Got the edges chamfered up as well, just need the parts to show up. Appreciate the tips.
 

Attachments

  • IMG_0149.jpg
    IMG_0149.jpg
    152.5 KB · Views: 328
  • IMG_0151.jpg
    IMG_0151.jpg
    139.2 KB · Views: 268
I got the bushing out this morning, no real issue using the drill method. A quick measurement shows that my countersink is almost 2cm deep into the shaft. Not sure if that is typical or an anomaly. Got the edges chamfered up as well, just need the parts to show up. Appreciate the tips.

thats possibly because the bush has been drilled out before and drilled too deep ?

The internal lip should measure about 12mm from the face of the shaft:wink2:

Myfeeling is that it would be better to pull the bush out raher than drill it . Theres less chance of damage and no swarf to worry about. If you look at YL76's images of the bush you can see how much damage has been done to the outside of the bush by it spinning on the drill bit . Hopefully no damage done to the internal surface of the bush recess .
(Excellent images by the way yamahalovin76)

looking at the wear on that shaft I would replace it if it were me. its only a few dollars why take the chance it will enlarge the oil seal and leak again?
 
Last edited:
I took a shot at your method, Peanut, but even after multiple cleaning wipes and revolutions of the shaft I could not discern where the split was, so I took my best shot and succeeded in only driving the bushing deeper into the counterbore. FWIW, the outside of my bushing is so smooth it looks chrome plated-I probably got lucky!

As far as someone overdrilling the shaft in a previous attempt to get the seal out, I dunno. For one, the seal itself was red, which I thought indicated it was likely the original one. And, if it was done with a hand held drill, whomever did it has drill-press steady hands- it's dead nuts straight.

Ah well- I'll have the new bushing and seal in soon enough, the tank is ready for color, and I'm in the middle of fabbing up muffler hangers. Planty to do still.

its lookin good Pat :thumbsup:

perhaps not all the original seals were split perhaps some models had a different bush arrangement ? I was just surmising as I have very little experience with these bikes .
 
@ Yamahalovin76
Do you have a note about the depth of the hole?

@ PatD
My experience is more like yours no galling what so ever.
I didn't know they were seamed till I crimped one recently I thought they were a solid brass lined steel jacket.

This is a shot of two extracted bushings I saved (cause I'm a pack rat) and two I've found from a USA supplier. But once again my memory has failed me.
Instead of ordering the correct 8X10X8. I'm the proud owner of 4 8x10x10's
Two solid brass and 2 steel backed brass with a Teflon coating on the inside.
I'm wondering about the extra 2mm would it give more support?

@gggGary I pmed you the link in case you are interested in adding them to your parts supply for 6fiddy's.
 

Attachments

  • DSCN2452.JPG
    DSCN2452.JPG
    126.8 KB · Views: 312
  • DSCN2453.JPG
    DSCN2453.JPG
    127.9 KB · Views: 314
mine is steel with no distinquishing marks I can discern.
Its approx 0.5mm thick , 8mm long and 10mm O/D It comes from a US 79 Special ll . No way of knowing if its the original fitment but my guess is that it is.
 

Attachments

  • clutch pushrod bush.JPG
    clutch pushrod bush.JPG
    194.7 KB · Views: 354
I'm having trouble getting mine out! I tried to pry it out with a little screwdriver as you did peanut, but to no avail. I'm stuck, I don't know what to do!!!
 
I used a 1" wood drill bit which has a sharp and hardened wedge shaped steel tip.

Try running a sharp knife point around the lip of the bush until you find the split. Then drive your pointed implement in close to one side of the split so you lever one side of the split into the middle. You only need enough to get hold of the bush with some thin nose pliers.

The bush is soft steel 0.5mm thick and the shaft is hardened steel so you'll not damage the shaft recess whatever you drive in there .
 

Attachments

  • $(KGrHqN,!icE+74w4wN,BQUK8IOoGw~~60_12.JPG
    $(KGrHqN,!icE+74w4wN,BQUK8IOoGw~~60_12.JPG
    14.8 KB · Views: 187
I have kinda wondered if it would be better if a mod was made so the rod doesn't spin? That would probably eliminate seal failure. The bushing is pressure oil fed so it should handle the rotation.
Some sort of a locator tab welded on the rod outside the seal?
Just a thought.
 
don't know why motorcycle manufacturers did'n't devise an arrangement whereby you fit a thrust bearing to the clutch (like a car) and simply hook up the clutch cable direct to the thrust bearing actuating lever arm just like a car .
This clutch design is incredibly crude just like the starter motor transmission
 
I have kinda wondered if it would be better if a mod was made so the rod doesn't spin? That would probably eliminate seal failure. The bushing is pressure oil fed so it should handle the rotation.
Some sort of a locator tab welded on the rod outside the seal?
Just a thought.

how would you handle the rotational impact on the face of the mushroom head rod when dumping the clutch at high speed ?:confused:
 
Back
Top