Canadian XS - Almost done!

SpongeBobbed

650 Simpleton
Messages
122
Reaction score
25
Points
28
Location
Calgary, Alberta
Hi There,

I've been following this site for a few years now trying to learn as much as I can, and I finally decided to post my bike. I caught the 650 bug a few years ago when I was in university, and picked up a POS for about $200. I had grandiose ideas of how I would build this bike, but reality soon caught up with me. I ended up finishing school and got a big boy job which has caused me to move 5 times in the last two years. I tried my hardest to keep building my bike, but it's been a battle to say the least. I finally managed to stay in one place for the last couple months and it looks like I'll be around for a while (fingers crossed) so I decided to try to get this thing finished.

Coming into this I had absolutely no fabrication or mechanical know-how. I've had to get help from so many people to get this bike to where it is, and I'm going to need a bunch of help to get it finished. I'm hoping that if I post this on here, it'll get me inspired to finish it, and hopefully I can get some great advice from some of the gurus on the site.


Anyway, here's the info on my bike:
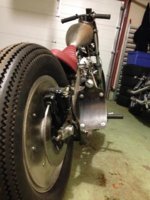
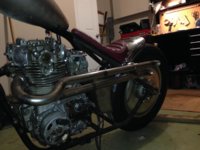
1978 xs650
- rebuilt engine and clutch
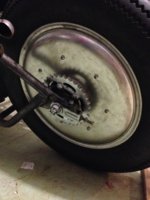
- Firestone 17x400 on the front and 19x500 on the rear
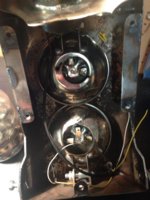
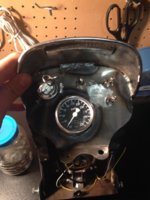
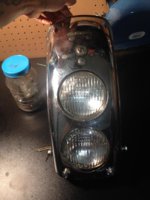
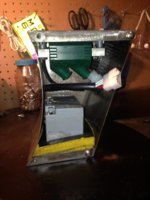
- Headlight/ignition/electronic housing built using an the stock rear fender
- Straight shot pipes
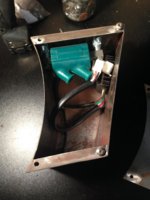
- Hand built electronic battery/electrics box
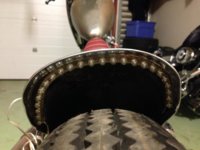
- Lane splitter bars, etc, etc.

Check out a couple pictures below. I'm going to post some more detailed pictures and asking for some advice, so please give me some advice as I go along.
Thanks a bunch!
 

Attachments

  • IMG_5844.jpg
    IMG_5844.jpg
    218.7 KB · Views: 208
  • IMG_5857.jpg
    IMG_5857.jpg
    230.4 KB · Views: 257
A huge reason I have this bike where it is today is because of an amazing fabricator/genius named Neil Laidlaw in Edmonton, Alberta. I met Neil one day when I needed to get a $5 bung fabricated, and we hit it off right away. Almost all of the fab work on this bike was done with his help (except for the hard tail - my uncle helped me with that). Neil is the type of dude who would just let me bring my bike in on a Friday afternoon and we would shoot the shit and work on different parts. Neil was a huge help is fabing the light housing, pipes, electronic box, handlebars, license plate bracket, and random other little parts. He really was a godsend.

Unfortunately Neil was in a very serious bike accident in August, and he's been in the hospital ever since. According to a few friends, Neil broke almost every bone in his body and also suffered some serious brain damage. It's been a huge blow to the Edmonton bike/sled/fab community, and we're all praying for a miraculous recovery for him. Life is incredibly cruel, and my heart breaks for that amazing dude.

Neil kept bugging me to get this bike finished, so I really want to get it done in honour of him. I in no way want to make his circumstances about me or my bike, but I really want to honour what an incredible inspiration he is to me. You can check out his website below:

http://www.npowerperformance.com
 
So here's the light housing/ignition/speedo/switch mount. I had seen someone in Japan use a fender as a fairing type set up before, so I thought we would add something different to this bike. The housing holds two hi/low beam lights so it'll light the street up really nice here at night. I also have two small laser turn signals at the bottom to keep it (semi) legal.

The speedo/ignition/light switches are on the other side and are accessible while you're riding. All the electrics for the parts mentioned above are tucked away nicely in the housing.

Check it out.
 

Attachments

  • IMG_5324.jpg
    IMG_5324.jpg
    182.6 KB · Views: 194
  • IMG_5318.jpg
    IMG_5318.jpg
    197 KB · Views: 203
  • IMG_5317.jpg
    IMG_5317.jpg
    168.9 KB · Views: 203
  • IMG_5319.jpg
    IMG_5319.jpg
    181.1 KB · Views: 184
  • IMG_5323.jpg
    IMG_5323.jpg
    174 KB · Views: 201
Here's the electrical box set up. Fabricated to connected to some bungs under the seat and also holds the rear fender in place. I've mounted the coil and reg/rectifier, and have mocked up the battery as well. I currently have it sitting in some hard foam and need to figure out a way to strap it down permanently.

You can see below the box is the reservoir for the rear master cylinder. I've kept the old res so I can use it to bleed the brakes, but once everything is mounted I'll replace it with a small tube so it'll be tucked away (might mount it to the side of the electric box).
 

Attachments

  • IMG_5325.jpg
    IMG_5325.jpg
    176.5 KB · Views: 193
  • IMG_5326.jpg
    IMG_5326.jpg
    149.2 KB · Views: 206
  • IMG_5327.jpg
    IMG_5327.jpg
    183 KB · Views: 215
  • IMG_5852.jpg
    IMG_5852.jpg
    197.5 KB · Views: 193
I decided to do something a bit different for the rear wheel (although I can't take all the credit). I've always really like how the Japanese dudes sport the mooneyes disks on their old choppers and I really wanted to do something similar for my scoot. That being said, I didn't want to fork over a few hundred bucks for something that probably wouldn't fit that well anyway. I have a good friend who put some pizza pans on his cb750 and it actually turned out super good. One day I went out to Walmart and bought two pizza pans (can't remember exact size) for about 10 bucks, and they happen to fit perfectly with the rear rim. We fabricated some spacers to fit between the pans and the wheel, and they worked great. Made a hole to get access to the air if needed, and that was it. Only took about an hour to complete and it works really well. People always trip out a bit when I tell them that those are pizza pans on the back.
 

Attachments

  • IMG_5866.jpg
    IMG_5866.jpg
    221.1 KB · Views: 199
  • IMG_5848.jpg
    IMG_5848.jpg
    194.7 KB · Views: 210
  • IMG_5844.jpg
    IMG_5844.jpg
    218.7 KB · Views: 177
Here's the set up for rear fender. I wanted to as many stop lights on as I could in order to keep the cops off my back, but I wanted it to look pretty simple as well. I currently have some mini turn signals that also serve as brake lights, and a small brake/license plate light above the license bracket. I'm also trying to figure out how to mount a small little LED strip right above the tire. There's a great spot for it on the fender, and it's tucked away pretty nice, but I can't seem to figure out how to keep it there. Does anyone have any ideas for a permanent bonding compound that will work?

Hopefully this is enough light to let the people behind me know I'm stopping!
 

Attachments

  • IMG_5858.jpg
    IMG_5858.jpg
    216.9 KB · Views: 174
  • IMG_5846.jpg
    IMG_5846.jpg
    217 KB · Views: 160
  • IMG_5855.jpg
    IMG_5855.jpg
    165.6 KB · Views: 178
  • IMG_5857.jpg
    IMG_5857.jpg
    230.4 KB · Views: 168
  • IMG_5856.jpg
    IMG_5856.jpg
    171.2 KB · Views: 169
Hey Vernk, unfortunately I don't have it wired up yet! Once I post up all my photos I'll be asking for some help from the pros on here on how to wire. I've looked through a bunch of wiring diagrams, but I want to get some more advice before I start putting everything together. I have all the supplies, just need to put it all together. As soon as I get it going I'll post it up. The lasers have a little bubble lens on them which is supposed to dissipate the light as opposed to shooting it straight out.
 
I wanted to do something pretty simple for the pipes on this bike, so Neil and I came up with the dual straight shot set up with a slight turn out at the end. I'm probably going to burn my leg off so I think I might need to build a small pipe shield or at least put some wrap on them.

I had this seat made by a good buddy of mine. I originally put together a pretty generic black solo seat, but I really wanted to have something that stood out. He works at a auto upholstery place, so he was able to whip this up pretty quick. Neil helped me build the pan for it out of some thin stainless steel. The fabric for the seat was sitting in the back of the warehouse for about 30 years and is a marbled reddish brown color. I was really happy how it ended up turning out.
 

Attachments

  • IMG_5867.jpg
    IMG_5867.jpg
    236.8 KB · Views: 208
  • IMG_5865.jpg
    IMG_5865.jpg
    195.1 KB · Views: 175
  • IMG_5862.jpg
    IMG_5862.jpg
    158.2 KB · Views: 183
  • IMG_5863.jpg
    IMG_5863.jpg
    193.6 KB · Views: 203
Wanted to go short and skinny on the bars and this is what we came up with. They look a bit uncomfortable but they actually feel pretty nice.
 

Attachments

  • IMG_5864.jpg
    IMG_5864.jpg
    128.4 KB · Views: 180
So that's pretty much it for now. The bike is mostly completed mechanically, but I do have a few odds and ends I need to finish up before it's completely done. I have to mount the rear brake stay as well as the clutch/throttle and speedo cables.

My biggest concern right now is getting it running. I bought a Pamco ignition for it and hope to start putting everything together in the next week or so. I'll definitely take a look through the forums to get some info, but if anyone has some advice for me, it would be greatly appreciated.

Thanks a bunch!!
 
inspired ! love the fender front cowling . great work. is there any rattle/shake factor?

Thanks man! It's actually super sturdy. It's bolted to the bike in 4 areas. We mounted two bungs off the bottom triple tree that it bolts to and we also bolted it to the stock mounts that the original front brake line connector mounts to. The whole bike
will vibrate a bit but it should stay sturdy.
 
rad man! im in university too trying to build my bike. my problem is time and money and lack of proper garage. I have friends too, glad to see im not the only one. gives me hope
 
Back
Top