I also use an old small knife to break the edge of the seal hole. If there are spots I can't reach, I'll resort to the Dremel. When you install the new seal, coat the O.D. with some sort of gasket sealer. This will lube it so it's easier to push in and also help it seal in the hole. For install, place the seal on a stubby Phillips and use that to push it in .....


-
Enjoy XS650.com? Consider making a donation to help support the site.
XS650.com receives a small share of sales from some links on this page, but direct donations have a much greater impact on keeping this site going.
You are using an out of date browser. It may not display this or other websites correctly.
You should upgrade or use an alternative browser.
You should upgrade or use an alternative browser.
An Adventure in Firsts: '83 XS650 Heritage Special Build/Rebuild
- Thread starter MarieKaramazov
- Start date
MarieKaramazov
XS650 Addict
Hi everyone!
Believe it or not, I'm still waiting on the pushrod seal to arrive. It wasn't listed as back ordered but when I called today she said it won't be in until the 18th!!! The cotter pin for the rear axle won't be in until the 11th too. Has anyone used anything else besides OEM part for that cotter pin? I imagine I should go stock for the seal, but was thinking the pin may just be a size/ shape/material I can get at the hardware store.
In the meantime, I got everything else I need to do that job and I've been sort of rearranging my tasks now that I have to wait on that. Ready to repair the stator wire. I'm thinking I'm going to do that next, retest the rotor (got a new meter) and maybe other tests like the load and batt again in case that last meter was somehow bad from the start. Then I'm thinking more basic maintenance, order bars, finish reading up on electric system so I can choose battery/starter/indicator setup, and then cylinder head stud and acorn nut retorque. Oh and I've been working on my overall design drawing and I'm thinking of making a master diagram of everything external/visible on the bike and then everything internal (not to the point of parts within parts). I've seen diagrams of pieces here and there, and some parts in service diagram, but nothing on one, comprehensive reference sheet. So I figure I'll build that as I go along.
Aaaand if after all that I still have time before the seal arrives, then I shall move to reading up on the carbs so I can resolve the potential rich/lean situation, and find and order more parts (fender, switches, seat etc).
I'm almost done with the master list so I'll post that soon too
Believe it or not, I'm still waiting on the pushrod seal to arrive. It wasn't listed as back ordered but when I called today she said it won't be in until the 18th!!! The cotter pin for the rear axle won't be in until the 11th too.
Has anyone used anything else besides OEM part for that cotter pin? I imagine I should go stock for the seal, but was thinking the pin may just be a size/ shape/material I can get at the hardware store. In the meantime, I got everything else I need to do that job and I've been sort of rearranging my tasks now that I have to wait on that. Ready to repair the stator wire. I'm thinking I'm going to do that next, retest the rotor (got a new meter) and maybe other tests like the load and batt again in case that last meter was somehow bad from the start. Then I'm thinking more basic maintenance, order bars, finish reading up on electric system so I can choose battery/starter/indicator setup, and then cylinder head stud and acorn nut retorque. Oh and I've been working on my overall design drawing and I'm thinking of making a master diagram of everything external/visible on the bike and then everything internal (not to the point of parts within parts). I've seen diagrams of pieces here and there, and some parts in service diagram, but nothing on one, comprehensive reference sheet. So I figure I'll build that as I go along.
Aaaand if after all that I still have time before the seal arrives, then I shall move to reading up on the carbs so I can resolve the potential rich/lean situation, and find and order more parts (fender, switches, seat etc).
I'm almost done with the master list so I'll post that soon too
Yes, the cotter pin is a routine item that you can get from the hardware store.but was thinking the pin may just be a size/ shape/material I can get at the hardware store.
Your local Harbor Freight store has an assortment of cotter pins for a few bucks.
Your work seems to be coming along quite well !
Last edited:
Partzilla has 'em (OEM) in stock. Look here.Believe it or not, I'm still waiting on the pushrod seal to arrive. It wasn't listed as back ordered but when I called today she said it won't be in until the 18th!!!
Yes, hardware store cotter pins work just fine.but was thinking the pin may just be a size/ shape/material I can get at the hardware store.
Look for the Carb Guide in Tech... it's the bible for the BS 34's and 38's. Let us know if you can't find it.then I shall move to reading up on the carbs
Edit: make sure it's a steel pin. Brass, copper.... aluminum pins might not hack it. I think hardware stores just carry steel ones but thought I'd mention that just in case.Yes, hardware store cotter pins work just fine.
Keep in mind that you can get a set of 7 engine seals including the pushrod seal for $14.50
free shipping on ebay.
free shipping on ebay.
MarieKaramazov
XS650 Addict
That's exactly where I ordered em from back on the 20th, said it was in stock then too. The in stock part is a lie it seems. Lady on the phone explained it isn't necessarily accurate, as the system checks after an order is placed. I specifically ordered from them because it said it was in stock and it was out on MikesXS.Partzilla has 'em (OEM) in stock. Look here.
Thanks for that, that's one of the things I was wondering and why I went OEM cuz I didn't know if it needed to be of a certain strength etc. Any idea if they call them cotter pins or if they're called something else mysterious at the hardware store?Edit: make sure it's a steel pin. Brass, copper.... aluminum pins might not hack it. I think hardware stores just carry steel ones but thought I'd mention that just in case.
Side note: Is there a good way by the way to figure what type of metal a piece is? Brass and copper are more obvious, but even between those which is which? and then steel v aluminum etc...
!!! I didn't know this! I figured it was more of an OEM thing since it's such a touchy area. Okay, so I just found thisKeep in mind that you can get a set of 7 engine seals including the pushrod seal for $14.50
free shipping on ebay.
https://www.ebay.com/itm/Yamaha-XS6...925942?hash=item548e327b76:g:xVYAAOSw5VFWHb0~ Ebay says it doesn't fit my bike but maybe that's just because the sk; listing says through 84. Any chance you guys know if all 83 oil seals are the same? Gonna keep looking. Thanks again for that!
Cotter pins are usually called split pins in Britain but also sometimes referred to as clevis pins. But I use R clips for preference:

Because I find them neater. Just pull it straight out instead of trying to force a mangled cotter pin straight enough to yank it through. And more reusable. Buy them in most hardware stores.
It's an interesting subject. Metals have such differing properties. Recognising them comes with familiarity? Obviously, copper is copper-colour, a sort of reddish gold. Highly conductive, so found in the core of electrical wires, but highly decorative when used for oil or petrol pipes, mostly on vintage bikes. Or steam punk specials. Brass is much yellower, but sometimes coated steel has a similar hue. Ferrous metals - iron and steel - are magnetic, though stainless steel is only very weakly magnetic. Iron and steel, except stainless, rust very quickly. Aluminium, which we usually encounter in a bewildering range of alloys, is a pale grey. Dull, because it oxidises quickly, but shiny if cut. Much lighter than steel. Much softer too, though some of the alloys are pretty tough. Then there's titanium, very light in weight but stronger than steel, slightly yellow appearance.
You get to notice the differences when you make your own parts. Cutting a custom bracket from aluminium sheet with a hacksaw is a lot quicker than cutting up a piece of mild steel and you'll never get through stainless or titanium without machine tools. But when you take the bracket you just made in aluminium and bend it to and fro a few times and it falls apart you start to question whether it was strong enough for the job.
Mostly something you won't need to worry about because in most applications the part will only be on offer in one of those metals. Unless you want to spend big money and replace your fasteners with titanium ones. Now that would be fancy on your special . . .
Because I find them neater. Just pull it straight out instead of trying to force a mangled cotter pin straight enough to yank it through. And more reusable. Buy them in most hardware stores.
Side note: Is there a good way by the way to figure what type of metal a piece is? Brass and copper are more obvious, but even between those which is which? and then steel v aluminum etc...
It's an interesting subject. Metals have such differing properties. Recognising them comes with familiarity? Obviously, copper is copper-colour, a sort of reddish gold. Highly conductive, so found in the core of electrical wires, but highly decorative when used for oil or petrol pipes, mostly on vintage bikes. Or steam punk specials. Brass is much yellower, but sometimes coated steel has a similar hue. Ferrous metals - iron and steel - are magnetic, though stainless steel is only very weakly magnetic. Iron and steel, except stainless, rust very quickly. Aluminium, which we usually encounter in a bewildering range of alloys, is a pale grey. Dull, because it oxidises quickly, but shiny if cut. Much lighter than steel. Much softer too, though some of the alloys are pretty tough. Then there's titanium, very light in weight but stronger than steel, slightly yellow appearance.
You get to notice the differences when you make your own parts. Cutting a custom bracket from aluminium sheet with a hacksaw is a lot quicker than cutting up a piece of mild steel and you'll never get through stainless or titanium without machine tools. But when you take the bracket you just made in aluminium and bend it to and fro a few times and it falls apart you start to question whether it was strong enough for the job.
Mostly something you won't need to worry about because in most applications the part will only be on offer in one of those metals. Unless you want to spend big money and replace your fasteners with titanium ones. Now that would be fancy on your special . . .
Last edited:
I bought this seal kit (fits all xs650) recently. The shipping was pretty quick. Quality seems OKThat's exactly where I ordered em from back on the 20th, said it was in stock then too. The in stock part is a lie it seems. Lady on the phone explained it isn't necessarily accurate, as the system checks after an order is placed. I specifically ordered from them because it said it was in stock and it was out on MikesXS.
Thanks for that, that's one of the things I was wondering and why I went OEM cuz I didn't know if it needed to be of a certain strength etc. Any idea if they call them cotter pins or if they're called something else mysterious at the hardware store?
Side note: Is there a good way by the way to figure what type of metal a piece is? Brass and copper are more obvious, but even between those which is which? and then steel v aluminum etc...
!!! I didn't know this! I figured it was more of an OEM thing since it's such a touchy area. Okay, so I just found this
https://www.ebay.com/itm/Yamaha-XS6...925942?hash=item548e327b76:g:xVYAAOSw5VFWHb0~ Ebay says it doesn't fit my bike but maybe that's just because the sk; listing says through 84. Any chance you guys know if all 83 oil seals are the same? Gonna keep looking. Thanks again for that!
https://www.ebay.com/itm/Engine-Oil-Seal-Seals-Kit-Set-fit-Yamaha-XS1-Xs2-XS-650-1-2-XS-1-XS-2-650CC/263771113704?ssPageName=STRK:MEBIDX:IT&_trksid=p2057872.m2749.l2648
Cotter pins, Cotter Keys are the usual names.call them cotter pins or if they're called something else mysterious at the hardware store?
Its not critical how hard the steel is.
Heck you can use a nail in a pinch; just bend it over to prevent it from coming out.
For smaller situations, I use safety wire, double thickness. Safety wire is stainless steel, purchased in a spool. Harbor freight has it.

This is exactly what I use, and have for some time.Cotter pins are usually called split pins in Britain but also sometimes referred to as clevis pins. But I use R clips for preference:
View attachment 178467
Because I find them neater. Just pull it straight out instead of trying to force a mangled cotter pin straight enough to yank it through. And more reusable. Buy them in most hardware stores.
For smaller situations, I use safety wire, double thickness. Safety wire is stainless steel, purchased in a spool. Harbor freight has it.
I'm good at safety wire, but I'm not going to drill bolt heads. @YamadudeXS650C, do you have a source for metric hardware drilled for safety wire?
Like Raymond, I use those R-clips, known as hitch pin clips or hairpin cotter pins in this country. I've replaced pretty much every regular cotter pin on the bike with them. I've been using them for years and have never lost one or had one fall out .....


I do take a precaution with the large rear axle clip though. I position it so the shock and/or shock mount holds it in place. But I know what you're thinking - how the heck do you get the thing out then? Simple, flip it down off the nut so it's horizontal, clear of the shock mount, and it slides right in and out.
I do take a precaution with the large rear axle clip though. I position it so the shock and/or shock mount holds it in place. But I know what you're thinking - how the heck do you get the thing out then? Simple, flip it down off the nut so it's horizontal, clear of the shock mount, and it slides right in and out.
Nice job on the safety wiring. Always thought it looked cool but was never successful in getting the wire tight enough perhaps a winter project to hone that skill.Cotter pins, Cotter Keys are the usual names.
Its not critical how hard the steel is.
Heck you can use a nail in a pinch; just bend it over to prevent it from coming out.
For smaller situations, I use safety wire, double thickness. Safety wire is stainless steel, purchased in a spool. Harbor freight has it.
For the pushrod seal you could try XSDirect in Canada. I believe they ship stateside.
MarieKaramazov
XS650 Addict
Thanks for this, Raymond. I was going to google it, but I figured you guys would have some special insider knowledge of it particularly in reference to bikes, and clearly you do. Thanks for taking the time to explain that. I've always wondered how people seem to know. Interesting stuff, metals...I"m going to look into it more, at some point after I learn about the other 9000 things I want to learn about.It's an interesting subject. Metals have such differing properties. Recognising them comes with familiarity? Obviously, copper is copper-colour, a sort of reddish gold. Highly conductive, so found in the core of electrical wires, but highly decorative when used for oil or petrol pipes, mostly on vintage bikes. Or steam punk specials. Brass is much yellower, but sometimes coated steel has a similar hue. Ferrous metals - iron and steel - are magnetic, though stainless steel is only very weakly magnetic. Iron and steel, except stainless, rust very quickly. Aluminium, which we usually encounter in a bewildering range of alloys, is a pale grey. Dull, because it oxidises quickly, but shiny if cut. Much lighter than steel. Much softer too, though some of the alloys are pretty tough. Then there's titanium, very light in weight but stronger than steel, slightly yellow appearance.
You get to notice the differences when you make your own parts. Cutting a custom bracket from aluminium sheet with a hacksaw is a lot quicker than cutting up a piece of mild steel and you'll never get through stainless or titanium without machine tools. But when you take the bracket you just made in aluminium and bend it to and fro a few times and it falls apart you start to question whether it was strong enough for the job.
Mostly something you won't need to worry about because in most applications the part will only be on offer in one of those metals. Unless you want to spend big money and replace your fasteners with titanium ones. Now that would be fancy on your special . . .
Aha! Didn't see this one. I've now bought several kits, including this one, because I'm getting impatient. My wallet may be pissed, but now I'll have plenty of seals for mistakes and/or future needs and save some waiting time .I bought this seal kit (fits all xs650) recently. The shipping was pretty quick. Quality seems OK
Oh, and I've ordered some brushes. Not sure how to check if mine need replacing yet, but figured I'd grab them when I found them and have them on hand as I know they're a wear item.
Digging these R clips. Going to grab some! Thanks guys!
Fixed the wires!

Tested the rotor again with the new multimeter....and now I'm officially confused. To recap, wire on separate tracks, 200 OHM setting, it was 4.7 on the last meter, but that's without a deduction of whatever the resistance between the wires was cuz it wouldn't give me a reading. On this meter, the resistance between wires was..0. And then also 0 when put to tracks...
Continuity reading on new meter--it reads 1 before touching ring to ground/center, and stays at 1. I know it's supposed to be 1, I just wonder if it's reading it at all since it's 1 without touching it to anything. I followed directions for multimeters, watched vids like this one... I'm going to watch more videos, like this one tomorrow. But it seems at this point that either my rotor needs to be rewound at the least, or I'm operating the multimeter improperly since is the 2nd. But I got readings on the first so this is just strange.
Anywho, aside from that, I noticed the two front acorn nuts are accruing oil even when the bike is sitting. It's not dripping but it's hanging from it. Same for seal and acorn nut next to it. Also thinking that maybe I should be moving carbs to the top of the list since I'll have time while the bike is down waiting on seal for at least a week...
Repair on the generator wire looks workmanlike.
Think you might be getting a wee bit confused with the multimeter - wish I could help but what you really need is somebody there with you to see what you are doing. Sorry, but I ain't jetting to LA just for that. I'm sure one of the helpful respondents on this forum will give a clear guide on checking the rotor and stator.
Think you might be getting a wee bit confused with the multimeter - wish I could help but what you really need is somebody there with you to see what you are doing. Sorry, but I ain't jetting to LA just for that. I'm sure one of the helpful respondents on this forum will give a clear guide on checking the rotor and stator.
MarieKaramazov
XS650 Addict
Sorted!
Resistance between tracks is 4.7-4.8, so good. (Took another look at new meter this morning and looks like in the dark last night I misread where the 200OHM setting was and had it at 200k, particularly cuz they have 200 past the diode marker so I figured it was for that, but it's not.) So resistance between leads was .3, reading was 5 to 5.1, so we're at about 4.7. [Side note: since that was same as the last meter's reading, I thought about that and judging from one video I saw, the guy said meters CAN have resistance between wires, so it seems like it's not necessary to have, as first meter didn't so that's why I wasn't sure if the reading was reliable. Perhaps some are calibrated to have that at 0. That meter gave resistance reading between tracks of 4.7 (0 between wires). So same reading.
As for continuity/checking whether it's shorting to earth, I think I'm good since it seems like what I want is to have no reading (not shorting to earth) with one wire on track and one to earth (using bolt at center of rotor as earth). On old meter that's 0, on new meter, it seems 1 is the baseline reading (not touching anything) on continuity (saw it was the same for other's meters as well), and 1 is what I got with one to earth and one on track.
If any of this seems off, let me know, but I think I'm good.
MarieKaramazov
XS650 Addict
The seal arrived! Alllmost done getting it in there.
Took quite a bit of time, but got the mystery epoxy removed yesterday! Had to alternate between chipping it off with various tools and wearing it down with sandpaper. Certainly have scratches there now, but I'm not worried about all that; lightly sanded any rough ones. Great news is that I didn't see any significant holes or cracks beneath it!

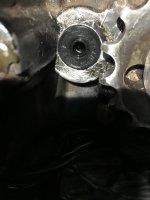
Today I got the old seal out in a snap! As you can see, there was oil just sitting there behind it.

I was going to use a Dremel or knife to smooth the bore, but I noticed that the opening already had silver showing around the whole, as if someone had already done it. I felt the hole and there was hardly anything that felt sharp. Seeing as the old seal just came out, and while it was worn on outer diameter, I wondered if maybe one of the POs had done the replacement before and gone too far with the sanding/beveling and that's why it flew out. I did some measurements of the hole and compared to seal and didn't seem far off, but it was hard to get solid reading as I couldn't fit caliper in there space fully. Anyway, I didn't want to go too far with the smoothing, especially if someone had already done it, and I didn't feel anything severe so I just hand sanded what "extreme" edges I sensed might be a problem. I did see what felt like something hardened in the hole, kind of looked like the epoxy (see photo below on left hand side of hole).

I got it off as much as I could and also used a safety pin to pick out some stuff that seemed to be in the recesses in the hole. Some seemed almost a part of the recess...
Sanded rod with fine sandpaper and polished with chrome cleaner and oiled before putting it in. Put SylGlide on the seal and bore opening and used a socket and rubber mallet to get the seal in. Everything was going pretty well, but then the top right and bottom weren't going in with the rest of the seal. I went at it for quite some time considering the task, tried other socket sizes, going at it with and without the rod in, tried using a short screwdriver like @5twins suggested. It's not so uneven now, but it's still not flush to the case... It got dark and I was starting to mess up the bottom of the seal with my hammering so this is where it was left:


This has me a bit worried that I should've shaved more off of the hole, but perhaps it's just a real pill to get in and I don't have the knack for it yet. I figure once I get it in (and replace chain and retorque chain sprocket nut) and run the bike, if it's leaking worse, then worse case I'll have to just do it again; all the seals I've ordered should be here by then haha. Aaaaand if I don't get it in, then...I don't know, I should be able to. I've learned not to trust what isn't working at the end of the day; so far, it's more because it's dark and the end of the day rather than there being a real problem.
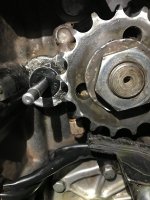
In other news, I'm suspicious of what's behind the sprocket. I know it's also known to leak and I was going to remove and retorque it (and check for any other damage), but then realized I don't have a socket large enough. I have a wrench large enough but from what I know and saw listed in manual for "drive sprocket," it lists it's a 22mm nut that requires 47ft/lb torque, so I need to torque it properly. But that sounded small and I measured the nut and it's about 36mm wide... The torque specs in manual have the parts listed as "thread diameter" though, so it seems the 22mm is literally the inner thread of the 36mm nut. Is this correct or am I looking at the wrong part/specs/doesn't need specific torque? Looking up 36mm sockets now... Perhaps the 22 and torque is only for rear sprocket...
Oh and I finished my master task list for the repairs/maintenance and modifications!
And if you ever end up getting sick of holding a towel to clean up the mess of oil or tiny sanding specks dropping behind your working hand, just turn one of the fingers on your other hand into a towel.

Updates tomorrow, wish me luck!
Oh and for the generator brushes, I read if they're below 7mm, I need to replace. I'm just measuring from tip of the carbon rectangle to the top of the housing it sits in, yes? (The red line in pic below) They don't look too short/worn at a glance but will measure tomorrow.

Took quite a bit of time, but got the mystery epoxy removed yesterday! Had to alternate between chipping it off with various tools and wearing it down with sandpaper. Certainly have scratches there now, but I'm not worried about all that; lightly sanded any rough ones. Great news is that I didn't see any significant holes or cracks beneath it!
Today I got the old seal out in a snap! As you can see, there was oil just sitting there behind it.
I was going to use a Dremel or knife to smooth the bore, but I noticed that the opening already had silver showing around the whole, as if someone had already done it. I felt the hole and there was hardly anything that felt sharp. Seeing as the old seal just came out, and while it was worn on outer diameter, I wondered if maybe one of the POs had done the replacement before and gone too far with the sanding/beveling and that's why it flew out. I did some measurements of the hole and compared to seal and didn't seem far off, but it was hard to get solid reading as I couldn't fit caliper in there space fully. Anyway, I didn't want to go too far with the smoothing, especially if someone had already done it, and I didn't feel anything severe so I just hand sanded what "extreme" edges I sensed might be a problem. I did see what felt like something hardened in the hole, kind of looked like the epoxy (see photo below on left hand side of hole).
I got it off as much as I could and also used a safety pin to pick out some stuff that seemed to be in the recesses in the hole. Some seemed almost a part of the recess...
Sanded rod with fine sandpaper and polished with chrome cleaner and oiled before putting it in. Put SylGlide on the seal and bore opening and used a socket and rubber mallet to get the seal in. Everything was going pretty well, but then the top right and bottom weren't going in with the rest of the seal. I went at it for quite some time considering the task, tried other socket sizes, going at it with and without the rod in, tried using a short screwdriver like @5twins suggested. It's not so uneven now, but it's still not flush to the case...
It got dark and I was starting to mess up the bottom of the seal with my hammering so this is where it was left:This has me a bit worried that I should've shaved more off of the hole, but perhaps it's just a real pill to get in and I don't have the knack for it yet. I figure once I get it in (and replace chain and retorque chain sprocket nut) and run the bike, if it's leaking worse, then worse case I'll have to just do it again; all the seals I've ordered should be here by then haha. Aaaaand if I don't get it in, then...I don't know, I should be able to. I've learned not to trust what isn't working at the end of the day; so far, it's more because it's dark and the end of the day rather than there being a real problem.
In other news, I'm suspicious of what's behind the sprocket. I know it's also known to leak and I was going to remove and retorque it (and check for any other damage), but then realized I don't have a socket large enough. I have a wrench large enough but from what I know and saw listed in manual for "drive sprocket," it lists it's a 22mm nut that requires 47ft/lb torque, so I need to torque it properly. But that sounded small and I measured the nut and it's about 36mm wide... The torque specs in manual have the parts listed as "thread diameter" though, so it seems the 22mm is literally the inner thread of the 36mm nut. Is this correct or am I looking at the wrong part/specs/doesn't need specific torque? Looking up 36mm sockets now... Perhaps the 22 and torque is only for rear sprocket...
Oh and I finished my master task list for the repairs/maintenance and modifications!
And if you ever end up getting sick of holding a towel to clean up the mess of oil or tiny sanding specks dropping behind your working hand, just turn one of the fingers on your other hand into a towel.
Updates tomorrow, wish me luck!
Oh and for the generator brushes, I read if they're below 7mm, I need to replace. I'm just measuring from tip of the carbon rectangle to the top of the housing it sits in, yes? (The red line in pic below) They don't look too short/worn at a glance but will measure tomorrow.
Attachments
Last edited:
MarieKaramazov
XS650 Addict
Found this Re the chain sprocket torque: http://www.xs650.com/threads/front-drive-sprocket-replaced.44176/#post-440720 http://www.xs650.com/threads/front-sprocket-nut-torque.1226/
Seems like it should be 65ft/lbs according to year
Seems like it should be 65ft/lbs according to year
You're good.Sorted!
Resistance between tracks is 4.7-4.8, so good. (Took another look at new meter this morning and looks like in the dark last night I misread where the 200OHM setting was and had it at 200k, particularly cuz they have 200 past the diode marker so I figured it was for that, but it's not.) So resistance between leads was .3, reading was 5 to 5.1, so we're at about 4.7. [Side note: since that was same as the last meter's reading, I thought about that and judging from one video I saw, the guy said meters CAN have resistance between wires, so it seems like it's not necessary to have, as first meter didn't so that's why I wasn't sure if the reading was reliable. Perhaps some are calibrated to have that at 0. That meter gave resistance reading between tracks of 4.7 (0 between wires). So same reading.
As for continuity/checking whether it's shorting to earth, I think I'm good since it seems like what I want is to have no reading (not shorting to earth) with one wire on track and one to earth (using bolt at center of rotor as earth). On old meter that's 0, on new meter, it seems 1 is the baseline reading (not touching anything) on continuity (saw it was the same for other's meters as well), and 1 is what I got with one to earth and one on track.
If any of this seems off, let me know, but I think I'm good.
It's pretty close. You might consider giving it a go as is. If it leaks, you can always revisit it and try to get it a little more flush, but I think it'll work as is.It's not so uneven now, but it's still not flush to the case...
Torque for that nut is somewhere around 80-100 ft.lbs. Most folks don't use a torque wrench, they just crank it down as tight as it'll go.Looking up 36mm sockets now... Perhaps the 22 and torque is only for rear sprocket...
Yeah... the manual is all over the place on that, but it's 22mm thread diameter, that's pretty beefy... and it has to seal the drive shaft because the engineers didn't think it important enough to put a seal there to keep the oil in
 ... so just crank that sucker down good and tight.
I'm enjoyin' this. You take advice well and ask good questions. Keep goin'