Chet Ironhorse
XS650 Enthusiast
Thanks guys... this project has certainly taken long enough, I have ton's of photos from this 4+ year build. Perhaps I'll make a build thread...I agree with the others, that is really super nice!
Thanks guys... this project has certainly taken long enough, I have ton's of photos from this 4+ year build. Perhaps I'll make a build thread...I agree with the others, that is really super nice!
That bike definitely needs it's own build thread.Thanks guys... this project has certainly taken long enough, I have ton's of photos from this 4+ year build. Perhaps I'll make a build thread...

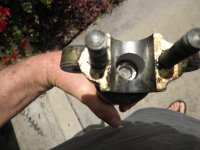
Humm, seems the 8mm hex bolt on the '72 fork bottom is stuck after loosening as much as I could. felt like something (nut?) is on the other end in the tube. So stuck I don't think I can turn it the other way now. Odd. looked at a post that Hugh did on that subject and that hex bolt should just come out...
humm x2.....I didn't see the next part on the 'older model fork tool (s). Oh, well. back to work on that later...hope I can get that stripped hex out with a tool in the other end
On at least one occasion, I was successful doing that with a broom handle.You have to hold the damper assembly from inside the fork leg.
On at least one occasion, I was successful doing that with a broom handle.
Broomstick on the floor. Fork lower slid down over it. Push down on the fork leg while turning the damper rod bolt. A friend to keep the broom handle from turning could prove useful. If Magilla Gorilla installed those bolts, all bets are off.If you could just apply pressure to stop it from spinning it might just work.
You have to hold the damper assembly from inside the fork leg. I have an extensive photo album that shows all the internal parts, plus the socket that I cut a slot in to hold the damper. Using that slotted socket on a couple of extensions allows you to hold the damper while you remove the hex head bolt at the bottom of the leg. Without holding that damper internally, it just spins in the fork leg.
http://www.xs650.com/media/albums/1972-xs2-forks-assembly-and-swingarm-details.3129/
Started installing the 8 plate clutch today but got side tracked by having to go and pick up my new (non Yamaha) addition to the bike fleet. Should be able to close it up tomorrow but no test ride until the springtime.
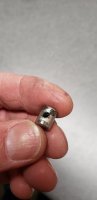
The spring (Belleville) washer behind the clutch basket nut is nearly flat and lost its conical shape. Should I replace this or just torque the nut back on with some Loctite?
.View attachment 186117View attachment 186118

‘76 doesn’t require any machining. 7 out, 8 in plus an extra steel plate.Are you just using the thinner plates or has everything been machined down to accept the standard plates?
What brand and where was the cable purchased? Nice to know which parts to stay away from.until the recently purchased new clutch cable snapped about 5 miles from home
Stopped to take a photo of the bike with the Strait of Juan de Fuca in the background with Seattle area way in the distance.