My $Free.99 Project

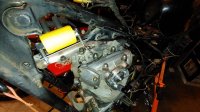
Got the clutch back together w/ the APE 8 plate kit. Stole an extra steel plate off my other build. almost missed the thicker plate on the inward position! But it all went together as easy as stock! Used some EBC springs and aluminum retainers, torqued em down to 80 in lbs. Deglazed all the steel plates on some glass w/ 600 grit too.

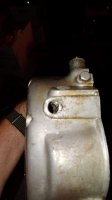
Replaced the oil bushing w/ a 12mm long from McMaster (thanks @5twins for the advice!), Chamfered the opening and replaced the oil seal too (filled the case groove w/ "The Right Stuff" RTV first) and then installed the pushrod.

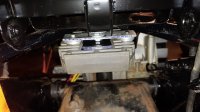
Also ordered a battery strap.

Running total: $1098.43
 
Last edited:
Well I mis-read the starter circlip re-tension method (thought the gear was elsewhere and put it out of mind to re-check, :cussing::cussing::cussing:) and SHOULD have done it while the clutch was all taken apart. So I'll have to pull the clutch basket tomorrow and re-tension the circlip to 6+ lbs.

I forgot that @Jim came through for me and sold me some battery tray and tank bushings, so that knocks out that missing piece!

Running total: $1118.43
 
Ignition switch rebuilt & mounted (still need to test it). Kickstart lever rebuilt w/ zerk fitting (works FAR better now!!). Got the starter gear clip pinched in the vise and it's noticeably tougher to turn (I didn't test the pull strength, as I don't have a fishing scale (I should get one though!) Gauges have all new LEDs and are mounted. wiring harness mounting started. Mounted Reg/Rect on a custom bracket in stock location (picture coming later). Sold some old fork shrouds.

Running total: $1058.43
 
Last edited:
R/R mount. But just barely touches the plastic fender, so it should be ok
 

Attachments

  • 20190906_214802_HDR.jpg
    20190906_214802_HDR.jpg
    141.2 KB · Views: 219
  • 20190906_214747_HDR.jpg
    20190906_214747_HDR.jpg
    153.5 KB · Views: 202
Well, bittersweet news. I started a new job on Monday (been unemployed for 2+ months), so I'll be able to make money but won't have nearly enough time to work on the bike! I'm trying to keep the momentum going as I'm getting closer!!

Did get some work done though - cleaned and lubed the speedo and tach cables. Need to finish up some of the wiring/ignition pieces so I can tie off the wiring harness and then move to testing compression. I want to pull the starter and inspect/clean it too, just to make sure it's doing its job properly. Also should count the heiden filtration into the total. Oh, and I robbed the dogbunny temp dipstick from the bobber build as it's a great option on even a stock build.

Running total: $1230.45
 
Just heard back form the emulator guy: 2 months out for them, so that kind of stinks. If those are holding me up from riding, Im not sure what I'll do. I guess that's the price you gotta pay to be cool huh??
 
Got the pamco installed, just need to get the Accel coil installed. Hoping to have wiring mostly done soon so everything will be fairly easy to test before the first fire attempt.

Working on small odds and ends too, like the side covers and whatnot. Nothing really big to report on, just been busy with working 2 jobs and having 3 kids, haha
 
Ordered a 1L9 xs400 worm gear off eBay to help make the clutch as smooth as possible.

Finished installing side cover, ,just need to plug the lower hole I questioned earlier. Anyone have the thread size for that??

Got carb mounts installed (used some new ones from TC Bros I found in a parts box) and test fit the carbs (had to relieve the top support brace). Also got the vent installed in top, complete with hole reducers, so I'll need to run vents back to the airbox.

Finally, does anyone have the part information to make a choke knob for the EX500 carbs? I saw some posts awhile back, but never saw part numbers for that. Any thoughts??

Running total: $1251.08
 
I couldn't find the question...

Sorry about that one. Looking for thread size for this hole on clutch cover, the PO had an oil cooler line coming out, but the fitting was not there to reference off of. Basically, is this a stock hole or an aftermarket one for the cooler?

On a diff note: after I installed the kick start lever, I noticed the lever is a little loose on the hinge. What's the recommended method to tighten this up some? It seems like the washer under the e-clip is bent/thinned some. Would a new washer help this out?
 

Attachments

  • 20190917_223032_HDR.jpg
    20190917_223032_HDR.jpg
    68 KB · Views: 193
That might need a plumbing plug. Not a bolt. Different thread size. If your not going to run a cooler, you might want to check that the oilway is clear and not plugged further up that way. That is the pressure side and usually it is plugged further up and routed out thru the cooler and then in the outer filter cover.
 
Last edited:
I pulled the oil pump and checked and couldn't find any obstructions. I pulled a plug out that someone had put in. I suppose I should check for a plugged passage by doing an oil pump prime before first fire... Keep it unplugged and ensure oil flows out?? Would that be a proper test??
 
Had to pick up some small bits: plug wire ends and a throttle cable adjuster for the carb. Still have to figure out the choke adjuster....

Running total: $1264.49
 
Other small update: got the front rotor swapped from the bobber, so I'll have the XS1100 up front and matching rear out back. I'll then match the rear rotor hole pattern to the floating rotor up front on the bobber since I'm running a front rotor out back.

Also, I found my "other" front fork brace - an extended height Hughs brace already powder coated black. So that SHOULD allow for using the stock fender in some way. Then I'll use my Gordon Scott brace on the bobber since it will sit lower. (This is all speculation since I've not fit anything up yet...) Still waiting to hear back on the fork emulators/springs, those SHOULD be ready in a week or two (fingers crossed!!). Once I get those back, I can have a rolling chassis!!!
 
Got my coil mount and wires finished up. Just used some scrap steel I had sitting around, it's not the most elegant, but it works and clears the tunnel w/ room to spare! Plug wires should be nice and clean. Any concerns with the job???
 

Attachments

  • 20191105_232727_HDR.jpg
    20191105_232727_HDR.jpg
    171.4 KB · Views: 133
  • 20191105_232734_HDR.jpg
    20191105_232734_HDR.jpg
    196.8 KB · Views: 191
A little finish work to the bracket, round off the square corners, smooth out the cuts, a coat of paint, and I'd say you're good to go.
 
I made my coil bracket out of something similar. I think it's like 16 gauge. It's been in use and holding up fine now for a bit more than 10 years .....

uWiqFHL.jpg


Xprz1CB.jpg


DJJjDkJ.jpg
 
Back
Top