My $Free.99 Project

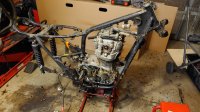
All talk and no pics makes the forum members angry, so here's a few pics taken right before I shut down for the night...

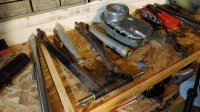
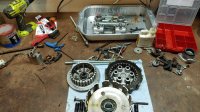
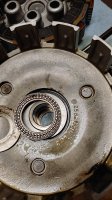
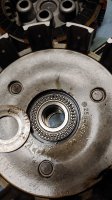
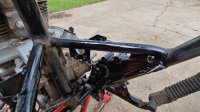
Swingarm has a center zerk and bronze bushings installed (what a PITA!). Tapered head bearings are in, forks are disassembled and dampening rods are on their way to the suspension guy to see if they can work with his emulators. Wheel bearings are installed. Clutch is pulled and awaiting inspection/overhaul. Points plate, rod and advance assembly is pulled and awaiting overhaul. EX500 carbs are back together and awaiting a bench sync and I need to figure out the choke pull (I'd like to do a mini handle but I can't find a short cable and knob??)

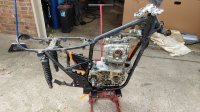
Tomorrow will be dedicated to welding up those thin frame areas. Anything else I should do to the frame while the welder is out? I recall someone saying it's good to weld up some of the frame overlap joints, but I can't recall specifics.
 

Attachments

  • 20190820_225732.jpg
    20190820_225732.jpg
    193.8 KB · Views: 187
  • 20190820_225741.jpg
    20190820_225741.jpg
    195.7 KB · Views: 182
  • 20190820_225806.jpg
    20190820_225806.jpg
    205.4 KB · Views: 146
Sold a small thing and got new coils as well as a fork tube (thanks @doncon !!). FYI, 650 Central doesn't supply the oil filled points coils anymore, but the ones he did sell were Emgo's. I believe I traced down the part number: 24-71512. They are 4.82 Ohm and should provide a hotter spark! Mounting will be a small challenge, as I'll need to provide some vibration dampening, but I'll figure it out!

Running total: $1295.85
 
Quick question: the Mike's needle bearing goes in like pictured, right? Basically, it replaces the stock one that only has 6 needles?

I'll replace the stock needle bearing and the washer underneath it. I found a post from @grizld1 that led me to believe this is correct.

Could someone confirm for me? Thank you!!
 

Attachments

  • 20190822_221555_HDR.jpg
    20190822_221555_HDR.jpg
    227.4 KB · Views: 188
  • 20190822_221557.jpg
    20190822_221557.jpg
    220.4 KB · Views: 144
Thank you @TwoManyXS1Bs!! That is super helpful.

So after reading of some chatter issues and other possible "problems" associated w/ re-using the stock clutch plates, I've decided to go w/ the 8 pack from APE. I've an alto 8 pack w/ machined hub sitting in a box for my bobber build, but I'll keep that around. I will also follow the advice here (http://www.xs650.com/threads/clutch-spring-cap-screw-modification.3408/page-3) for the screw caps.

I just need to clean up the pushrod and inspect the overall condition and then I can start putting it all back together. I'm also refreshing the kick start lever, as it was SUPER tight to turn, but it was quite rusty.


Side note - how do I know if the ignition cam bushings (the internal ones) are worn out? Assuming they are, what are the recommended replacements, ie are there upgrades? Thanks!
 
Thanks again to those that helped me with my frame thinning area. I built it up with some tack welds and ground it smooth, then hit it with some "rust tough" enamel. I went ahead and hit the surface rust next to the swingarm bosses, and once the paint it cures, I'll finish cleaning up the engine back there as much as reasonable.

Also, an outdoor shot. Finally, got word from the suspension guy, and he's going to make me some custom emulators but they'll take 4-8 weeks (oh well, not like I'm in a hurry to get it running!). This means they'll be available from another source besides Racetech! Once I confirm pricing, I'll let y'all know in a separate post.
 

Attachments

  • 20190823_150653_HDR.jpg
    20190823_150653_HDR.jpg
    189.1 KB · Views: 187
  • 20190823_150706.jpg
    20190823_150706.jpg
    233.5 KB · Views: 132
...Side note - how do I know if the ignition cam bushings (the internal ones) are worn out? Assuming they are, what are the recommended replacements, ie are there upgrades? Thanks!

The advancer shaft bushings are available on MikesXS.

The shaft only rotates about 13°, and doesn't see much in the way of radial side loading. You could remove it, clean off all grease from the shaft and internal bushings, reinsert, and test for radial side-side play, most importantly on the points side. A tiny, almost imperceptible amount of play would be normal, and doing 5twins advance rod service and greasing procedure would remove the side play.

If there's significant side-side play, say more than 0.002", it'll mess with the points gaps, and ignition timing. Probably not an issue with electronic ignition timing rotors...
 
Ordered one piece clutch pushrod (thanks @TwoManyXS1Bs!!), clutch pushrod bushing, EBC clutch springs, spring screw retainers (https://www.ebay.com/itm/Yamaha-XS650-Clutch-Spring-Retainer-Kit-Chopper-Bobber-Custom-Cafe-Rat/283180188267?ssPageName=STRK:MEBIDX:IT&_trksid=p2057872.m2749.l2649) and the APE add a plate clutch kit. I got the retainers because for that price it wasn't worth the hassle of modifying my own.

I WAS able to save my rear axle and axle nut, and I found my swingarm pivot shaft nut, so that saves a bit!! Got the swingarm mounted and sideplay figured out (right around .006"), thankfully I didn't throw out the shim.

Running total: $1477.34
 
Got bronze head washers installed tonight (bought them at the local Ace hardware for well under half of Mikes price, granted his are brass). Removed, chased all the threads, cleaned, put some ARP torque lube on threads and bottom of acorn and then followed torque sequence for all 8 acorns to 25 ft-lbs and then 35 ft-lbs. My only "concern" is that the washers I used were as thick as any others, but they were a skosh smaller OD, maybe .040" - .050" smaller OD. I don't believe it will be an issue, but I'm not certain.

Still have to follow up the other bolts to toque, like under the spark plugs. Should I put a new sealing washer under those as well? Copper or bronze?
 
Bolts under the plugs don't get sealing washers, just normal washers. 35 ft/lbs is getting a bit high on the head torque, nearing stud stretching territory. I won't go over 30 anymore and in fact, I'm happy to stay around 28.
ESPECIALLY with anti-seize/lube!
Oversqueeze the barrels and they can start to deform, causing uneven ring/bore wear.
 
Thanks for the info guys! I suppose I should back off then. I recall reading that 35 was the new "norm", but I can certainly back off to 28-30.
 
No, about 30 has become the new norm. The original 26 ft/lb spec was a bit light, especially in light of the fact that the 4 outside acorn nuts always come loose with the original rubber/metal sealing washers still in place. At only 26 pounds, it doesn't take much loosening before head gasket leaks can start. If you look at lots of 650s, you're going to notice that many, if not most, that haven't been renovated are going to have leaking head gaskets. It seems to be a very common issue with these bikes.
 
No, about 30 has become the new norm. The original 26 ft/lb spec was a bit light, especially in light of the fact that the 4 outside acorn nuts always come loose with the original rubber/metal sealing washers still in place. At only 26 pounds, it doesn't take much loosening before head gasket leaks can start. If you look at lots of 650s, you're going to notice that many, if not most, that haven't been renovated are going to have leaking head gaskets. It seems to be a very common issue with these bikes.

:offtopic:
Leaking head gaskets is pretty much the norm on most aluminum block motors with some age and miles. For a variety of reasons the original assembly compression forces have relaxed over time. I have been pretty successful stopping head gasket leaks with a re-torque on many motors including the typical OHC 4banger in front wheel drive beaters. Ignore that they have torque to yield bolts, do a loosen one at a time and retorque to a decent figure. It's got 200,000+ miles and it's leaking oil, what'da got to lose?
Sorry, Wannabe back to your motor!
 
Are you feeling lucky? LOL I'd back em off and retorque to 30 one at a time.

This. If I'm using a non-TTY fastener, I never try to back down the torque. I only ever use loosening torque if I want to see if a fastener CAN back off at a given figure, but I ALWAYS unload the fastener full, then re-torque properly. So I loosened all the nuts and will re-do the torque sequence at 20-22 lbs and then at 30.

Thanks for the follow up and help guys!!
 
On another note, I'm going to "rob" my bobber build of some Heiden parts, as part of this build theme was to ensure the bike had the proper deficiencies taken care of. That being said, I feel the oil filtration is lacking on these, and I don't want to pay $40 for a stock filter, only to have to modify it. That's why I like the Heiden filter screen and oil cooler since it uses a paper filter (and there might even be a PSC option for a reusable stainless filter as well). I'll certainly replace the bobber parts when that build comes to light more, but for now, I'm going to use them on these one!
 
Ok, everything torqued properly. Head nuts to 30 ft lbs, under spark plugs to 16 and the one between the carbs to 7.


Now here's a question I've never been able to find an answer to. Breaker points felt lubricators: can/should they be cleaned? If so, what's the best way? If not, is there an acceptable material besides NOS on eBay for $10+ ea that would suffice?
 
Back
Top