-
Enjoy XS650.com? Consider making a donation to help support the site.
XS650.com receives a small share of sales from some links on this page, but direct donations have a much greater impact on keeping this site going.
You are using an out of date browser. It may not display this or other websites correctly.
You should upgrade or use an alternative browser.
You should upgrade or use an alternative browser.
1977 yamaha 650 d restoration files
- Thread starter lawrgj
- Start date
-
- Tags
- ground up refurb restoration xsotm
sseres
XS650 Junkie
Noodles look yummy
VosaME
XS650 Addict
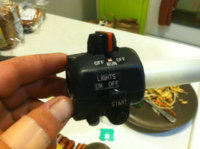
Looks good! I think that unit might be the blinker unit? Or possibly a relay of some type?
lawrgj
XS650 Addict
its not the blinker unit... i wonder?
lawrgj
XS650 Addict
So dumb itis the rectifier
BruceDeuce
XS650 Addict
Looks good! I think that unit might be the blinker unit? Or possibly a relay of some type?
Bro its the right housing control. Good thing you found us! Do you know how to ride?
lawrgj
XS650 Addict
bruce I was asking about what the rectifier was, not the controls.... yes I have been riding since I was about 6
BruceDeuce
XS650 Addict
bruce I was asking about what the rectifier was, not the controls.... yes I have been riding since I was about 6
Bro if you look closer I was quoting and repling to VosaMe

Inevitable
XS650 Addict
Just out of curiosity what brand of degreaser are you using...I grabbed that Simple Green from Home depot the other day....Ya...it sucks...
lawrgj
XS650 Addict
degreaser... I used engine brite.... let it soak overnight till almost dry and then soaked again, not to mention the hours of brushing
ronstern
XS650 Addict
Yeah, I have one of those also, no idea.
ronstern
XS650 Addict
Haven't had a chance to work on mine for a while, just polishing up the wheels. Have to take a day off to bring all the parts up to powder coat, only open on weekdays. Then I have to crack open the head and peek inside.
lawrgj
XS650 Addict
ron it is the rectifier... mine is going pma/pamco so I dont even need it...
glad to see you went with powder, I am sending mine to the paint shop this week I think.
glad to see you went with powder, I am sending mine to the paint shop this week I think.
lawrgj
XS650 Addict
but! I did just get some heat shrink tubing from platt electric today and just re did the wrap on my left and right controls with it! its awesome,
lawrgj
XS650 Addict
Ok all, just got my second order from mikes, and somehow through all of you kind souls on the classifieds section, and with your knowledge, I have acuired all oem parts I was missing or needed, even found oem grips nos from a local shop!
so now we are going to get serious...
from now on every post is going to be centered around how to's and logs of assembly. I hope to turn this into a total step by step on how I am going to get this pile of parts back up to its glory!
I cant wait!
I have about 90% of the parts cleaned and prepped.
and with elbow grease I have polished all the original nuts and bolts and will use them when I can.
and dont worry, pics will come
Mister Mellow
Big Dreams, Thin Wallet
.

...
...
Many of the original nuts and bolts are cad plated. Polishing usually removes that and they start to rust. Testor's silver model paint works well for painting the bolt heads. It's a dull silver, not bright like chrome, and mimics the original cad plated finish quite well. I coat all fastener shafts and threads with anti-seize. Yes, the total length of the fastener shaft, not just the threads on the end.
lawrgj
XS650 Addict
5twins... if you cover the whole thing,
a.) removal? wouldnt it be stuck like heck?
b.) what color are you using for the anti sieze? blue is really tough. are you using it as a corrosion retardant as well as anti vibration?
a.) removal? wouldnt it be stuck like heck?
b.) what color are you using for the anti sieze? blue is really tough. are you using it as a corrosion retardant as well as anti vibration?
No, not Loc-tite, anti-seize. It's a thread lubricant. It comes in both nickel and copper based versions. I use the copper based stuff because it shows up better on the threads (it's copper colored, the other stuff is silver). You should be using it on pretty much all the fasteners on your bike, especially the steel into aluminum ones. It prevents corrosion and thread galling.
http://www.newmantools.com/felpro/c5a.htm
http://www.newmantools.com/felpro/c5a.htm
lawrgj
XS650 Addict
So I have been working hard on polishing, these are my forks,
First thing I did was use aerosol based kleen strip aircraft stripper,
2. coated in oven cleaner, I mean coated, it will bubble and turn black, wait 10 minutes but don't let it dry...
3. wash off,
4. orange roloc wheel one direction,
5. blue roloc wheel opposing direction,
6. polished lightly to see any problems,
that brings us to this on one fork.


the next step which I'll have pics for soon,
is to start in with the sanding,
so far I have cleaned both forks, and have started working one from 320 to 600 so far always alternating direction.
First thing I did was use aerosol based kleen strip aircraft stripper,
2. coated in oven cleaner, I mean coated, it will bubble and turn black, wait 10 minutes but don't let it dry...
3. wash off,
4. orange roloc wheel one direction,
5. blue roloc wheel opposing direction,
6. polished lightly to see any problems,
that brings us to this on one fork.
the next step which I'll have pics for soon,
is to start in with the sanding,
so far I have cleaned both forks, and have started working one from 320 to 600 so far always alternating direction.