79F Standard Rescue in progress

Following bars in other threads now to help on a future decision.
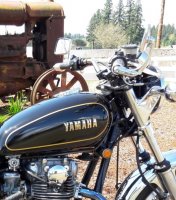
On my 78E which has now donated stock bars to my 79F. I am NOT going to use the funky cafe bars. Flipped over they look good until the clutch perch is installed. Insufficient clearance for the clutch cable and headlight.
In the past I really liked a set of EMGO Euro bars in a 78. They were a tad narrow so I used these bar end mirrors.
Is there a brand of "Euro" bars maybe a little wider than the EMGO's ?
Anyone ?
Thx , RT
 

Attachments

  • 20190122_103050.jpg
    20190122_103050.jpg
    236.1 KB · Views: 209
CB400f, very clever again TwoMany XS1's
You always provide great info. I'll read it.
I was wondering how wide my old Seca 650 bars were ? They were sporty yet the mirrors were adequate.
Another good set of stock Standard bars in good shape would also be fine with me .
-RT
 
And, just for reference,

70-73 "256" Handlebar dimensions:
(Viewed from top)
Width = 28 1/2"
Bottom clamp straight length = 6"
(Viewed from side)
Rise to bend = 6"
Sweepback (lay bar on floor, all bends flat on floor, center of pipe perpindicular to end ctr) = 7 3/4"
Angle (viewed from side) 60° from vertical

I don't have dimensions for '74-on "447" bars...
 
The handlebars removed from my XSE measure right at 30" , that's wide ! They had a sticker under the left grip "Made in Japan"
price was $10.95.. who knows what they are.
My Seca handlebars were only supposedly 27.5" . Seems too narrow.
 

Attachments

  • 20190122_201843.jpg
    20190122_201843.jpg
    171.4 KB · Views: 179
  • 20190122_202947.jpg
    20190122_202947.jpg
    170.3 KB · Views: 206
On my 78E a couple years ago I serviced the steering stem. Now I'm doing it again to the 79F.
Funny to find mistakes from the past such as somehow adding extra rubber rings and steel rings into the mix. I most likely picked em up at a salvage shop and thought they belonged mashed in there under the ear tubes. Lol
Now I see ..
 

Attachments

  • 20190122_201659.jpg
    20190122_201659.jpg
    127.1 KB · Views: 196
If I have it off, I like to paint the inside of the headlight bucket with a lighter color (white or silver). Besides protecting against rust, it makes seeing the wiring easier. I just brush paint it since it's inside and not seen. I do the same to the bottoms of the fenders (clean off the rust, brush paint silver).

Hi 5twins,
yeah, lighter & brighter bucket innards is a good thought,
mighta saved me from mistaking a black ground wire for a chocolate signal wire and blowing half a box of fuses.
But silver inside fenders? WTF? I use a rattlecan of rubber based underseal.
 
Back two brakes.. Made it out to change my rear brake shoes and it did get more interesting than expected. See, the Vesrah shoes came with the bike so I decided to try them .
Upon attaching these to the backing plate and a trial fitment I discovered they would not quite clear the drum on the cam side.. weird ! Casting flaw ? IDK but no time to figure it so I grabbed the stock originals which are cleaned up with alcohol and still "ok" . That's when I discovered the shoes are actually marked R & L , hmm. Why ? There is no mention of this in my manual or any threads I found .
Still pondering this ..
 

Attachments

  • 20190127_094346.jpg
    20190127_094346.jpg
    153.9 KB · Views: 202
Another interesting delay was while converting the headlight back from the upgraded H4 to the original Koito light I eventually found the PO had also discarded the original mounting piece behind the light.. the one used had just a slightly different bend.
Fortunately I sourced all the original type components and have a headlight I like now.
 

Attachments

  • 20190127_080927.jpg
    20190127_080927.jpg
    136.4 KB · Views: 195
  • 20190127_081005.jpg
    20190127_081005.jpg
    176.1 KB · Views: 194
And the sump strainer repair is going well. Just slowly gluing now.. How did all the flat track racers of the past deal with these strainer failing ?
 

Attachments

  • 20190127_081233.jpg
    20190127_081233.jpg
    147.8 KB · Views: 186
Back two brakes.. Made it out to change my rear brake shoes and it did get more interesting than expected. See, the Vesrah shoes came with the bike so I decided to try them .
Upon attaching these to the backing plate and a trial fitment I discovered they would not quite clear the drum on the cam side.. weird ! Casting flaw ? IDK but no time to figure it so I grabbed the stock originals which are cleaned up with alcohol and still "ok" . That's when I discovered the shoes are actually marked R & L , hmm. Why ? There is no mention of this in my manual or any threads I found .
Still pondering this ..

Hi Machine,
L & R, eh? Left and Right? That from the front or from the back?
L & T (Leading & Trailing) might have actually been helpful.
 
Leading or trailing would be helpful. Still there is no apparent difference between the shoes.
Found the "R" & "L" marks a curiosity. And maybe meaningful. As to the Vesrah shoes , they are actually marked 1& 2 ..
 
Back two brakes.. Made it out to change my rear brake shoes and it did get more interesting than expected. See, the Vesrah shoes came with the bike so I decided to try them .
Upon attaching these to the backing plate and a trial fitment I discovered they would not quite clear the drum on the cam side.. weird ! Casting flaw ? IDK but no time to figure it so I grabbed the stock originals which are cleaned up with alcohol and still "ok" . That's when I discovered the shoes are actually marked R & L , hmm. Why ? There is no mention of this in my manual or any threads I found .
Still pondering this ..

The shoes should be interchangeable.
I think I see an oddity in your old shoes.
Are the lining thicknesses different?
MachineBrakeShoes.jpg

Myself, I'd rather that new shoes have too much material, than not enuff.

Ggggary's post.

http://www.xs650.com/threads/better-rear-brake-shoes-drum-brake.6022/#post-62590
 
Yes, the shoes should be the same. But on used ones, I do mark them "top" and "bottom" before removal so I can put them back where they were. Sometimes used shoes will bed in or take a set where they were mounted and will work better or best if put back in that same spot. I really hope there's nothing wrong with those Vesrah shoes that can't be easily fixed because I just bought some, lol. And if they don't work, to make matters worse, I ordered one set but they mistakenly sent me two. Smokin' deal for me if they work, not so much if they don't, lol. VB-225 is supposedly the Vesrah part # for the 650. Is that what you've got?

full


full
 
VB-225 is supposedly the Vesrah part # for the 650. Is that what you've got?
Yes. Just returned home. Not much for measuring at home but now I am even more curious and will look further in this not fitting the drum circumstance.
 

Attachments

  • 20190127_134659.jpg
    20190127_134659.jpg
    137.9 KB · Views: 195
No obvious visual reason. I'll have to get my wheel/hub/ springs out and retry the fit later.
One obstacle in these XS projects is always there. Time, lack of garage time. As today again, committed for other.
Thanks all for now . Sorry for the unanswered questions. -RT
 
I'm glad the topic of your rear brake plate came up because I wanted to ask you a question about yours. Did you happen to notice what style camshaft you have? I know it would have to be one of the longer (82mm) shafts pictured below, but is it the center one with the "long flats" and funky scalloped spacer washer, or the "short flats" version on the right, with the 2 plain thick washers as spacers? .....

hWi5STC.jpg


jskirgT.jpg


The change occurred either in '79 or '80, but the parts diagrams are confusing on this. They list the "long flats" version and funky washer for the '79 Standard but the "short flats" shaft with the 2 spacer washers for the '79 Special II. I never had access to a '79 brake plate to check, only '78 and '80 ones.
 
Back
Top