Blowing main fuse

Link94

XS650 Enthusiast
Messages
41
Reaction score
30
Points
18
Location
Walla Walla WA
Looking for some advice I own a 1980 XS650G and am in the electrics portion of my cafe build and recently removed the reserve lighting unit and light checker to make space in my electrics tray at the advice of some guys on here that had successfully done it and showed me pictures and everything. I jumped two of the wires from each of those components together as instructed but now every time I turn my key the main fuse blows. Everything worked great before making that modification so I’m guessing there is more to be done than the two jumper wires I was told were the fix. I have power from the battery to the solenoid and out the red wire to the fuse box but not across the 20A main fuse and when I turn the key it blows every time. Any advice is appreciated I’m assuming I have a short somewhere.
 
Maybe the fuse holder for that 20A main fuse has gone bad? You should have power on both sides of that fuse, key on or off. It's simply spliced into the power feed wire from the battery to the ignition switch, so it should be "hot" both sides all the time. The other three fuses should have no power either side until the key is turned on. It's quite common for the original fuse holders on these bikes to go bad. The usual fix is to change all the fuses over to more modern blade type fuses.
 
That would be an ideal fix I never thought about that. The fuse only has power on the one side with the key off and immediately blows with key on. I’ll look into that thanks. I was thinking that one of the other wires in those components needed to be grounded somewhere but I’ll try the fuse thing tomorrow.
 
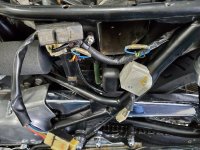
This isn’t my bike but this is what I did. I will add that I am running an aftermarket light strip with running/brake/turn signals all in one also.
 

Attachments

  • 53552D6F-B8CE-4848-91B2-21B0D146394B.jpeg
    53552D6F-B8CE-4848-91B2-21B0D146394B.jpeg
    211.3 KB · Views: 225
Hello Link94. Wish I could contribute more as to why your fuse is blowing. I don't think its because of the removal of the light checker and or the RLU and jumpering. My own 79 has no neg symptoms of this mod yet. I've only test ran it 3 times, and yet to have the tail light wired in tho.
I did experience a main fuse blowing years back on a 78E which seems to have been Rectifier/Rotor related? Yet unproven there as well.
Good Luck, -R
20200313_124640.jpg
 
No worries thanks for your input I’m hoping to chase down the issue tomorrow starting with a bad fuse holder since I’m not getting power across my main fuse.
 
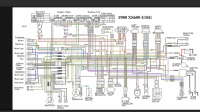
So after looking at my wiring diagram closely it looks like the appropriate jumper connections on the reserve lighting unit to restore power to the headlight would be blue/yellow to yellow instead of blue/yellow to blue/black which is what is jumped right now. Maybe that is what is causing my main fuse to blow...I’ll find out tomorrow.
 

Attachments

  • C1C173D3-EBF3-4D1B-8DB9-F7E0562B3AD9.png
    C1C173D3-EBF3-4D1B-8DB9-F7E0562B3AD9.png
    538.2 KB · Views: 204
No, blue/black to blue/yellow is correct. Here's a link to the page we've all followed for years .....

http://www.excess650.co.uk/tips & tricks.htm

Study your wiring diagram carefully and you can see those are the correct wires. The blue/black is headlight power coming out of the safety relay. From there it feeds the instrument lights and also feeds into the RLU. Inside the RLU, it gets transferred to the blue/yellow which sends it up to the hi/lo switch and from there, on to the headlight.
 
I doubt this is the issue with your bike Link - but another source of shorts & blown fuses are the turn signal stalks.

If you look at each of the four turn signals, they are mounted with a 2-3" piece of hollow threaded rod. The power wire for the signal light passes through that hollow rod - and the entrance to the hole may have a sharp burr which can, over the years, cut through the wire insulation leading to a short circuit.

On my '76 Standard (the redoubtable Lucille :yikes: ), I got her running and everything was working perfect - and then about two weeks later, the fuse would blow every time I signaled a left turn. Right turns were OK - just lefts. I found that the left-rear signal wire had rubbed on that little burr - and it was shorting out whenever power was applied to the signal. Since the '76 has only one fuse, it knocked out the entire bike. The cure was easy: just disassemble each signal stalk and de-burr both ends of that piece of threaded rod with a suitable piece of emory cloth or sandpaper. The whole shebang took about an hour - an easy two-beer job.

Why does this happen? Well, aside from the burr (which I found on each end of all four of my signal stalks, incidentally), some people say that these bikes vibrate...a bit. ;)
 
Thanks for the heads up man I got home from shift this morning and it looks like the issue wasn’t any of the things I thought it was haha I had power across my main fuse and took a look at the alternator and one of the springs and little brown pieces behind the metal clamp that holds the brush assembly together were sticking out and touching the aluminum I imagine this is why I was frying main fuses like they were in the microwave with nothing but the ignition plugged in! I’m gonna clean those brushes and possibly replace them and see if that fixes my issue.
 
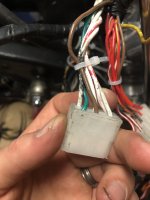
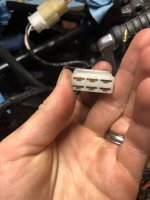
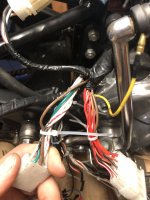
I have power at my head and tail light! I narrowed down the faulty connector causing the short but haven’t opened up the harness to check upstream for a short yet. Right now I have the ignition/alternator/tail light/headlight/blinkers plugged in with no short but when I plug in the connector in the picture boom goes the main fuse instantly. Anyone know what this connector leads to? I ran out of time to chase it till tomorrow.
 

Attachments

  • 0A0E10C8-7E04-4B1F-8DE0-E511C781F0FD.jpeg
    0A0E10C8-7E04-4B1F-8DE0-E511C781F0FD.jpeg
    121.3 KB · Views: 279
  • 9F82466C-94A7-440D-AFA4-A01BA255625D.jpeg
    9F82466C-94A7-440D-AFA4-A01BA255625D.jpeg
    114.6 KB · Views: 201
  • C5784E28-11F1-4053-A422-D85C2F6D05AA.jpeg
    C5784E28-11F1-4053-A422-D85C2F6D05AA.jpeg
    168.7 KB · Views: 193
I took the one out that looked incorrectly installed and it didn’t look damaged but I removed the other one as well and sprayed them with electric cleaner and reinstalled them and connected both connectors coming from the alternator along with the solo yellow wire with no main fuse blown until I plugged in that connector.
 
It looks like it has a lot of the same color wires as the reg/rec I’m gonna strip the harness tomorrow and see where she leads
 
Check for shorts in your brushes. I believe that connector goes to the alternator. The other thing is a short on the brushes could destroy your solid state regulator. I believe the tech section has a test procedure for the regulator.
 
Copy that I don’t really know how to tell if the brushes are good or not but I can tell they’re old so I’m gonna get some coming regardless and hope that’s it then next step learn how to test the regulator.
 
Copy that I don’t really know how to tell if the brushes are good or not but I can tell they’re old so I’m gonna get some coming regardless and hope that’s it then next step learn how to test the regulator.

Its always good to have a spare set of brushes with you (these danged things always seem to fail in the middle of nowhere with a girl on the back....at night, in the frickin' rain...the night before thermo examination - DAMHIK) - but before you change them, have a good look and get a ruler out.

The better-made brushes will have a line scribed on them across one or two of the sides at right angles to the long axis. That line is a wear limit indicator (you can see it on the lower brush in the photo below adjacent to the "3" on the scale) and as long as the brush is longer than that, they are OK to re-use. I think the limit is 7 mm (or about 5/16") - and if you can see the line plus a bit, just polish up the end with some fine sandpaper and stick 'em back in.
tzFW1xutuNyWt5j4-PhWDqag7f4RRgnyl3KjH80kR&usqp=CAU.jpg

You should also clean the two concentric slip rings on the alternator rotor while you are at it.

I haven't had to replace the brushes very often on my bikes these days. I just check them at the beginning of every season and as long as they are well ahead of the wear limit, I reinstall them. However, I had a 1975 XS650B back in the 70's when I was a student and that thing chewed brushes like clockwork about every 6-9,000 miles (and I rode it A LOT). I suspect that the alternator slip rings were rough - but honestly, I never thought to look. I just started carrying brushes and a screwdriver and changed them whenever the bike became hard to start.

One other thing - DO NOT fall for the PMA trap as a means of eliminating the brushes. Those systems are expensive and do not seem to stand up well and a lot of people have had a lot of frustration with them. By the way, PMA stands for Permanent Magnet Alternator <I think> and they are the norm on modern bikes - but the aftermarket XS650 units don't last.
The only real upgrades to the existing charging system that might be useful are:
  • a modern voltage regulator and/or rectifier (the rectifier lives on the underside of the battery box and is often corroded and ruined by a leaking battery). I use a combo rec-reg unit but a lot of folks buy separate ones and they work just fine too (search on the forum for how-to's)
  • a re-wound alternator rotor - and the best choice by a country mile is our own Jim - the forum guy with the WW-2 American army helmet. Jim has built his own tooling to clean and rewind XS650 rotors and when you get one from him - it WILL work perfectly. He has a thread on the forum - his prices are reasonable and his work is simply ....perfect.
 
Last edited:
Back
Top