-
Enjoy XS650.com? Consider making a donation to help support the site.
XS650.com receives a small share of sales from some links on this page, but direct donations have a much greater impact on keeping this site going.
You are using an out of date browser. It may not display this or other websites correctly.
You should upgrade or use an alternative browser.
You should upgrade or use an alternative browser.
Camchain help
- Thread starter Yama
- Start date
-
- Tags
- engine rebuild

Yama
Jason
Yama, it isn't as accurate as working with a dial indicator and degree wheel, but here's a procedure that will tell you approximately where you are on cam timing. First jam a line in the hole in the crankshaft, draw the line across the center of the camshaft, and rotate the motor until the notch is parallel to the line. Then drill the center hole in a cheap plastic protractor to accept a screw, wrap the screw with tape, and push the screw into the camshaft hole--you're not looking for a tight fit, you just want the screw centered in the hole so that you can tell about how many degrees the rotor mark is from the TDC mark. That's your approximate timing error.
Yama
Jason
Since there is no way for me to get the mark exactly in line can I close up the head, getting it as close as possible and adjust the timing elsewhere, like the advancing unit if I use the dial method to find TDC or does it not work that way? I guess what I need to know is how would one of you more experienced mechanics deal with this situation. I want it to be dependable and run properly since I'm going to all this trouble to rebuild it. All internals are in great shape. I found out after I ripped it open the previous owner did an overhaul and the pistons are 1st over and in great shape. I replaced the rings, valve job, new gaskets and new cam chain. I should have taken note where the mark was before I took it apart because it ran before, rough and low compression, leaked oil, but ran.
You're confusing camshaft timing with ignition timing. Positioning the camshaft controls its position in relation to the crankshaft; you're trying to get valves to open and close at the right time. You can't compensate for error there by playing with the ATU, which advances and retards the spark. Just pick up a cheap transparent protractor, look through it at the alternator marks with the notch set straight-up with a line, and find out about how far off you are at the crank. Then make your decisions.
Brian902
XS650 Junkie
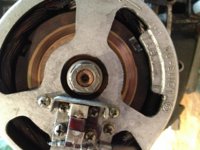
Looks like you are off by one tooth.
Your picture shows you are using the correct TDC marks on the rotor. That's good.
So with that mark lined up and the cam chain tight on the front side rotate the cam one tooth so your notch mark is at the 12:00 o'clock position. On the opposite side at the 9:00 o'clock position you should see the punch mark in the sprocket aligned with the gasket surface of the head.
If your head is not seating enough because the head bolts are not tight, which you can't do until you put the top portion of the head on, you can rig up some spacers, like a socket, on the head studs and gently tighten down the lower portion of the head just so you remove a bit of the space between the cylinder and head. Normally not needed but if you are concerned, try that.
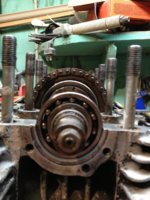
Punch mark in picture is there at the 9:00 o'clock position, near end of cam is the right end or Advance unit end with pin hole for advance unit alignment, far end is the points end or left end of cam with notch for points.
Viewed from the right end, when the alignment pin and points notch are in the up 12:00 o'clock position and the sprocket punch mark
is at the 9:00 o'clock position and aligned with the gasket surface, cam chain tight on the front side, TDC mark aligned, you will have the cam timed properly. This is another way to crudely verify that the cam sprocket is at least close to being installed on the cam properly. If it was ever removed, dial gauges and degree wheels are the only true measure of accuracy.
When done, rotate the engine slowly one full turn on the crank, re-align the TDC mark, and re-check your marks.
NO NO NO, you can't put the engine together unless this issue is fixed.
Hope this helps.
Your picture shows you are using the correct TDC marks on the rotor. That's good.
So with that mark lined up and the cam chain tight on the front side rotate the cam one tooth so your notch mark is at the 12:00 o'clock position. On the opposite side at the 9:00 o'clock position you should see the punch mark in the sprocket aligned with the gasket surface of the head.
If your head is not seating enough because the head bolts are not tight, which you can't do until you put the top portion of the head on, you can rig up some spacers, like a socket, on the head studs and gently tighten down the lower portion of the head just so you remove a bit of the space between the cylinder and head. Normally not needed but if you are concerned, try that.
Punch mark in picture is there at the 9:00 o'clock position, near end of cam is the right end or Advance unit end with pin hole for advance unit alignment, far end is the points end or left end of cam with notch for points.
Viewed from the right end, when the alignment pin and points notch are in the up 12:00 o'clock position and the sprocket punch mark
is at the 9:00 o'clock position and aligned with the gasket surface, cam chain tight on the front side, TDC mark aligned, you will have the cam timed properly. This is another way to crudely verify that the cam sprocket is at least close to being installed on the cam properly. If it was ever removed, dial gauges and degree wheels are the only true measure of accuracy.
When done, rotate the engine slowly one full turn on the crank, re-align the TDC mark, and re-check your marks.
NO NO NO, you can't put the engine together unless this issue is fixed.
Hope this helps.
Attachments

Last edited:
Yama
Jason
Griz, thank you for that in depth explanation. I see where I was confused and that makes sense because the cam can only turn in relation to the crankshaft, so thanks to your explanation I see I must get those two aligned exactly. Brian, yesterday I as thinking that very thing with spacers and tightening everything a little more and seeing where everything is in relation at that point. I didn't do it yet because like all desperate thoughts wanted to give it a little thought, I didn't know if doing something like that would land me in a worse predicament, like a stripped stud. But I do think, now that someone else had that same thought, I will give it a try tonight. Thank you all for your help and I will keep you updated as to how or if the problem gets fixed.
Last edited:
Looks like one tooth to me also. Work the chain one tooth right as you are looking at it. If I had a choise, a bit advanced at this point would be ok. As the new chain stretches a bit it will get a bit longer, this bit of length on the front side will let the cam retard a bit.
As I said before a degree or three won't have a great effect on the way it runs or the life of the engine.
Leo
As I said before a degree or three won't have a great effect on the way it runs or the life of the engine.
Leo
Brian902
XS650 Junkie
Yama,
When I mentioned using the spacers and head bolts, I'm only talking about 10 ft lbs on a couple of studs to remove the slack and hold things together for the alignment and testing the marks after rotating the crank.
And can you see here where you are off by one tooth. If that notch was straight up you would be good to go.
Attachments
Yama
Jason
Cooler heads prevail !!! When I took a step back and realized I must be making a mistake in lining up the mark, it worked. In my frustration I kept moving more than one tooth at a time giving the appearance of it being the engines fault. I locked the rotor in place so the mark would stay put and determined where to move the chain to. When I put the tensioner in it the mark was as vertical as it could be. I feel dumb that I kept making the same mistake when moving the chain, but when your frustrated I guess that happens. Thank you to all who have given me advice and telling me in a nice fashion that it was me and not the engine that was at fault.
I am Carbon
shade tree mechanic
Yama Righton Man!
I figured You would get.
These Guys are perdy helpfull.
I figured You would get.
These Guys are perdy helpfull.
Brian902
XS650 Junkie
Camshaft alignment:
Now before you put the top on, temporarily put the two end caps on to make sure you have then end clearance between them and the cam bearings the same so the cam is centered in the head. Otherwise you will be re-aligning after installing the head because one of the end caps will not tighten properly, leaking oil, or might crack the end cap.
You can do the same thing by measuring how far each end bearing is in from the end and make them as equal as possible. Then test the end cap fit.
You'll only have one side of the head to work with but the end cap will still give you a good measure if held flush to it's mating surface.
Yep. Not only that, but a misaligned camshaft will cause premature chain wear and allied evils. There are two steps to this. 1: Make sure that cam bearings are on all the way to the stop. 2: Measure the gap between the edge of the outer bearing and the edge of the bearing journal on both sides with the depth gauge of a decent caliper, and make sure that the measurements are equal. And congrats on your perseverance, Yama.
pedronx2k
instagram @dro_sr
im at this cam/chain stage now...good info guys! ...love this place!