Clutch adjuster

Geoffrey Straet

XS650 Enthusiast
Messages
50
Reaction score
31
Points
18
Location
Brussels
IMG_0695.PNG IMG_3161.JPG IMG_3164.JPG Hi all and happy turkey day,
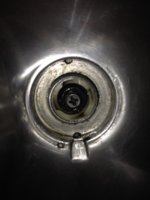
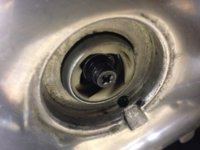
I wanted to adjust my clutch today but did not really know what was wrong, the procedure looked quite easy but it seems lîe something is missing. Photo 1 shows the adjuster sçrew and lock nut as it should be, from a how to video, the second photo is my bike and both photos don't look the same, looks like a part is missing but I can't figure what. How do you get to that lock nut???
Plus the assembly seems to be turning nicely in the video, mine doesn't...
 
yours looks to be missing the lock nut....it's a special type nut.. thin.... ya could use a standard nut to get you by.. but it would limit adjustment.... w/o the lock nut.. adjustment may creep..move... worst case.. get a nut... take your time and grind it thinner.. dress the grind marks...
 
The lock nut is there but I can't reach it. The rim of the housing is sticking out while in the video it looks like being pushed deeper inside...
 
.. remove the side cover.... rotate the screw adjuster assembly out.. prior to do'n so..note position of the lever end on the inside.... you can mark the spot with a pen on the inside of the case.. it helps align the assembly when it comes time to install it.
then carefully place the assembly in a vise and carefully break the nut loose... Beware.. these units are weak..soft metal..plastic.... doesn't take much to deform them.. the nut is known to be stuck.. difficult to remove.
I use a section of cardboard and as I remove the allen screws that secure the side cover to the engine.. place them in order of removal.
 
I think your worm is assembled wrong. When correct, the inner steel male part of the worm should be out flush or nearly flush with the outer plastic part, not inset so much like yours. Also, the adjusting screw shouldn't protrude out past the lock nut by much more than a thread or two. Yours shows quite a few threads. It should look like this .....

ovxwlfh.jpg


Take the cover off and disconnect the clutch cable from the worm arm. Turn the worm arm in until it is fully seated into the female plastic part of the assembly. It should look like this .....

r54KF8L.jpg


The male part of the worm has 4 "swirls" on it. You can start threading it into the female part in one of 4 positions but only one of those will give you the proper final position as shown above once it is turned all the way in. It will be easy to tell the "wrong" positions. The worm arm will be 90° to 180° off from where it should be when screwed all the way in.
 
Thanks for the tips! I wonder why the female worm and the housing stick out so much from the case. Is it pssible that this is not the right part?
 
Ok, just watch a how to on youtube, the female worm thread seems to have been mounted inside out, that's why it sticks out so much, I' try to fix this. Question about the side cover gasket, do I need to change it whenever I remove the cover?
 
Yes, now that I look at it closer, your female worm part is installed backwards, lol. That tin shelled part should face into the case. No, you don't need to change the gasket if it isn't broken. It doesn't seal any oil in, just helps keep water out of the alternator area.
 
but check that the ball bearing is still inside

Geoffrey: the ball bearing to which Gary refers is visible in 5Twins photo. The curved yellow-coloured arrow underneath the word “angle” is pointing directly at it - you can see the silvery surface of the ball down inside the worm mechanism.

Those balls are sometimes stuck in there very securely but other times, they fall out and roll away without provocation, never to be seen again.

Anyhow - the ball pushes directly on the end of the clutch push-rod and it certainly needs to be there for the clutch to functIon correctly.

Pete
 
Last edited:
Hi, I took out the assembly last night and it looks in pretty bad shape, a lot of play in the lever, the pin in broken in, the ball bearing still inside the female worm but there is no retainer at all, it comes out from both sides, is it normal?
Very dirty, with a lot of grease and dirt, mounted the wrong way. I'm thinking about replacing the whole assembly, it's not that expensive..
 
I'm thinking about replacing the whole assembly, it's not that expensive..

Others may differ, but given the general concerns about the XS650 clutch actuation mechanism and its operation and the fact that your’s appears to be fairly messed up....that might not be a bad idea.

Other views?

Pete
 
sure but............
is a "good used" or a mikesXS Chinkon the better course?? IMHO If you buy new, don't kid yourself, no matter where you buy, there's prolly only one vendor making these
 
..... and the replacements differ slightly than originals. The "swirl" on the worm pitches a little differently. Parts from the replacement and an original won't "mix and match". You have options for scrounging a replacement. The female plastic portion of the assembly was used on several other models, and that's the part that usually needs replacing .....

http://www.boats.net/parts/detail/yamaha/Y-371-16396-00-00.html

The complete "1L9" unit from an XS400 is a viable alternative and with a minor mod, works quite well. I've been using one on my 650 for a couple years now and quite like it .....

SpVzwFI.jpg


aAWC74O.jpg


If you watch eBay, you can usually find nice, complete units for $20 or less.
 
I have one vendor here in the Netherlands that sells the whole assembly for 40$. I cleaned mine the best I could but it really doesn't look tight enough to do the job, parts of the assembly are not really available separately...
Another question, how do you lubricate that thing? Would white grease do it?
At least I know now how this assembly works, makes me a more educated rider
 
I use the heaviest grease I've got, Sta-Lube Premium Red. I wouldn't consider white lithium grease to be heavy duty enough. I only use that for light duty stuff like my key locks/switches (tank, seat, ignition) and for plastic to plastic or metal spots (throttle tube on the handlebar).

Take the inner metal male part right out of the plastic female part. Fill the grooves on the male part with grease. These correspond to the high spots or "ridges" in the female plastic part. Fill the grooves in the plastic part with grease. They correspond to the high spots on the metal male part. Screw the two back together. All the excess grease will be forced out. Wipe it away. Now you're all set, the worm is totally lubed and packed with grease.
 
There's no way this can disangage the clutch! Pulling the lever should push the thread outwards, not inwards! Am I right?

Hi Geoffrey,
the clutch actuator uses a multi-start LEFT-handed tread so it's shaft moves inwards towards the clutch as the lever is lifted.
The thread's handedness won't be reversed if the plastic nut is installed backwards.
 
Yeah heavy grease, I like the black molybdenum based stuff for nasty environments like here. Pay attention to ALL parts of the system, the lever/perch needs to be R&R'd worn out pivot is normal. The cable is often junk with rusted strands making for very poor action, can be much different under load than when "free", cable routing; few, gentle bends or it's going to fight you.
 
Indeed - in my experience, the whole XS650 clutch system is a bit finicky, but it can be made to work well - if you pay attention to the details.

Pete
 
Back
Top