condensors capacitance & arcing at points

cbuckle

XS650 Enthusiast
Messages
40
Reaction score
4
Points
8
Location
Ontario, Canada
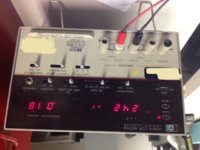
Hello, I checked my condenser and it is measuring 262nF and 264nF to ground (off of the black lead to ground cable [completely isolated] but I continue to get arcing at the points on my 74 650xs. I also get infinity ohms when measuring the resistance(a good thing). It is the first time the bike has run now in 30 years. I have read that this arcing is most likely due to a bad condenser. Can someone please tell me what value I should have on these condensers/ capacitors? I have access to spare electronics parts and was thinking of putting two 470nF capacitors back to back (making my own condenser)... any thoughts? my point gap is ~ .014"

thanks
 
Deep subject, the "correct" capacitance varies with ignition coil used and other circuit components. Failed condensers can be sneaky.
Two tests are need resistance, then capacitance. an ohms test should show a flow then increase to infinite resistance, easier to see on an analog, needle type, tester.

Some good reading here. With a couple of good function tests.

http://www.smokstak.com/forum/showthread.php?t=21175
 
The book value for the condensers is 220nF, mine are in the 240's. These things need to withstand hundreds of back EMF volts, and engine heat, hence the large size.

You can do an impromptu leakage test using the highest resistance test on your meter. Short the cap first, then do the resistance test. Watch the meter show low resistance, slowly climb, then stop at infinite. It's charging the cap thru the high impedance ohms test. Shouldn't take more than 2-3 seconds. Much longer could be leakage.

Some tiny sparking of the points is normal, but can be made worse if the points are dirty/pitted.

I use a special meter to ensure that point contacts are below 0.1 ohms, preferably below 0.05 ohms.

View attachment 41253

There's an interesting tutorial out there that discusses optimal matching of condenser to ignition coil. Fairly involved, requires special equipment. It's on my bucket list...
 
Thanks for the advise. Its good to hear that I may see some tiny sparking. I have access to a fancy test meter HP 4261A which tells me it is good 'on the bench'

I will be checking my points for dirt/sand. Thanks
 

Attachments

  • cap test.JPG
    cap test.JPG
    44.8 KB · Views: 298
All that fancy, expensive testing equipment makes a Pamco seem cheap by comparison, lol.
 
filed/cleaned my points then re-gapped my point to .016". Attached is a video of the arcing I'm getting. Let me know if you think this is tolerable

 
That's about right for filed points. Tolerable.

I'm one of those fussy, perfectionist cheep bastards that disassembles the points and polishes the contact faces with a Dremel and Craytex wheels. Then cleaned to that below 0.05 ohm reading. So, mine barely arc at all...
 
That's about right for filed points. Tolerable.

I'm one of those fussy, perfectionist cheep bastards that disassembles the points and polishes the contact faces with a Dremel and Craytex wheels. Then cleaned to that below 0.05 ohm reading. So, mine barely arc at all...

Pardon my ignorance, this is my first time ever playing with a vehicle with points, but deal with similar "breaker" style contacts on other things. Do you notice the points last longer when polished and at a lower resistance? It seems like if it arcs less it'll erode the points slower?
 
...Do you notice the points last longer when polished and at a lower resistance? It seems like if it arcs less it'll erode the points slower?

Yes, and the reasons can be complicated. Arcing will occur when there's sufficient voltage to bridge a gap. The gap can be air, from normal points opening, or impurities that interfere with conduction. Add heat from the arc, a little microwelding here, a little oxidizing there, and things start going downhill.

There's also the critical points opening speed, where you're trying to open the points gap faster than the coil's back-EMF and condenser can bridge that gap. So, a worn points cam, that opens the points too slowly, can lead to arcing.

Intermittant conduction at the moments of make/break contacts occurs within all switches. A known and studied phenomema, caused problems with early keyboards, solved with 'debounce' circuitry...

Awesome, thanks for the information! What I was expecting but I've never polished contacts in similar application, this might change.

It's not just switches that need debounces... but that's another subject, and not even really motorcycle related, lol.
 
Those sparks on the vid are not bad at all, your OK. On new points before you install them hold them up to the light and make sure the two contact surfaces are perfectly parallel all around when closed. You want them perfectly flat against each other. You can bend the movable arm to tweek it into place. Most new sets are not that good. Also after a few hundred miles check the point gap & timing on new points as the ware blocks bed in and can change the settings a bit.

When I was young I learned from a couple old racers about tuning points systems, those guys took it seriously.
 
Nobody has mentioned the use of a dwell meter for setting the points gap. It's the most accurate way and the only way to accurately set used points that have some pitting. I haven't stuck a feeler gauge in a points set in years, lol.
 
To start a new Thread or to continue on? Now that I'm happy with my electric I figure it's best to see how well I can get this bike to idle. With a cool bike my RPM's seem to be below 1000, I noticed after doing some timing checking (and the bike is warming up) my RPM's are speeding up ~2000...
I figured since the bike runs I don't need to back pedal and set 'static timing' as I will properly set it with a timing light. Attached are a couple of video's. I'm wondering because the RPM's are increasing is the advance increasing? Should I be stopping the weights from opening? Is it a good idea to look at the advance assembly with a timing light or could it be misleading. I've read the service manual on how to set the right cylinder ignition first, then the left

Hoping someone will watch the video's and tell me I skipped a step.
1974 Yamaha xs650 Right cylinder timing........
1974 Yamaha xs650 Left cylinder timing.......
1974 Yamaha xs650 Advanced Assembly with Timing light ...
 
Back
Top