Cam rod and timing points

cbuckle

XS650 Enthusiast
Messages
40
Reaction score
4
Points
8
Location
Ontario, Canada
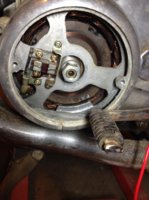
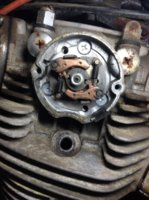
First time former, I have a 1974 TX650A with 2500 miles which has not seen a spark in 30 years, I've read a pile of information on the bike and still learning. When cleaning the points and cam I noticed the cam has a keyway cut in it, but the 'cam rod' on the threading does not have a keyseat. After losing off the nut I was able to freely spin the cam.

To properly set the timing now should I use the rotor/stator at TDC on the right cylinder compression stroke, then adjust the CAM to where I first get a short on the right cylinder point? Or use F marker instead of TDC?

I also read on how to make a spark by spinning this CAM by hand. Is this a good idea to confirm spark and point gaps setting?
http://www.xs650.com/forum/showthread.php?t=11271&highlight=cam+rod

Many thanks
 

Attachments

  • Points.jpg
    Points.jpg
    162.6 KB · Views: 2,336
  • rotor-stator.jpg
    rotor-stator.jpg
    142.5 KB · Views: 1,088
  • IMG_3466.jpg
    IMG_3466.jpg
    156.5 KB · Views: 1,593
Welcome to the forum, cbuckle.

Sounds like you're missing the round dowel pin (part# 8) that fits the points cam slot (part# 36).

70-73-Camshaft.jpg

The thread in that link discusses spinning the timing/trigger rotor for a Pamco ignition.
Doesn't apply to your points ignition.

A search on "advance shaft pin" will get you relevant threads.

Here's timing info for your points ignition:

IgnPoints01.jpg IgnPoints02.jpg IgnTiming.jpg
 
Last edited:
Be aware that there are several (3 total) of these locating pins in the system, locking all the advance rod components in the proper position so the timing is correct. There is another in the little disc on the other side that ties the rod to the advance unit. When installed, that pin and the points cam pin must align, point in the same direction, or the timing will be 180° off .....

AdvanceRod.jpg


There is also a pin for the advance unit itself, locking it at the proper position on the cam. From your pic, the advance side looks OK, but if you can't get it timed correctly, that would be something to check.
 
5T and 2M, thank you for your quick replies. would you believe I found the pin on the shop floor? maybe I will get to setting these points sooner than later. if I don't have a short with the point that matches to the compression cylinder stroke, would you assume I'm 180 degrees out?
From the pics that I have seen my felt pads seem to be in rough shape.
Would you recommend flipping the pads, trimming them, or buying fresh? I'm still in the stages of trying to even see if this unit will run.
thanks again!
 
I'm not sure what you mean by "a short with the point". Just make sure the locating pins on each end of the advance rod point the same way. It's possible to assemble things with them pointing opposite to one another. That would throw the timing off 180°.

As I said, from your third pic, the advance side looks correct. You can see the pin slot at about the 12 o'clock position peeking out from behind the retaining nut. Just make sure you assemble the points side so it's pin points the same as that, so it matches it. There are also alignment marks on the advance side, a little slash mark on the disc and on the advance unit. You can see them in your pic at about the 8 o'clock position. They should align and yours do.

CorrectAdvanceInstall.jpg
 
You adjust the points for gap at any place the points are open. Just turn the engine and watch the points cam. When the lobe opens the points you adjust the gap. Turn another 180* and the other points are open, adjust gap.
Turn till the rotor mark lines up with the F marks. At this point one cylinder is coming up on compression. To find which one remove the valve adjuster covers. The side with both valves having free play is the side that is coming up on compression. The side with a tight exhaust and loose intake is on the exhaust stroke.
If your points are wired right, the right cylinder gets fired by the upper set of points, the left the lower.
Turn engine over till both valves on the right cylinder are closed and coming up on compression, Watch the timing marks, Stop on the F mark. Hook up your timing toll. A light bulb or ohm meter. With the two screws that hold the full base plate loose turn the base plate till your timing tool indicates the points just opened.
Turn engine over 180* to the F mark. The left side should be coming up on compression and you can set the left set of points. To adjust these points loosen the two screws that hold the half base plate to the full base plate, adjust to indicate the points just opened.
Your done.
The repair manual, which you should have explains this with pics to show you how.
Leo
 
Thanks for the help with the valves XS, originally I was going to turn the engine over with my thumb on the spark plug hole and the one that pushes out the air would be on the compression stroke. I like the idea of looking at the valves as I have not done that. Hopefully Tuesday I will get back on this. Yes, I do have the service manual.
 
cbuckle, welcome, are you in the Golden Horseshoe or north of 7? I am watching this thread for inspiration. Setting points and timing is next on my engine rebuild list for my '76.
 
You are following the very basic guidelines for determining TDC on a motor, any motor, but you needn't do that on your XS if you just learn what the factory marks mean. Granted, not all factory shop manual stuff is right, but this basic stuff is. If you really want to worry about something, concern yourself more with matching the points gap on each set of points to one another, and then matching the idle timing fire point on each cylinder. This is quite the chore, and quite the hair pulling experience.

But it can be done. You need good tools though. You need a timing light and you ABSOLUTELY need a dwell meter. If you elect to live and SUFFER with the factory dual points system, you need a dwell meter to set the points accurately. I know, others will argue and disagree with me. I've encountered this on other sites for other bikes that use points. For as knowledgeable as they think they are, they just don't fully understand the workings of a points type ignition. Or more correctly, they don't understand how used, pitted points can't be gapped with a feeler gauge any more.
 
Timing Headaches continue being way too advanced. I have my point gap set to .015”, I have confirmed the pins on the advanced rod are lined up, in the proper position (shown above), I have removed the advanced assembly to confirm I’m at TDC on my Camshaft (which also lines up with the TDC mark on the rotor). my ‘points base plate’ completely rotated counterclockwise in order to retard my timing… but I am still way to advanced… I figure at this point I am ~ 19 degrees advanced when at idle or when setting the timing statically


What I have done is used a die grinder on the base plate so I can further rotate the base plate but I feel this is not the right solution. Attached in yellow is the minimum advanced I could get with the factory base plate and the red is where I am able to move it now. But this is not enough movement.


I’m looking for a reason why the timing could be so far off. If my Camshaft is at TDC and lines up with the rotor marks. Is it possible I jumped Cam chain jumped a tooth? Could my Cam lob be wrong? Any suggestions would help, Thanks
Points modified.jpg rotor-stator modified.jpgpin hole.JPG
 
The slot in your points cam is pointing toward 10 o'clock. At TDC, it should be at 12 o'clock for the right cylinder, 6 o'clock for the left cylinder...
 
Sorry, that was an old photo. I was just using it to show what I cut away on the base plate. It does point to 12 o'clock for the Right cylinder at TDC
 
You can't set your idle timing unless the bike is at idle (1100 to 1200 RPM). The advance begins by maybe 1500 to 1800 RPMs. If you're sitting at 2K, the ignition is already part way into it's advance curve. Turn your idle speed down and maybe your timing will better match the marks.
 
I watched your advance video in your other thread and 2M is right. Your advance unit is jumping around. I don't think it should be doing that. At the end of the video you show the timing marks. Your timing is jumping around too, from full advance to retarded. Have you serviced (cleaned and greased) your advance rod so it can turn back and forth easily and freely? It looks like it may be sticking.
 
I will look at the advance rod. Any advice on what to use to clean it? Just slide it out and oil it up? Also when I check the timing with the engine off it is still too advanced
 
A bore or bottle brush and your choice of solvent followed by rags will clean the inside of the cam.
A rag and solvent for the rod.
I use a lithium base cv joint grease to lube because I have it. Other lubricants may be more suitable.
 
If the advance rod is sticking at full advance or even partial advance, you would see an incorrect timing reading even with the motor off. Well, the reading isn't actually wrong, it's showing the timing for whatever position the rod happens to be stuck at. It's not showing the correct idle timing because the rod hasn't returned to that position. I also noticed in your advance video that the advance weights aren't moving, not flinging out due to the centrifugal force. They may be frozen on their pivot posts too. After sitting for 30 years, the whole advance unit and advance rod could be frozen up, lol.

Take the cover off the advance housing and try to rotate the advance rod by hand. It should rotate about 1/8 to 1/4 turn and then snap back smartly to the fully retarded position when you let it go. Also try lifting the weights up off their seats to check that they rotate easily on their pivot posts and out to the stops. Those pivot posts and the advance rod have to be serviced occasionally and kept lubed. This is one of the first things I do when I work on one of these. They are some of the most neglected parts on these bikes. The advance rod and most of the advance unit itself are just raw steel so will rust up if not kept "wet" with lube.

When you remove the advance rod, you will find two bushings in each end of the cam. The inner one is just a plain straight bushing. The outer one, however, is rather special. It has grooves cut into it's I.D. These are there to retain grease and keep the advance rod lubed for a very long time (years) .....

GreaseGrooves.jpg


Clean any old hard grease out of there and pack them full of fresh stuff .....

GreaseGroovesFilled.jpg


Lightly grease the entire length of the advance rod before putting it back in. This isn't for lubing the rotation but rather to protect the rod from rusting should any moisture get in there. For the advance unit itself, I wipe the whole backing plate down with a Q-tip dipped in oil. Don't use a lot, just make it look "wet". Too much will just fling off all over the inside of the housing as the unit spins. For the weight pivot posts, the first time I service them I do remove the weights, clean everything, then lightly grease the posts and re-assemble. After that, I keep them lubed by occasionally applying a few drops of foaming chain lube to each post. I do this after a ride when the motor is hot so the lube penetrates better. I wet the springs down with it too.
 
First off, you guys are like Jedi Masters... I have so much to learn from all your wisdom, thank you! You guys were correct! the Advance was sticking and runs a lot better now. I still think I am a little too advanced but I should be able to reduce it by lessening the point gap a little more. I am also still running on the modified points plate to make it more retard. When I pulled the Advance rod out it was clean, but dry...same with the assembly Advace Rod.JPG Advance assembly.JPG

Also are some videos:
Advance before greasing
after greasing
and Left cylinder plus points after greasing (you can see slightly that I have modified the points plate )
Also the advanced after greasing with the engine running

Please let me know your thoughts... I'm glad I 'figured' this part out before my vacation... it was driving me crazy
 
Now that looks better, sounds better too, smoother running. Yes, fool with the points gaps. If the points are used then near the minimum gap setting is often needed, sometimes even slightly below. Used points can develop pitting on their faces. The spark actually jumps between the pits. You can't measure the gap between the pits with a feeler gauge. The gap you are measuring and setting is actually bigger in operation because of the way the points fire between the pits. This is why a dwell meter works best for setting used points. There's no measuring, it "reads" the gap electronically.

The larger the points gap is, the sooner the lobe on the points cam will hit and begin to open them. This makes the points fire earlier or more "advanced".
 
Back
Top