Custom Aluminum Steering Damper for 70-73 XS1 XS1B XS2 TX650

Hi Jack, I swear that if I'd gone through all this hassle and frustration I'd have decided to cut my losses and have knobs turned up from 6061T6 aluminum bar stock. Then sought out a "Bro with computer mill" to have the triple tuning fork logo cut into them.

Geez first of all they look great as is. More importantly this is a great project that a fellow member worked his ass off on. I think your being unfair both to the original idea, (mine) and to Steve. It's not like the bike won't run, or handle well with these units. It's just that when you buy products online you never know the quality until you open the package. I like mine,and I'm happy as hell with it. I still have another back up plan to make this work, but even if it doesn't come out mirror like I'll still appreciate Steve's work and skill.
Jack
 
Yeah, cmon fred, spin up a few and see whats what . But i see you fred, alum billet would be better, but 2m found a good start with those castings..
Im not bangin you, and I understand your point. Starting from scratch would triple the price, and most of the billet stock would be at steves feet.
 
Geez first of all they look great as is. More importantly this is a great project that a fellow member worked his ass off on. I think your being unfair both to the original idea, (mine) and to Steve. It's not like the bike won't run, or handle well with these units. It's just that when you buy products online you never know the quality until you open the package. I like mine,and I'm happy as hell with it. I still have another back up plan to make this work, but even if it doesn't come out mirror like I'll still appreciate Steve's work and skill.
Jack

Hi DrofBBQ,
hey! I ain't knocking nobody!
Kudos to all concerned in the project.
It's that I got frustrated just by reading about how all the skill and effort that went into the project was set back the way it was.
I can only imagine how pissed off the actual builder became when he got the parts completed and then found that the castings were too porous to take a good polish.
 
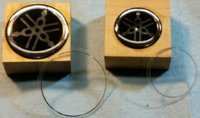
Two 3D tuning fork emblems arrived today, in 30mm and 40mm.
Difficult to photo, reflective innards. They're flexy, have a rubbery feel.
This'll take some contemplating and planning.
Thinking of going with that 'brushed' finish, coated in clear.

DamperKnobs22.jpg
 
Here it is finally came in late today and just ran it for about thirty seconds. It sounds like a watch so quite, no viberation what so ever. Love it.
New Buffer ..jpg
 
Soon, you'll be able to answer the greatest mystery:

"How long does it take to polish off an 8 pound brisket?"
You know what makes that more funny to someone from the Midwest? Very few people around here knew what brisket was until I started selling it. The first thing some one from the Midwest thinks when they hear brisket is cornbeef and cabbage. Here Ribs and Smoked Pulled Pork outsells brisket 5 to one.

Another topic I just got off the phone with the tech people at Caswell Buffing and Plating Company. And I sent them this picture.

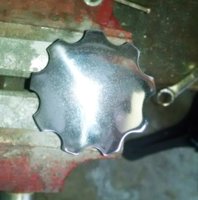
Damper knob .jpg

And I explained I had just sanded this completely smooth and then buffed it. He kinda laughed and said stop buying cheap castings from China. Then he went on to say they cast and as fast as they can they dump the knob into a water bath so it will cool. Never allowing for drying/finishing time. He said if they let them sit, cool, and mature for awhile the bubbles would all come to the top and be gone with a quick buff.But he said with the pinholes being small it may be possible to put a coat of good mag wheel clear on it and give that a light sanding and buff with the hope of the pinholes filling up with clear. He also said if you get it smooth again hand buff with very little compound and clear it....light sand...light hand buff it may look better. So those may be the choices. Ok my report for today is done.
Jack
 
Two 3D tuning fork emblems arrived today, in 30mm and 40mm.
Difficult to photo, reflective innards. They're flexy, have a rubbery feel.
This'll take some contemplating and planning.
Thinking of going with that 'brushed' finish, coated in clear.

Hi 2Many,
I got two similar emblems from the Local Yamaha store and mounted them on my bike's Standard tank. Gotta be at least 10 years ago.
Peel'n'stick & rubbery like yours but 50mm diameter and the logo and surrounding ring are chrome on a black ground where yours look to have a white logo and black surround.
I reckon that mine and yours are close enough to give a meaningful long term report.
Peel'n'stick onto new clearcoat, not clearcoated after installation, still stuck on as strong as ever and still look like new.
 
- - - The first thing some one from the Midwest thinks when they hear brisket is cornbeef and cabbage. - - - Jack

Hi Jack,
us ex-Brits know all about brisket but when you mentioned cornbeef and cabbage I went and Googled Colcannon.
Which led me to viewing all manner of other similar recipes.
Which is pure gastro-porn for a person who recently starved himself 60lbs thinner and is stalled at 10lbs above his target weight and two inches above his target pants waist measurement.
And at my age even the truism that losing 2Pi inches from the waist gives another inch available for deployment is losing it's appeal.
So damn you Jack, and the BBQ you rode in on!
And Saskatoon's annual Battle of the BBQs is coming up soon.
I'll check if any of the stalls offer a brisket dish.
 
..logo and surrounding ring are chrome on a black ground where yours look to have a white logo and black surround..

These are also shiny chrome on black, just tricky to photo.

..I reckon that mine and yours are close enough to give a meaningful long term report.
Peel'n'stick onto new clearcoat, not clearcoated after installation, still stuck on as strong as ever and still look like new.

Thanx, Fred. I was hoping for that...
 
The edges of the emblems taper down to a sharp edge, so had to remove about 0.015" from the edges to allow for flush mounting into recesses. The trimming also made them perfectly round.

DamperKnobs23.jpg

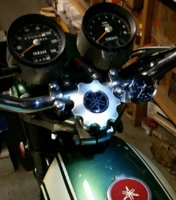
Two of the knobs were recessed, then all three knobs clearcoated. After a couple days cure, the emblems were fitted, and the shafts mounted. This is about as good as they will get. An original knob is on the left.

DamperKnobs24.jpg

Fitted the 'brush finish' knob to my XS1B to see how it looks.

DamperKnobs25.jpg
 
Back
Top