Engine Rebuild & Beautification (Shot Blasting)

bdholsin

XS Enthusiast
Messages
647
Reaction score
23
Points
16
Location
Coleman, MI
I've torn down my engine and I'm ready to order a bunch of parts, seals, etc. This will be my visual diary of the rebuild process.

I'm sticking with stock pistons and not going oversize as the current stock pistons are in good shape. I've cleaned the hell out of them and they are looking pretty good. Even got into the ring grooves and oil passages with pipe cleaners. There is absolutely no buildup or debris anywhere on them.

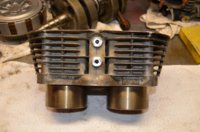
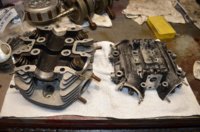
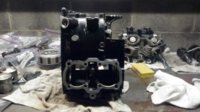
I've also made the decision tonight to get the case halves, cylinder block, head and head cover shot blasted to get rid of the awful paint that is half worn away. The thumbs below show their condition right now. I'll be spending some time in the pole barn with my scroll saw and band saw to make some covers to shield the surfaces that I DON'T want blasted.

Right now I know that I need new connecting rods, piston rings (I broke a couple of them), seals, cam chain, cam chain tensioner and guide.
1. The connecting rods (at the wrist pin) may be the source of my mysertious clatter when the engine is running. Maybe...I just don't know. I can clearly see that the copper coating is pretty much gone from my rod ends.​
2. The original purpose of this teardown was to replace the cam chain, guide and tensioner. I was getting shavings in my oil so I figured this would be a good time of year to do it.​
3. My goal is to have shiny aluminum on the outside when it is all said and done. I'm keeping my fingers crossed.​
 

Attachments

  • Cases Before 1.jpg
    Cases Before 1.jpg
    171.6 KB · Views: 314
  • Cases Before 2.jpg
    Cases Before 2.jpg
    154.4 KB · Views: 307
Last edited:
Few more pics for the diary.
1. The cylinder block - pretty dirty and unattractive.
2. Head and head cover - half the paint has worn off over the last 29 years. Going to go "naked" soon.
3. Pistons after quite a bit of cleaning/scraping and cussing.
4. With the exception of the head gasket, I am cutting my own gaskets (when necessary) out of gasket paper in an effort to save cost. I've found that a paper punch is perfect for punching bolt holes along the edge of the gaskets.
 

Attachments

  • Cylinder Block - Before.jpg
    Cylinder Block - Before.jpg
    183.8 KB · Views: 213
  • Head & Cover - Before.jpg
    Head & Cover - Before.jpg
    228.1 KB · Views: 261
  • Pistons.jpg
    Pistons.jpg
    146.3 KB · Views: 228
  • Sump Gasket.jpg
    Sump Gasket.jpg
    180.2 KB · Views: 219
Keep posting the pictures! Im interested in seeing the difference of before and after and might be something I will look into doing on my own.
 
Thanks Rogue. I'm making cutouts of the sealing surfaces so they don't get blasted. Case halves are done and I'm working on the cylinder block and head/head cover now.
 
Alright, so I've spent much of the day tracing patterns in 1/4" luann and cutting them out with the scroll saw. In retrospect, perhaps I should have gone with 1/2" birch plywood. The luann is pretty flimsy but it was only a few bucks for a 2'x4' sheet at Home Depot. Here are pics of the case halves, engine block, head and head cover blocked off. Now to see if my cousin will let me play with his media blaster.

Just a note...I'm holding the head and cover together with just the valve adjuster covers. I should probably through bolt it for a little bit more stability but I've made three trips to the hardware store already. I don't fell like another.
 

Attachments

  • Blocked Off 1.jpg
    Blocked Off 1.jpg
    239.7 KB · Views: 301
  • Blocked Off 2.jpg
    Blocked Off 2.jpg
    200.4 KB · Views: 271
Even with everything blocked off, I'd be hesitant using anything other than soda for engine cases/heads. Only takes one particle of silica/glass to get accidentally lodged in the metal surface of an oil passage. That one particle can ruin a bearing, necessitating a total teardown/rebuild.

http://www.xs650.com/forum/showthread.php?t=14399&highlight=media+blasting

I'm really interested to see your results, great pictures so far.
 
I wouldn't blast the lower case....that is either enameled or powdercoated or something stock from the factory....gives the '82's and '83's something a little different from the rest of the pack....only a big, stupid, Ass Monkey would do that- HAHAHAHAHA!!!! j/k

Anyway, this duck walks into the bar and orders a shot of whiskey. The Bartender, seeing that the duck doesn't have any pockets to hold a wallet sez....."How ya gonna pay?"
Duck sez "Put it on my bill."
 
Last edited:
Dave - Yeah, I was thinking glass for the heads and block. Sand for the case halves.

nj1639 - much of the paint/enamel/powdercoat is chipping/worn away. I may as well go naked on it and make it all look pretty. It'll get dusty and dirty while riding anyway but it'll look good for a little while.
 
I used scrap plywood I had laying around for my covers and bolted them through the head and cylinders with all-thread .....

BlockPlates2.jpg


The bottom cover from the head and the all-thread transfers over and is used on the jugs .....

BlockPlates8.jpg


The cylinder sleeves that hang out of the bottom of the cylinders are covered with old ready-to-spread frosting contaners. They're a perfect tight fit, so tight in fact that I need to warm them with a heat gun to get them on and off .....

BlockPlates5.jpg
 
Looks good 5twins. I like it. Do the cylinder sleeves really need to be protected on the outside? The inside is a certainty. Maybe it's time for me to eat some frosting.
 
I leave a few more covers on than you've got. As you can see above, I leave the cam chain adjuster cover on because I like to blast it clean. Also, on the head I leave the breather housing, just duct taping the hole shut .....

BlockPlates3.jpg
 
Did you consider bead blasting after you blasted it to get down to the metal? Just curious if there is a better finish with the glass beads.
 
I totally agree with Cafe-Dave. I bead blasted my '83 engine when it was completely assembled after I rebuilt the internals. That way the crankcase breather, intake and exhaust were the only access to the inside of the engine, very little chance to get a bead in an oil passage. It worked great and looked even better. Only hard part was man-handling the entire engine to blast it.

Bead blasting took all the paint off, didn't need to go to sand for media.
 
I have used plumbers putty for the oil passages and cover them with aluminum tape. The beads will stick the the putty if the tape fails. I also use the alum tape on the machined surfaces. I use a medium size glass bead which tends to peen the surface creating a bright surface. I like the product from Graingers. I would not use sand on any of the castings. Also clean-up is very critical.
 

Attachments

  • XS2 and Kingpin .jpg
    XS2 and Kingpin .jpg
    128.6 KB · Views: 197
I used scrap plywood I had laying around for my covers and bolted them through the head and cylinders with all-thread .....

BlockPlates2.jpg


The bottom cover from the head and the all-thread transfers over and is used on the jugs .....

BlockPlates8.jpg


The cylinder sleeves that hang out of the bottom of the cylinders are covered with old ready-to-spread frosting contaners. They're a perfect tight fit, so tight in fact that I need to warm them with a heat gun to get them on and off .....

BlockPlates5.jpg

Twins....any chance of you tracing those covers and mailing them to me? (The odd ones, I can figure out the others...)
 
Use a head gasket (old or new) to trace it out on the wood. That's all I did, then cut it out with a jigsaw.
 
I glass beaded my jugs and cyliner head without covering up anything. If you are VERY picky about cleaning after you will have no problems. I wash it in HOT water with citrus baced cleaner. Then mineral spirits in a parts washer. Then another citrus wash. Then lots of compressed air. Built many motors that had this done. Thousands of miles later, no ill affects. When I was younger working in a high end machine shop I spent many hours blasting cranks, heads and rods. Standard practice. They still blast rods with glass to help relieve stress and make them stand up to higher loads. I only use mineral sprits and citrus on the crankase and do it while plugged. Detailed prep is done with scotchbrite and an acetone wipe down before paint. Again. Final clean up needs to be done correctly before build up and you will be fine.

 
Thanks TwoJugs. I've been reading everyones experiences and cautions. I'm leaning toward a careful cleaning after blasting. One thing that has me waiting on a decision so far as what media to use is finding out what media my cousin has at his shop. That will be my limiting factor.
 
Back
Top