Flat battery bike died

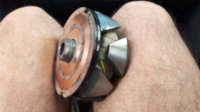
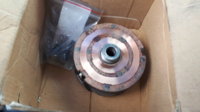
Got my rotor off this morning thanks to a bloke here called Pete who rode over with his rotor puller.
So I rang Sal and said I was driving into Brisbane to drop it in to him as well as pick up my Victory Vegas parts from a mates paint shop.
They'd been sprayed in 2 pak GMH Raven Blue Mica with added Silver Crystal coarse metallic the day before, the tank, fenders, and sidecovers.
Came out great, blacker than black inside but out in the sunshine Blam!
Comes alive!
So after leaving my rotor with Sal as well as my brushes which he said he'd sort too , I drove further right inti the city to the Victory Indian deaership that are repairing the rest of my bike after an old fool did a u turn taking my bike out.
Most of the parts were in so they an put it all togethet soon.
Heres a couple of pix, cant wait to see it all together and ride.
The XS will probably be sorted by then too.
A bike for every mood, what a great idea...

A few pix also of our club run on Sunday , the stick I utilised to hold my seat up whilst charging the battery at Cramms Farm .
And the two 500mm lengths of 2 inch pipe that Im hoping to make some baffles out of.
I removed the baffles totally for the run and its just a bit too snarly and bordering on obnoxious so gonna tone her down a tad I think.
Tank came out nice hey!
20180123_112448.jpg
20180123_112502.jpg
20180121_141325.jpg
20180121_103057.jpg
20180122_165924.jpg
 
A fun and productive weekend.:)
Doncha' wish they all went that way? Tank looks great!
 
Thanks! Sure does! And will look even better on the bike once shes all back together and up n running again.

As for the rotor, Petes puller had it off in a flash, no hammer rap needed just some muscle on the spanners off it popped.
Sal the rewinder briefly explained the the process of seperating the rotor halves before putting them in his workshop oven, Im sure not too many pies get heated in it as theyd have a strange flavour!
Good little setup hes got in a suburban backyard shed and Ive finally found someone with a messier workbench than mine!
Funny how any horizontal surfaces in a workshop tend to accumulate 'stuff'
When I showed him the cut n shut job I did adapting a Range Rover brush onto my broken one he had a look at it then at the one remaining good one and and said itd had a lot of heat and pointed out the spring had blueing on it.
"Leave em with me and I'll sort em out"
He said :)
Adding that he and his wife may be coming to the Gold Coast on the weekend for the beach and that he may be able to drop them back to me to save me a 100 mile return trip .
Its Australia Day holiday on Friday 26th so mail services will grind to a halt.
Till then its back on the trusty Honda C90 to get my jollies.
They say 'You meet the nicest people on a Honda' that was the early sixties and seventies advertising blurb anyway :))
Good time to investigate my tailight thats not working, Ive testlighted it and its in the wiring somewhere, Ill take a peek inside the headlight shell and also theres a plastic jnner rear fender that looks to come off easy...
If I cant find the break then Ill probably just wire the tailight into the ignition circuit somewhere.
 
Looks like he did a right fancy job. Don't forget to hook the regulator back up ;)
Don't suppose you asked about wire size... ?
 
Up to 14.6 revving it harder..
Went for a test ride and soon as I got up over the border mountain range the heavens opened up! Really heavy driving rain forced me to turn around.
The headlight on this bike is pissweak its an old sealed beam job with 'motorcycle' embossed into the glass.
Anyway low beam is useless and high not much better...rideable with extreme care....Had hoped a better charging system may have helped..but no.
Also the red idiot light is on, the ignition light I guess it is... though it only comes on when key is turned on goes out when bike starts but then comes back on with my headlight.
And the idiot light underneath it is lit too...fixed em both by sticking black electrical tape over them.
I couldnt find why my tailight wasnt working (brakelight good) so I found a live wire under seat coming off the grey lighting box under the seat its a light green wire that has power when the headlights turned on so I tapped into it and soldered a wire from it to the blue tailight wire...fixed!
Gee its great to be riding a proper bike again after the C90 Honda ..
 
You need to study up and learn more about your bike's electrical system. Just hacking into wiring like you're doing will probably end up creating more problems than it solves. These are old bikes and when you get one, you need to completely go through the wiring. You need to check all the wires and connections, clean them too. I found nearly a half dozen rubbed through bare wires on mine when I went through it, potential problems that could have happened at any moment.

You have an odd model compared to what we got in the U.S. 1978 was the last year we got a headlight on-off switch on the handlebar. It was also the 1st year the tail light got wired directly to the key switch. The handlebar switch (if fitted) no longer had any control over it. But yours may differ. To make the tail light come on with the key, a new ignition switch was fitted. It had the blue tail light wire connected to 2 spots on the bottom of the switch ("On" and "Park" positions). Earlier key switches had the blue wire connected to only one spot ("Park" position). If you examine the contact plate in your ignition switch, that's how you'll be able to tell.

The gray box under your seat is the RLU. That light green wire in it you tapped power from is the feed to the headlight failure indicator light on your dash. That's that "other" light you have coming on. That light green wire shouldn't have power unless one of your headlight beams have failed. That may be why your headlight sucks. The originals aren't great, but they are a bit better than you seem to be describing. If the low beam fails, the RLU automatically directs power to the high beam, but at a reduced level. It lights up but not as bright as it normally would.

There's another little doodad on these bikes called a light checker. That's what is connected to that red light on your dash that is coming on. Early versions had 3 wires and only monitored the brake light. Later versions got more complicated with 7 wires, and monitored both tail and brake light function. If an early version craps out, it shouldn't be a problem. It just monitors power flow (or lack thereof) on the brake light switch yellow wires. However, on the later more complex version, power to the tail light actually flows through it. That could present a problem if it has crapped out.

So, depending on which components you have, you may have a faulty RLU, a faulty light checker, or some burned out filaments in your headlight, or a combination of these things. Then again, it could be your crappy, dirty wiring and connections. I've seen the pic you posted of the wiring under your seat. Birds build neater looking nests than that, lol.
 
Thanks mate thats a great explanation that I can actually understand.
Timely too as my phone just txt beeped from a bloke I sold a tailight too last night whos looking for a roadworthy certificate, but thats another story, Im awake ahead of my alarm .
You must be taking of the pic I took at the picnic area showing the stick holding the seat up, very observent and yes very messy was my thoughts too, Ive tidied up a little as wires were in danger of rubbing through the tyre, its early , you know what I mean.
Ill go put coffee on and check my ign for blue wires.....then we know what we are looking at...and yes my right handlebar switchblock controls the headlights and has a parklight position on it too.
I had a B model RD350 a long time ago and hitting the brake lit up the red light so I know what you mean and Im thinking mine is an ignition light.
Ok coffee...thanks :)
In half hour I can buy a sealed beam but it wont be motorcycle specific like the one in it..Im guessing a different spread on low beam..
20180121_141325.jpg
 
Ok difficult to see the back of ign switch so I removed the headlight light unit to look inside and as per pix theres four wires outta the switch , red, brown, blue, blue red.
Then outta the connector theres 5 wires , with an extra blue.
Can I upgrade headlight to a Quartz Halogen without causing any dramas to electrics (thats an extra question I know maybe should have another thread but for now.....)
 

Attachments

  • 20180129_073607.jpg
    20180129_073607.jpg
    155.4 KB · Views: 143
  • 20180129_073656.jpg
    20180129_073656.jpg
    128.9 KB · Views: 142
  • 20180129_074747.jpg
    20180129_074747.jpg
    117 KB · Views: 153
Never seen a wiring diagram that exactly matches what you have. Closest is the European model which shows that blue/red wire out of the ignition switch. It's for the little parking light bulb in the headlight shell. That's a common feature on European bikes and in fact, I think it's a requirement. To see how the switch is wired, looking at that plug end won't help. You need to look at the other ends of those wires, where they connect into the back of the switch.

Yes, an H-4 headlight upgrade is something most of us do. As long as you stick with the standard watt bulb (55/60) it won't over-tax the system. Don't try to run one of the high power 80 to 100 watt bulbs. There are many aftermarket options out there. All you need is a 7" size replacement. If you'd rather stick with Yamaha parts, you can use the H-4 unit fitted to the late 750 and 850 triples, or the 1100s. I think the 850 is a better option as the chrome ring is the same too .....

https://www.ebay.com/itm/1980-Yamah...ash=item4b2dffa1c6:g:2zsAAOSw4IZaEyGH&vxp=mtr
 
Be careful. I'm afraid an XS850 headlight won't fit. It's larger in diameter than a standard XS650. XS650 measures 22cm in diameter and the XS850 24.5cm's. That's about an inch larger.

Agree with the Watts. I ordered an LED H4 which supposed to use only 8 Watts. Already replaced the rear/brake light for a LED which does work perfectly. Don't know if the H4 type LED will give enough light. But hey, only 6 bucks and no shipping cost :) This is the one I ordered:
https://www.aliexpress.com/item/Nan...32840885064.html?spm=a2g0s.9042311.0.0.BhUxer
 
It dont have to be original so just a car sealed beam will be better than the light its got now.
And yes it does have a small park light in headlught shell but it dont work and Im not worried about it .
This aint a concourse rebuild I just want the bike rideable cos in reality once I get my Victory back Ill be riding that most of the time and this will be more of a toy.
I just need a headlight and tailight the easiest and cheapest way out.
In reality I should have never got involved in a bike thats aged 30 years since my last Special, but I know theyre basically a great bike.
 
Ok got a semi seamed beam H4 conversion all up with a 55/60 globe for $27 trade price:)
Just fitting it then Ill start the bike and see what works and what doesnt.
Suppose best I test for 12 volts or more at the headlight plugs before fitting it.
Then I gotta find a safe place to tap into the lighing circuit for the tailight if it dont come good on its own
 
Ok latest update.
Fitted H4 and nothing except pass light works which is high beam.
So this grey box jump may not be applicable to my bike?
Ive already cut the two blue wires with black and yellow trace and too close to plug to reconnect unless I do another couple of joins alongside it for them.
At least with the grey box I had some light .
Tested voltage at low and high on plug before fitting headlight and was getting 8 volts with engine off, didnt check with engine running. Gonna try that now before I attempt to refit the grey box RLU or whatever its called.
 
The RLU removal and bypass works on all models as far as I know. There should be no wire snipping or cutting involved with it. You simply unplug the unit, remove it, then jumper 2 wires together in it's remaining harness plug, the blue/black and the blue/yellow. If you don't connect those 2 wires together, the headlight will not work. There are a couple good ways you can go about this. If you have a matching plug for the harness one, you can install the jumper wire in it and simply plug it in .....

fgwgGjX.jpg


If you don't have a matching plug, you can make up a single jumper wire to jump the pins in the harness plug. Make it just the right length and you can wrap it around the back of the harness plug, feeding it between some of the wires going into the plug. This will effectively hold it in place .....

ITGmYKY.jpg


KcTBN8X.jpg


FvJKZ77.jpg
 
Sadly its too late to do any of those as Ive snipped the two blue w/trace wires close to the back of female plug and twitched them together, no solder till I know it works....and it doesnt.
No headlight low or high now and only a high on the lh pass switch (which you may not even have if your lights are on all the time.
Had to go for a 6 monthly skin cancer check and now having lunch...its probably nightime there in US .
When I get home Im gonna finish putting it back how I had it with the RLU hooked up as I at least had bad lights as opposed to none.
And take it from there...
My other desperate option is to bridge the pass button so Ive at least got high beam.
In these
days of ultra blinding lights my high beam wont be blinding anyone.
 
Ok this is the latest I retrieved the grey box from over the hedge and connected it back up twitching the two blue w/ yellow , w/black trace back together and wired the tailight back into its proper wire .
Now got very dull low beam, fair high beam and a better passing light.
Also my tail lights working.
Then tried joining the two blue w/traces and zero hi/lo lights just passing.
So much for ditching the grey box.
The only globe not connected is the park light in the headlamp, now maybe thats screwing with the system so Im gonna take the headlamp out again and connect it up to the loom and see what happens.
Gee I love electrics:-(
 
Fitted the headlight park light and wired into the loom
Now the rh blinkers stopped working..
Tailight works .
Headlight park light on all the time.
Low beam weak
High beam better
Pass light better still.
Took both switchblocks apart and liberally sprayed carby cleaner inside em and called it a day.
 
Back
Top