Flattrack racer build

I made it Air. I also make one that has adjustable width. Here is a pic. They are a lot of trouble to make but they are sturdy.
 

Attachments

  • IMG_0699.jpg
    IMG_0699.jpg
    162.4 KB · Views: 454
Got the body work mounted. Pics show the forward mount for the seat which locates on the small triangular sheet metal that's welded to the seat loop at the backbone. The rear tank mount location was also tricky because the threaded hole on the frame had a funky angle to it.

Also picked up more parts for the engine. Everything came from Michael Morse at 650 Central:
Racer's 145mm long rod kit with Wossner 80mm pistons
Lightweight drain plug kit (2)
Tzubaki cam chain
Deep sump oil sump kit
New forward cam chain guide
and my barrel sleeved and bored for the pistons

Ok so now I need to split the cases. Any tricks to this? I've been tapping on places but it doesn't seem like its doing any good. I need to apply more pressure but I'm not seeing any places where I can do this without risking breakage. Only other cases I've split are SR500 and there I use a case splitter. What do you do for horizontally split cases?
 

Attachments

  • IMG_0711.jpg
    IMG_0711.jpg
    134.4 KB · Views: 403
  • IMG_0707.jpg
    IMG_0707.jpg
    113.8 KB · Views: 407
  • IMG_0706.jpg
    IMG_0706.jpg
    150.9 KB · Views: 426
  • IMG_0705.jpg
    IMG_0705.jpg
    88.4 KB · Views: 399
  • IMG_0704.jpg
    IMG_0704.jpg
    121.2 KB · Views: 385
  • IMG_0703.jpg
    IMG_0703.jpg
    124.3 KB · Views: 393
  • IMG_0712.jpg
    IMG_0712.jpg
    102.6 KB · Views: 380
  • IMG_0713.jpg
    IMG_0713.jpg
    131.7 KB · Views: 412
  • IMG_0715.jpg
    IMG_0715.jpg
    221.7 KB · Views: 431
  • IMG_0716.jpg
    IMG_0716.jpg
    220.1 KB · Views: 435
Ok, got the cases split. Got lucky again and just kept tapping on the ends of the studs and a couple of other places and began to see a gap form so I knew I was making progress. Took lots of pictures so I had a reference when it came time to put things back together. I'm going to paint this engine so I want to bead blast it first. This will be tricky. Bead blasting dust finds its way into the damnedest places so a meticulous process of sealing has to be done first. I pre-assemble the case halves with the output tranny shaft in place along with the two side covers. Then plug up any remaining holes with a combo of tape and/or paper towels soaked in WD40 to trap any dust before it makes its way into any places where it shouldn't be.

The pic with the red arrow shows a stud that is stripped. Anyone know if new ones are available? I have not found one yet but I'll keep looking. Also the pic with the green arrow shows a pin that is recessed where the end crank bearing is on the clutch side. Shouldn't this pin be protruding like the others in the background? If so I've got some work ahead of me getting this thing out! :doh:

Anyway, just ordered new bearings for the crank so as soon as those show up the crank gets sent out to have the long rod kit installed as well as balancing, welding and general blueprinting.

More pics to come as work progresses...
 

Attachments

  • IMG_0728.jpg
    IMG_0728.jpg
    163.3 KB · Views: 411
  • IMG_0727.jpg
    IMG_0727.jpg
    207.4 KB · Views: 391
  • IMG_0717.jpg
    IMG_0717.jpg
    219.1 KB · Views: 406
The long rod kit includes special pistons made by Wossner. A spacer under the cylinder is not necessary. But you must check all clearances as this is not a "bolt in" kit. Michael Morse sells the kit at 650 Central.

The longer rod is supposed to flatten the torque curve so yes you get better traction off the corners. With stock rods the midrange torque is explosive and the longer rods help to "mellow" this out. Not necessarily more torque, just more manageable.
 
Ok, making some more progress. Since I got the frame up on wheels I needed to check rake angle/swing arm angle to determine shock length. If I move the forks all the way down in the triple clamps I barely get a 25 degree rake and a 7 degree swing arm angle. This results in a 13.5 inch shock. This is what Doug Horner at VMC said I should expect. So I decided to go with Durelle shocks this time (I've been using YSS). Should arrive in a few weeks.
Next was to cut off that ugly shark fin chain guard on the left engine side cover. I was planning on doing it anyway but I found out while trying to get the engine in that it wouldn't fit without cutting it off.
Got the engine mocked up so I could make engine mounts. Lower end first. I took some before and after pics. I'm pretty happy with the way the forward mounts came out. Made a template out of paper with dimensions derived from just eye balling mounting points with a tape measure. The points on the template aren't accurate. They are just there to give me a rough idea of the overall dimensions of the piece. I had to make a tiny little transfer punch (pic) to locate the actual point to drill the holes for the frame side of the mount.
More pics to come....
 

Attachments

  • IMG_0734.jpg
    IMG_0734.jpg
    172.3 KB · Views: 514
  • IMG_0744.jpg
    IMG_0744.jpg
    221.7 KB · Views: 500
  • IMG_0738.jpg
    IMG_0738.jpg
    195.3 KB · Views: 520
  • IMG_0735.jpg
    IMG_0735.jpg
    155.3 KB · Views: 512
  • IMG_0732.jpg
    IMG_0732.jpg
    243.3 KB · Views: 532
  • IMG_0730.jpg
    IMG_0730.jpg
    268.2 KB · Views: 525
  • IMG_0751.jpg
    IMG_0751.jpg
    164.2 KB · Views: 471
  • IMG_0749.jpg
    IMG_0749.jpg
    232.3 KB · Views: 485
  • IMG_0748.jpg
    IMG_0748.jpg
    219.7 KB · Views: 469
  • IMG_0746.jpg
    IMG_0746.jpg
    112.4 KB · Views: 460
  • IMG_0747.jpg
    IMG_0747.jpg
    172.3 KB · Views: 469
  • IMG_0745.jpg
    IMG_0745.jpg
    177.1 KB · Views: 483
More pics of stuff...

Two of the engine mounts bolts were quite long so I just threaded the end of some 01 drill rod I had in my vast supply of metal (a little too vast actually) then welded a nut on one end. Also made spacers for those mounts and the upper rear mount as well. Next was to get the top end castings bolted into place on the engine, then put the engine back in so I can make the head stay mount. Doug Horner at VMC said I should only need to use one of the head stay mounts on the rocker box/cam cover so that's what I'll do. It'll really simplify the whole head stay. I'll take a pic once it's done.
While the mocked up engine was out I made up a little plug for the starter hole. Getting rid of all the starter hardware, both kick and electric, will really shave some weight.
Next are plugs for the kick starter hole and the tach drive hole. Then on to foot peg mounts and the brake pedal/master cylinder set up. This will be greatly affected by the exhaust pipes. I may go with high pipes to eliminate any issues. If not I'll be using a Shell style 1/2 mile set up like the one Hoos Racing makes. We will see....
 

Attachments

  • IMG_0754.jpg
    IMG_0754.jpg
    148.6 KB · Views: 434
  • IMG_0753.jpg
    IMG_0753.jpg
    156.1 KB · Views: 426
  • IMG_0757.jpg
    IMG_0757.jpg
    243.9 KB · Views: 503
  • IMG_0739.jpg
    IMG_0739.jpg
    201.1 KB · Views: 401
  • IMG_0742.jpg
    IMG_0742.jpg
    136.5 KB · Views: 431
  • IMG_0741.jpg
    IMG_0741.jpg
    123.2 KB · Views: 452
I am sure this is somewhere in this forum but can you or anyone tell me what it takes to swap a F6 front end in for the stock xs front end? Lot of mods?
 
Is that a rear motor mount that is mounted to the swingarm pivot? Whatever it is ... its like staring at the sun! I cant look at anything else in that picture other than the welds on whatever that piece is... hahah... weldporn...

Nice build! Definitely following... Would love to get a 17" wheel setup so i can run some of those maxxis dirts!
 
Thanks for the link Airwolfie! Much appreciated. What did you ever do for a disc? Ducati? And if so, what issues did you have with that?

One last thing, what year are the forks you used and does it matter on year?
 
Thanks for the link Airwolfie! Much appreciated. What did you ever do for a disc? Ducati? And if so, what issues did you have with that?

One last thing, what year are the forks you used and does it matter on year?

I have heard the Ducati ones work too. They are quite pricey though!

Yamaha FZR discs work with the stock wheel, same hole layout and ID. The OD is good if you use the R1's blue dot calipers. You will also need spacers under the discs to bring them out. I found out every setup has different size spacers for the discs. You will have to measure it to see what yours are.

Mount the discs and calipers first before measuring the spacers for the spindle. The R1 spindle goes with the xs wheels, you just need to buy appropriate BB's.

Mine was off a 2001, but I have seen later ones done as well. Anything can work, you just have to think about it a bit!
 
Back to work on the racer but haven't got much done cause I'm waiting for parts: shocks, seat pad, cylinder head and exhaust parts. I don't want to start on foot peg mounts 'til the seat is done so I can get a proper feel on the ergonomics and I need to have the engine installed to set up the brake lever and right side foot peg cause this is a right side shifter so the brake pedal has to be in the right place. I also want to have the exhaust pipes in place when I set up the brake pedal and right peg.

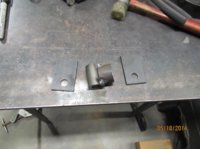
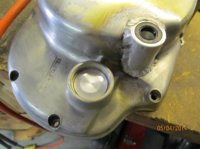
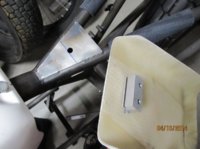
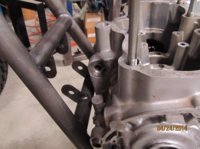
Soooo, I got the head stay done at least. They didn't come out great but that's ok, they'll be hidden under the tank, no one will see :shrug: 
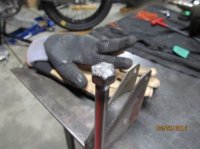
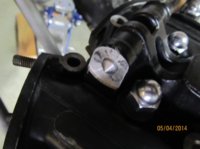
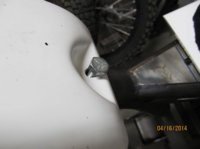
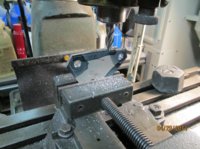
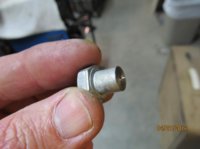
I had to make up another little transfer punch to locate the holes for the rocker box side of the stay. Also got the kick starter and tach drive plugs installed. I put a thin bead of silicon sealer on the plug before pushing them into place. They both have about a .001 to .002 inch interference fit.
Next is to order exhaust parts so I can start building that. After hearing some of the Yamaha twins racing at the track I realized I don't really need mufflers. Surprising how "not loud" these bikes are with straight pipes. So it'll be stainless low pipes exiting on the right with megaphones only.

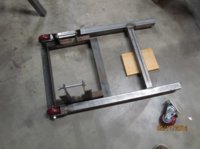
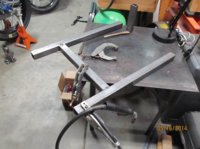
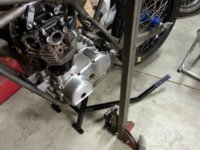
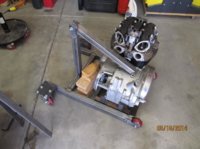
Anyway, in the mean time I thought I'd try my hand at designing and fabricating a mini cherry picker/engine hoist specifically for this bike. How much does an XS650 engine weigh without carbs attached....125, 130lbs?? I can't lift and negotiate a lump that heavy into a frame :hellno:. So I'll need a tool to help me.

I made up some rough drawings and grabbed a pic from the internet to show what I have in mind. Pretty much a standard cherry picker design except mine will be MUCH smaller using the little bottle jack in the pic. I was thinking of using some 1.5" square tubing with .090 wall thickness for the frame. Think it will be strong enough? I would place the boom right below the intake ports at the base of the cylinder when lifting the engine. I'm thinking of holding the engine up with just tiedown straps so that I can jimmy it around if I need to when placing it in the frame. One strap around the cases and one strap around the top end to balance it. Feedback???? What does everyone think? Think it'll work? I think it would be a great challenge to make and design....only if it will works of course.

If I get to putting this thing together I'll post pics of my progress.

Also for those that know, is there a way to place these thumbnail pics I have here in the text body where I want? I tried the copy and paste thing but it didn't work. Thanks in advance for any help.
 

Attachments

  • IMG_0766.jpg
    IMG_0766.jpg
    204.9 KB · Views: 370
  • IMG_0764.jpg
    IMG_0764.jpg
    157.6 KB · Views: 376
  • IMG_0763.jpg
    IMG_0763.jpg
    136.3 KB · Views: 365
  • IMG_0765.jpg
    IMG_0765.jpg
    172.7 KB · Views: 378
  • IMG_0762.jpg
    IMG_0762.jpg
    119.2 KB · Views: 370
  • IMG_0761.jpg
    IMG_0761.jpg
    150.5 KB · Views: 373
  • IMG_0769.jpg
    IMG_0769.jpg
    129.4 KB · Views: 370
Well racing season is in full swing and the race bikes need work so things have really slowed down on the Champion project.

I did have some time to work on the engine hoist tho. Things are coming along nicely (with a few mistakes here and there). Should have the jack fully mounted by the end of today. I really want to test this thing out so I'm goin gangbusters on it right now.

More pics to follow...
 

Attachments

  • IMG_0777.jpg
    IMG_0777.jpg
    178.9 KB · Views: 330
  • IMG_0775.jpg
    IMG_0775.jpg
    128.3 KB · Views: 297
  • IMG_0773.jpg
    IMG_0773.jpg
    153.1 KB · Views: 319
  • IMG_0772.jpg
    IMG_0772.jpg
    174 KB · Views: 299
  • IMG_0771.jpg
    IMG_0771.jpg
    196 KB · Views: 297
  • 063.jpg
    063.jpg
    217.7 KB · Views: 337
  • IMG_0778.jpg
    IMG_0778.jpg
    181.7 KB · Views: 311
  • IMG_0779.jpg
    IMG_0779.jpg
    177.6 KB · Views: 323
  • IMG_0781.jpg
    IMG_0781.jpg
    166 KB · Views: 343
  • 079.jpg
    079.jpg
    223.1 KB · Views: 341
Back
Top