In the slow process of customizing my '78 special with a tracker/scrambler look and I am trying to decide what gauges I want to run. Stock, mini, tach only..... etc.... I'd like to see some pictures of different gauge configurations people are running. I currently have a 5 3/4 headlight, but I fabbed a small aluminum mount to run the stock tach in the center of the trees to the ignition mount holes, but it looks kinda funny with the smaller headlight, so I am leaning towards going back to the factory one. I like the idea of just the stock tach for several reasons... built in neutral/high beam indicators, lost oil pressure warning since the oil pump drives the tachometer. I can live without a speedo since I don't plan on any high speed racing in my future... LOL. I also want to incorporate a voltmeter somewhere, but that may get tucked under the side panel if I cannot make a clean installation on the bars. I've searched the forum and seen a few pictures but would be nice to see comparisons all in one place. Let's see what you have and what you would change or suggestions to why I should run a different setup....... Thanks.
-
Enjoy XS650.com? Consider making a donation to help support the site.
XS650.com receives a small share of sales from some links on this page, but direct donations have a much greater impact on keeping this site going.
You are using an out of date browser. It may not display this or other websites correctly.
You should upgrade or use an alternative browser.
You should upgrade or use an alternative browser.
Gauge/Instrument cluster ideas
- Thread starter willis
- Start date
All my gauge set ups or pretty much stock. On the volt meter, it should be on the bars so it is easy to see as you ride, rthat's when you need it. On the side cover you won't see it well.
Leo
Leo
Hey Willis,
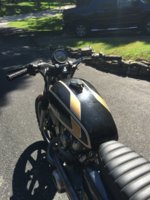
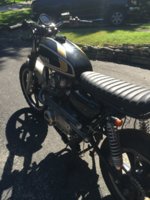
I take the center light tree housing off and cut the metal that supports it off, then relocate the ignition switch, using the '78 thru '84 special switches, to the front right frame tube just below the gas tank. In place of the ignition switch I mount a voltmeter. The sr500 tachs have the indicator lights for neutral, high beam and blinkers......or you can get creative installing a blinker into the stock tach or the speedo. All three of mine run the voltmeter as stated.
I take the center light tree housing off and cut the metal that supports it off, then relocate the ignition switch, using the '78 thru '84 special switches, to the front right frame tube just below the gas tank. In place of the ignition switch I mount a voltmeter. The sr500 tachs have the indicator lights for neutral, high beam and blinkers......or you can get creative installing a blinker into the stock tach or the speedo. All three of mine run the voltmeter as stated.
All references will be for the Rev counter gauge................Gauge Cases have holes for the gauge lights but in some cases there are blanks where there could be lights installed, (note in the pics).
76 Gauge

76 Gauge Case; gauge has 2 Gauge lights, (top), and 3 instrument lights, Neutral, high-beam and the rear brake pad warning light

Your 78 gauge, (below), will have 2 gauge lights, (top), and 2 Instrument lights, neutral and High-beam.
The case should look like this one, and have a blank, where an instrument light could be installed.
If you wanted to drill out the blank and face, another light could be installed, an indicator or maybe a LED volt meter.
Later cases only had one gauge light so if you really wanted another light then one of the gauge lights could be converted, so in effect you could run 4 instrument lights and 1 gauge light

here is what the 76 gauge looks like from the inside. Early gauges used metal for the light tunnels but the later models, Like yours, will be cardboard. Note the gauge light has an angled cap to defuse and spread the light. The instrument lights shine directly onto the back of the gauge face light lens's

The rev Counter gauge is easy to take apart because it doesn't have the trip meter lever, which can be a pain to remove.
I have a tutorial in my albums that shows how to remove the Gauge face lens to get at the cases.
http://www.xs650.com/media/albums/gauge-repair.1728/
76 Gauge
76 Gauge Case; gauge has 2 Gauge lights, (top), and 3 instrument lights, Neutral, high-beam and the rear brake pad warning light
Your 78 gauge, (below), will have 2 gauge lights, (top), and 2 Instrument lights, neutral and High-beam.
The case should look like this one, and have a blank, where an instrument light could be installed.
If you wanted to drill out the blank and face, another light could be installed, an indicator or maybe a LED volt meter.
Later cases only had one gauge light so if you really wanted another light then one of the gauge lights could be converted, so in effect you could run 4 instrument lights and 1 gauge light
here is what the 76 gauge looks like from the inside. Early gauges used metal for the light tunnels but the later models, Like yours, will be cardboard. Note the gauge light has an angled cap to defuse and spread the light. The instrument lights shine directly onto the back of the gauge face light lens's
The rev Counter gauge is easy to take apart because it doesn't have the trip meter lever, which can be a pain to remove.
I have a tutorial in my albums that shows how to remove the Gauge face lens to get at the cases.
http://www.xs650.com/media/albums/gauge-repair.1728/
Last edited:
Love to see some pictures of this setup. I like the simplifying and eliminating the center tree.Hey Willis,
I take the center light tree housing off and cut the metal that supports it off, then relocate the ignition switch, using the '78 thru '84 special switches, to the front right frame tube just below the gas tank. In place of the ignition switch I mount a voltmeter. The sr500 tachs have the indicator lights for neutral, high beam and blinkers......or you can get creative installing a blinker into the stock tach or the speedo. All three of mine run the voltmeter as stated.
Wow.... Thanks for that gauge info skull. I will definitely be looking at your album when I have access to my computer. That's a lot to try and look at on my phone.
No prob. That gauge thread had a tutorial with each pic but when Travis changed the site over the tutorial became the pic heading and with restricted text some of it got lost. If you need any clarification, holla
Yeah Willis, I'm dealing with some pretty basic Internet here......pm me an email addy and I'll send ya a pic from my iPad......can't seem to figure out how to load a pic up to this site.......photobucket don't seem to want to connect up.....21st century problems.
Hey NJ.............................. New technology makes things so much easier. Store you photos with us and have access to them 24/7/52..............Yea right.
I have trust issues so have 2 external hard drives and my laptops hard-drive for storage....................If using a lap top or desktop and your pics are in a file there is no need to resize, just drag and drop into the post. Best to use "more options" when writing a new post, gives you a choice of seeing a full pic or thumbnail as above.
I have trust issues so have 2 external hard drives and my laptops hard-drive for storage....................If using a lap top or desktop and your pics are in a file there is no need to resize, just drag and drop into the post. Best to use "more options" when writing a new post, gives you a choice of seeing a full pic or thumbnail as above.
I did a search on site here for an old thread with a pic of the setup but this first gen iPad will copy the link but wont drop it in a post.
Search sr500, authored by nj1639..... Pulls up a few threads with pics of the setup.
Search sr500, authored by nj1639..... Pulls up a few threads with pics of the setup.
Found it
nj1639's gauge cluster
Post #6 http://www.xs650.com/threads/mounting-a-voltmeter-gauge.10329/#post-105705


nj1639's gauge cluster
Post #6 http://www.xs650.com/threads/mounting-a-voltmeter-gauge.10329/#post-105705
Nice. Thanks to both of you. NJ... you can disregard the PM I sent you.
Skull... your album will not allow me access. I get an error code denying access. Is this something that is marked for public or private?
Skull... your album will not allow me access. I get an error code denying access. Is this something that is marked for public or private?
Last edited:
CoconutPete
1979 XS650 Special
I have only created it in Photoshop, but I like the idea of messing with the trailtech computers, and I also like the look of one round instrument. I mocked up having the tach in the center and then the Trailtech Stryker (basically like the Vapor but gives you a voltmeter instead of a tach) right in front of it, basically over the bar clamps.
CoconutPete
1979 XS650 Special
Is that a standard bracket from certain years? I like the idea of having the ignition there.
Is that a standard bracket from certain years? I like the idea of having the ignition there.
Hey Pete, that's the switch from the '83. There's a bit of a gusset there that I drilled a hole through for the mount. I had to remove a bit of the metal on the back of the switch to get it flush - and in retrospect a spacer between the switch and the gusset might achieve the goal......since that shot was taken I've moved the switch to the right side. I move them all to the right side now because keys should activate while turning clockwise, right? ;-)
I believe it was 1980 that the yellow reflectors were moved to a bracket on the front down tube, previous to that the front reflectors were round and mounted to the gusset, same location that I drilled for the '83......in those instances just unscrew the reflector and mount the switch there, no need to remove any metal from the back of the switch.
The pre '78 ignition switches may not lend themselves to this mod as aesthetically as the newer switches.
If you are not fixed on having an actual voltmeter here is another suggestion. I have used this LED indicator. It is a 10mm red LED that flashes, steadily burns or remains unlit depending on the voltage. Like a generator light on an old car. You may be able to fit it inside the face of a stock gauge.
http://www.improvingclassicmotorcycles.com/products.htm
http://www.improvingclassicmotorcycles.com/products.htm
CoconutPete
1979 XS650 Special
Thanks for the info. I will look into this. I'm all in favor of removing wires from the "pivot point".Hey Pete, that's the switch from the '83. There's a bit of a gusset there that I drilled a hole through for the mount. I had to remove a bit of the metal on the back of the switch to get it flush - and in retrospect a spacer between the switch and the gusset might achieve the goal......since that shot was taken I've moved the switch to the right side. I move them all to the right side now because keys should activate while turning clockwise, right? ;-)
I believe it was 1980 that the yellow reflectors were moved to a bracket on the front down tube, previous to that the front reflectors were round and mounted to the gusset, same location that I drilled for the '83......in those instances just unscrew the reflector and mount the switch there, no need to remove any metal from the back of the switch.
The pre '78 ignition switches may not lend themselves to this mod as aesthetically as the newer switches.