How to go Special to Standard in 6 easy steps.

Kevin Werner

Amatuer
Top Contributor
Messages
5,654
Reaction score
24,944
Points
688
Location
Sheboygan, WI
I have seen several posts questioning mounting a Standard style seat on a Special and recently in this thread. https://www.xs650.com/threads/frame-differences.64644/
I thought that the question comes up often enough that I could put together a brief synopsis thread on the Red Bike. That thread goes 34 plus pages and is a testament to how helpful the members can be.

I cover this process in 6 posts

Let me start. I acquired an 81 Special II and had a loose vision. What can I do? I examined the frame prints from our very own Tech Section https://www.xs650.com/threads/xs650...workshop-manuals-and-other-information.30569/ and decided there was no meaning full difference in the seat loop and side cover area. .
78-84.jpg
74-79.jpg
 
Last edited:
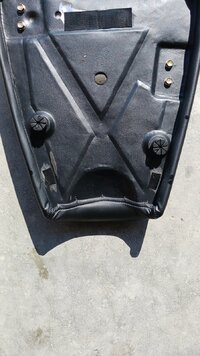
I found a seat at Texavina https://texavina.com/ that I liked and ordered it. They claim their seats are based on the factory seat pan and are direct bolt on repacements.
seat.jpg

An initial dry fit on my bare frame indicated the the special seat hardware is diffent from the standard. I planned different sidecovers too so I cut the seat and sidecover mounts off the the frame top rails. I built sidecover hangers by slicing a face off of 1"light weight sqaue tube.
flatstock.jpg
I then formed sidecover carrier on the top tube of the frame.
formmount.jpg
fitmount.jpg
checkmount.jpg
The side covers on the Special are mounted with little "bullets" that press into rubber gromets on the frame. The uppers were cut off. When fitting time came arround, I noticed that the "old style" side cover lower mount hole aligned with the Special lower grommet. I made up some bullet from 1/4 bolts with 1 nut jammed to the head with loctite blue. These are mounted with fenderwashers into the lower side cover mount.
sidecoverbullet.jpg
 
Last edited:
Back to the seat. I wrestled with a mount system. I considered trying to find XS650 standard hardware but the complexity of getting mount somebody cut off a frame aligned and rewelded scared me. Hey, remember this?
flatstock.jpg

the remaining channel fits right over the frame. Nevermind the poor welds.
seatmountfront (1).jpg
The middle and back mounts are similar. All are faced with velcro and the seat base has similar.
seatmountmid (2).jpg
seatmountaft (3).jpg
seatbase2.jpg
 

Attachments

  • seatbase (4).jpg
    seatbase (4).jpg
    416.4 KB · Views: 35
The change from Special to standard generally include different handle bars. I went with a Euro bend on polished Virago risers. I also went with minimalist headlight mounting ears to show of the Candyapple red headlight shell.
leftsidecoverpolishedup.jpg
A sissy bar was the source for the side handles. Those handles are needed to get the bike on the sidestand (you cant pull hard on the seat) an I need some place to hook bungee cord.
sissybar.jpg
 
Last edited:
A big part of Special to Standard is the 16" to 18" rear wheel conversion. I was considering that task when this wheel showed up in Classifieds. It is nicely detailed and polished, complete brakes, alloy rim and new K70 Dunlop.
rearwheelhubtire.jpg

With a nice new rear, I felt compelled to build a new front after cleaning up the front hub.
frontwheeltrue.jpg
frontwheelcomplete.jpg
 
I knew the paint would be special and none of the tailight assemblies I saw would fit and/or keep the rear fender exposed. I knew that in advance so I prepped the holes for the plate mount and @Jim filled and smoothed the holes before painting. I made up my own compact mounts. The fender really looks nice here.
plate1.jpg
 
Last edited:
Having started this thread I feel its is best for me to follow up on the ongoing project in regards to those steps I outline above. I want to go back to post #2 where I fitted seat mounts and side cover mounts. This was very much a trial and error process and I had thought I would wrap the sidecover hangers in rubber (bicycle innertube). As It turns out I am not happy. The hanger lips (securing the sidecovers) are too short. They are less than 1/4" and should be longer "just in case" the bottom bullet breaks free and your side cover could go skidding down the road. Those lips should be at least 3/8" and I settled for much less. The joy of getting old is that you wake up in the middle of the night and fret about things like this. It will be a while before I consider making new parts here so I added reusable zip ties around the frame tube to make absolutely sure the @Jim Mona Lisas hanging on my bike do not go sliding down the road. These ties can be released and reused.
sidecoverhangars.jpg
 
Last edited:
Yeah, the stock Standard tabs that I've seen come with a rubber cover that has an upside-down "L" at the top to help secure them.
Yes, they do. In my winter project thread the P/N was offered up for those items but my mounts are much smaller (narrower) than the standard mounts and are placed to insure alignment(back of the front slot, front of the back slot). My mounts are simple from stock on hand. I work with a pedestal (not bolted to the floor) small vice, a hammer, vicegrips and a piece of railroad track (for an anvil).
 
Last edited:
Having started this thread I feel its is best for me to follow up on the ongoing project in regards to those steps I outline above. I want to go back to post #2 where I fitted seat mounts and side cover mounts. This was very much a trial and error process and I had thought I would wrap the sidecover hangers in rubber (bicycle innertube). As It turns out I am not happy. The hanger lips (securing the sidecovers) are too short. They are less than 1/4" and should be longer "just in case" the bottom bullet breaks free and your side cover could go skidding down the road. Those lips should be at least 3/8" and I settled for much less. The joy of getting old is that you wake up in the middle of the night and fret about things like this. It will be a while before I consider making new parts here so I added reusable zip ties around the frame tube to make absolutely sure the @Jim Mona Lisas hanging on my bike do not go sliding down the road. These ties can be released and reused. View attachment 249519
Always good to leave yourself a little added insurance (I.E. the zip ties). 👍

Incidentally, I can totally relate to the things that wake you up in your thoughts at night. 😉
 
Back
Top