Funny you mention that . I was thinking yesterday that maybe a dimming rheostat would be a nice addition.
-
Enjoy XS650.com? Consider making a donation to help support the site.
XS650.com receives a small share of sales from some links on this page, but direct donations have a much greater impact on keeping this site going.
You are using an out of date browser. It may not display this or other websites correctly.
You should upgrade or use an alternative browser.
You should upgrade or use an alternative browser.
How to re face your gauges
- Thread starter Mailman
- Start date
Norton7d
XS650 Junkie
Funny you mention that . I was thinking yesterday that maybe a dimming rheostat would be a nice addition.
How would that work, controlling the light in both gauges?
Just a potentiometer. Blue wire from bike to one side . Blue wire to gauges on middle tap. Need to play with the resistor value. Cold weather first of next week. Will play with it and see.
Norton7d
XS650 Junkie
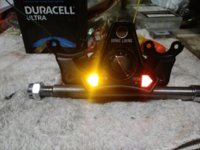
I have my gauges out now, i will do a side by side in the light and darkness with the new bulbs, if too bright, i will only use in blinkers and taillight
ckahleer
XS650 Addict
About 10 years ago I had a KLR650 that did not have self canceling turn signals. Several times I found myself riding with my turn signals on. (I know, I'm getting old)
Replacing the indicator bulbs with super bright LEDs solved that problem for daytime riding, but were blinding at night. The addition of a photo-resistor to the ground path of the LEDs worked great, very bright and noticeable during the day and dimmed to almost nothing at night.
Replacing the indicator bulbs with super bright LEDs solved that problem for daytime riding, but were blinding at night. The addition of a photo-resistor to the ground path of the LEDs worked great, very bright and noticeable during the day and dimmed to almost nothing at night.
Looks Great Bob! I was going to go that route with my 75 but they don't make a decal for that yearHello my fellow restoration addicts. This article will cover the process involved in re facing your old, faded and cracked speedometer and tachometer dial faces with new reproduction decals. I will not be covering how to disassemble your gauges because that has already been covered in my other thread. Starting here at post #162 The instructions are pretty comprehensive, with a most excellent addition from 2M.
http://www.xs650.com/threads/mailman’s-xs2-a-sympathetic-restoration.51520/page-9
So this is what I’m starting with,
View attachment 115729
The original gauge face is silk screened and the paint has dried and shrank and it just looks nasty.
After disassembling the gauges here are the faces.
View attachment 115731 View attachment 115730
Note that the chrome bezels around all of the openings have already been removed. Now in order to apply the new decals, the old paint must be removed. This is best accomplished by wet sanding. I did the first step with 400 grit wet sandpaper laid on a flat surface and with a liquid dish soap added.
View attachment 115732
Here are the initial results with 98% of the paint removed.
View attachment 115733 View attachment 115734
You can see a lot of scratch marks and we want a smoother surface before applying our decals so I did it again with 1000 grit wet sandpaper. Now we are ready to apply the decals. I got these decals from Diablo Cycle / Reproduction Decals and they are of a high quality for a reasonable price. Throw these guys some business!
http://www.diablocycle.com/search.php?mode=search&page=1
Now on to the application. Here is my set up ready to go. My two decals , my clean gauge faces, a plastic credit card and a micro fiber cloth to work out the bubbles.
View attachment 115736
First clean the gauge faces thoroughly with alcohol and let dry.
View attachment 115735
Then have a small spray bottle with some water and a single drop of dish soap in it. This will allow you to lift and reposition the decal. If you have ever applied a screen protector on an electronic device the method is similar. Make sure you have washed your hands and your fingertips are free of oils. Then wet the dial faces.
View attachment 115738
Peel the protective cover from the decal.
View attachment 115737
And then carefully peel the decal from the paper back and align it on your dial face. Once you’ve done that, take your credit card covered with a micro fiber cloth (so you don’t scratch the decal ) and work any water bubbles towards the edges.
View attachment 115739
View attachment 115740
Beautiful!
Now the tachometer decal requires that you cut the indicator light openings yourself. That is easily accomplished with an exacto knife.
View attachment 115741
A little before and after.
View attachment 115742
Re install the dial faces on your instruments, using a small amount of locktite on the threads. Note: Be careful to tighten these gently , so your screw head does not twist and lift your decal.
You could also add tiny black flat washers under your mounting screws to protect the decals from lifting.
View attachment 115743
Press your indicator needle back on, clean the glass, and then crimp the bezel back on to your instrument. Being sure to cover your pliers with tape so you don’t scratch anything.
View attachment 115744
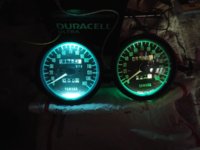
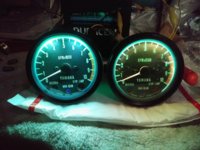
Now admire the results!
View attachment 115745 View attachment 115746
They came out extremely nice! I could not be happier!
I would like to thank 2M for his invaluable assistance on this project. I consider his article on restoring gauges to be required reading if you are contemplating opening these gauges up.
http://www.xs650.com/threads/early-model-70-71-instrument-rebuild-rejuvenation.31305/
Thanks for looking, I hope this might help anyone who has thought of doing this job.
Bob
Norton7d
XS650 Junkie
Please tell what parts were used?About 10 years ago I had a KLR650 that did not have self canceling turn signals. Several times I found myself riding with my turn signals on. (I know, I'm getting old)
Replacing the indicator bulbs with super bright LEDs solved that problem for daytime riding, but were blinding at night. The addition of a photo-resistor to the ground path of the LEDs worked great, very bright and noticeable during the day and dimmed to almost nothing at night.
Any pics?
The fruits of my labor. Special thanks to Mailman! Couldn’t be happier with the results.

The fruits of my labor. Special thanks to Mailman! Couldn’t be happier with the results.
View attachment 156047
Congratulations! They came out beautifully! So you finally wrestled your speedometer into submission! 
Really well done, that makes me happy.")
Really well done, that makes me happy.
I never got the trip meter reset knob off. I just pulled the glass off and wrangled the chrome bezel off that way. Very pleased with the results. Thanks again for all your help
You’re welcome, happy it worked out!
Norton7d
XS650 Junkie
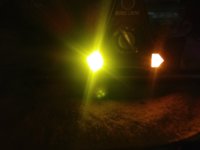
Here is my side by side test.
LED, on the left, bulbs on right.
I purchased the brighter white LED's.
I will run them in the gauges / behind the dials, but not in the flasher display as that was too bright for me.
Is there an LED equilivabt to run in the actual flashers, which doean require mods?
LED, on the left, bulbs on right.
I purchased the brighter white LED's.
I will run them in the gauges / behind the dials, but not in the flasher display as that was too bright for me.
Is there an LED equilivabt to run in the actual flashers, which doean require mods?
Attachments
Last edited:
If you use a windscreen the brightness can be a big issue too. My CB750C has a big flat windshield and the original watt bulbs make a big glare when using the turn signals. Real bright and almost distracting.
Scott
Scott
Is there an LED equilivabt to run in the actual flashers, which doean require mods?
You have to read-up on the tech stuff on that SuperLEDs site, and note that you often have choices of lumens, lighting intensities, and lighting spread angles...
Thanks for this thread @Mailman !!
Doing my research before I dive in, have three sets of replacement faces, two from diablo and one set from blighty.
A 72 set will be my training project before sawing open a 70 pair.
Good luck with your job. A word of caution the glass lens is very fragile. I cracked a lens on a speedo I was trying to take apart for Greg ( GLJ ) and I know BowlingSS cracked one too.
You might wish to bookmark this thread too.Watching with interest. Not for any particular reason…
https://www.xs650.com/threads/early-model-70-71-instrument-rebuild-rejuvenation.31305/
"for no particular reason".
One of those Chinese electric heat shrink guns, rust buster, and a Milwaukee #1 phillips bit, got me this far.


Gotta go read twomany's remove the extension posts one more time.
https://www.xs650.com/threads/mailman’s-xs2-a-full-on-restoration.51520/page-10#post-542345
Re re-read and I think I'm going with LEAVE IT ALONE.
Gotta go read twomany's remove the extension posts one more time.
https://www.xs650.com/threads/mailman’s-xs2-a-full-on-restoration.51520/page-10#post-542345
Re re-read and I think I'm going with LEAVE IT ALONE.
Last edited: