Ignition Switch Repair

Bullnose

XS650 Member
Messages
15
Reaction score
8
Points
3
Location
Washington State
I need to repair or replace the dust cover/door on this switch on ‘78 Special. Local locksmith was not helpful. Does anyone have experience locating that part and what I could expect when I remove the screws holding the switch together? Boing, boing!
 

Attachments

  • AD6F29EE-5584-48C6-BE83-F5E10ADD3A7F.jpeg
    AD6F29EE-5584-48C6-BE83-F5E10ADD3A7F.jpeg
    126 KB · Views: 127
Last edited:
I've never seen that offered as a separate part. It's crimped onto the top of the lock cylinder .....

7Jbx4WQ.jpg


I suppose you might be able to pop it off somehow, straighten it out, and re-install it.

The fact is, I've never seen any of the lock parts listed or offered for sale. Scrounging them from other locks is about the only option I think.
 
Thanks for a peek inside. Good stuff. When I talked to local locksmith he said that part was available for automotive switches. Maybe I’ll disassemble and see if something lines up.
 
I have a great deal of experience with these locks. This is very doable if you have patience and finesse.
The hard part is getting the interior cylinder, shown in 5twins pic, out of the housing. In both of the interior cylinders in the pic, you can see wafers sticking up. The wafer all the way on the left is the locking wafer, it prevents the interior cylinder from coming out of the housing. When you get to it, you need to press the locking wafer in from the back with a pick, then you can extract the interior cylinder.
Now, it is a matter of popping of the crimped-on cover, and carefully flattening the face. Go slow with the flattening. Work it from both sides. You can definitely improve it, but you still may not be happy. Crimping the face piece back on is a bit tricky. As is getting the finished interior cylinder back into the housing. Learning curve.
 
You are not going to find that cover. You will have to try to repair it.
You could buy a used switch with a good cover, and swap in your old wafers, so that your old key still works. That's the only way you're going to get it really looking good.
BTW, immediately under the face cover there is supposed to be a little plastic "dust door" assembly. It closes the slot, and prevents crud from getting in when the key is removed. Yours is surely broken, and the broken parts have probably fallen out. If you get a really good used switch the dust doors may still be in it. That would be a plus.
 
Here's a link to a switch overhaul thread ......

http://www.xs650.com/threads/ignition-switch-overhaul.46712/

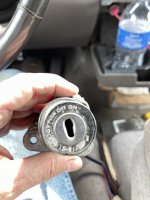
While the pics are pretty good, the guy leaves out some key points in his description, and more importantly, he doesn't do a complete job. He only disassembles the bottom portion of the switch and doesn't pull the lock cylinder out. He was praised for the write-up but I rate it as only fair. But, you can use it to get the thing disassembled down to the lock cylinder. Once you do, this is what you'll see .....

xICfsp1.jpg


The spring will lift out revealing the sliding lock wafer that DB mentioned. Note it's orientation. If we call the slot on the upper left where the wires enter the top or 12 o'clock, you want the lock wafer pointing to around 7 o'clock. It's possible to install the lock cylinder with the lock wafer pointing in the opposite direction, 180° off. If you do that, the fork lock will still operate but you won't be able to remove the key in the "Lock" or "Park" position .....

CR9VnkU.jpg


Press the lock wafer into the lock cylinder with a small screwdriver or pick .....

8y7vp37.jpg


..... and the lock cylinder will slide out the top .....

7Q8B46w.jpg


Note the side of the cylinder that the wafers spring out of (for proper re-assembly insertion). They pop out towards the "Ignition" label, not the "On-Off" one. Once the cylinder is out, it needs to be cleaned up. The wafers get all crusty. Here's some from a lock I did recently. The 3 on the right have been polished clean and shiny with a little wire wheel in a Dremel. The 2 on the left are how they came out (pretty crusty) .....

WcIzgPL.jpg


Then I pack the cleaned lock cylinder full of white lithium grease and re-assemble .....

5SFV9sB.jpg


8RSnaBK.jpg
 
I don't have it bookmarked either because, like I said, I don't think it's very good. That guy was kind of a hack, lol.
 
No, the only thing you might watch for is the spring-loaded wafers shooting out of the lock cylinder as you slide it out of the housing. Hold a finger over the top of them as you slide it out. They're sort of latched into the lock cylinder by a little bump on their sides, but it's easy to dislodge them. I make a little drawing and label the wafer slots. I pull the wafers one by one, measure them, and lay them out like in the pic above .....

Dp7FMj4.jpg


The length of the bottom portion on the wafer differs, and that corresponds to the different depth key notches. Mix them up and the key won't work any more .....

szNTuOj.jpg


VlxnGSN.jpg


mA5mHeT.jpg
 
While replacing the whole lock cylinder is an option, you would have to make sure you got one that your key would physically fit into. Yamaha used no fewer than 6 different key blank styles .....

VQvfXxv.jpg


If the switch on your '78 is the original, it would have a 4 number key code. It is usually stamped on the key and on that top cover you're looking to fix .....

keTx72A.jpg


Here's a chart you can use to find out what key blank it takes. You would need to find a replacement that takes the same blank if you wanted to use your original key .....

rvaxJhS.jpg


But there's more, lol. Yamaha used these 4 number locks up through 1980. In 1981, they changed to a letter and 5 number code. But this was more than just a code number change, they also changed the number of different notch cuts and their depths. The earlier locks used 3 different depth cuts that differed by 3/4 mm. These new later locks used 4 different depth cuts but they only differed by 1/2 mm. That means that even if your key fit into a later lock, you couldn't re-key it to make it work because the wafer sizes don't match the key cuts.
 
Is there supposed to be a question in there somewhere?
 
Back
Top