Interesting LH side oil leak

Skip

XS 650 Screwturner
Messages
180
Reaction score
461
Points
63
Location
Timberlea , Nova Scotia, Canada
I have been chasing a LH Side oil leak recently... thinking that my bike had only been ridden 351 miles over the last 7 years I immediately blamed hardened clutch push rod and main drive seals which replaced with still having a leak.
So today I got the brain wave to do what any other rational thinking person would do in the first place and run the bike with the side cover removed to hopefully see where the oil is coming from....now in my own defense...the oil in the bike now has less than 400 miles on it ...so it is still honey colored and hard to see.....
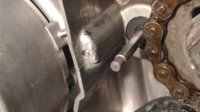
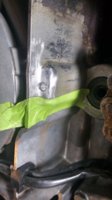
Well what I have found is a imperfection in the upper case casting at the 2' clock position of the stator..about 1/2" above the split in the upper and lower c
IMG_20180728_145901635.jpg
IMG_20180728_150102394.jpg
ase of the engine which boarders on what I believe. to be a oil return oil galley..

It had been repaired and I was able to remove the small chunk of repair material that was placed in there who knows how long ago....Have any of you guys seen anything like this before?
 
This is a picture with the repair removed which popped right off.... exposing a dowel or bolt end....could this be an original casting procedure?....
 

Attachments

  • IMG_20180728_214655824.jpg
    IMG_20180728_214655824.jpg
    97.5 KB · Views: 117
  • IMG_20180728_214806290.jpg
    IMG_20180728_214806290.jpg
    68.1 KB · Views: 109
Hmmmmm....never seen that sort of thing before Skip.

Looks like a good candidate for a JB Weld repair.

Pete
 
What you’re looking at is the plugged end of an oil passageway. The oil passageways are drilled in straight lines and interconnect. The ends of the holes are then plugged with epoxy. There appears to be two different epoxy treatments. One looks like ground up aluminum mixed with a hardener. The other looks almost like clear plastic.
Here you can see the oil passageway path. This photo also shows what the the clear epoxy should’ve looked like in your unit.
98911B98-1B30-45F2-AE8F-467B85F81E58.jpeg


In my engine I found some of the epoxy plugs that look like ground aluminum had deteriorated and were leaking. When I pried on them they popped right off. Underneath them was a ball bearing wedged into the hole by the factory to close off the oil passageway. I cleaned up the area and re sealed the plugs with JB Weld.
FE76F9B1-FF6B-4398-BDD7-16E78549C586.jpeg
58B8E059-3CE3-4A70-BA65-76210BE55804.jpeg
 
It does indeed MaxPete....
I am not sure what was used to repair it before...looked almost like a glob of solder....My buddy who has been a MC mechanic all his life was puzzled as well..but a lesson learned.....never assume anything... although replacing 2 seals is never a base thing... certainty not a big expense...and half the fun of these ol' things is working on them
 
Great explanation and pictures Mailman....you hit it on the head...I was thinking a temporary repair would be JB Weld with a spring time out of storage repair would be aluminum weld....but if Yamaha used an epoxy filler repair that lasted 40 years....I guess a well prepared JB weld repair should be deemed acceptable for the next 40 years
 
Check your front sprocket, they loosen up and cause an oil leak. Plenty of threads on that, do a search.

Scott
I certainly will put the torque wrench on the drive sprocket while I am in there for good measure...but I did indeed run the bike with the LH side cover off and actually saw the leak coming out of the failed aluminium epoxy area
 
Easy to fix the leak then. Clean it out really good with brake cleaner and a paper towel and JB it and let dry 24hr+. For me mixing in more black part than white part gets harder and does better.
 
After letting the oil bleed out of the leaking oil galley overnight....and flushing out and blowing out area today and ensuring it is clean...I roughed up the repair area with a 3M roloc hub cleaner disc...wash it down one final time and then apply the JB weld....now let it cure overnight and will fire it up tomorrow afternoon and fingers crossed.....
 

Attachments

  • IMG_20180729_132432561_HDR.jpg
    IMG_20180729_132432561_HDR.jpg
    112.1 KB · Views: 155
  • IMG_20180729_211405534.jpg
    IMG_20180729_211405534.jpg
    58.3 KB · Views: 172
After letting the oil bleed out of the leaking oil galley overnight....and flushing out and blowing out area today and ensuring it is clean...I roughed up the repair area with a 3M roloc hub cleaner disc...wash it down one final time and then apply the JB weld....now let it cure overnight and will fire it up tomorrow afternoon and fingers crossed.....

That certainly looks like it should do it. Good luck!
 
Too funny....if ya want I can send ya over some JB weld to fill in the molars :laugh:
Just be sure to slip some waxed paper between the upper and lower molars before you bit down for 24 hours to let it cure!

Actually while talking dental work I have wondered about some of this new UV cured stuff the dentists use. When I dumped the 1982 and broke off about a 1/4 inch of my front tooth my dentist just cleaned up the stub and in a matter of a few minutes she had built up the broken stub back to a perfect match to the unbroken one. There has to be a few places where that that technology could be put to use on an XS650 project!
 
It is pretty amazing how dental technology changes...I too, know first about dental technology.....years ago playing in a "Gentlemens" over 30 hockey league...got a high stick righting the mouth...busted off the corners of my 2 front teeth...those UV repairs lasted almost 20 years
 
Back
Top