Into to myself and my brat/scrambler build

Had a few minutes today to work on bike. Very carefully cleaned the fins with degreaser and q tips. (would have loved a soda blaster or steamer). Then carefully painted the lower jug with a brush. I think it came out pretty well and really cleaned the motor up. The last pic is of next weeks project, lots of polishing\sanding. My fingers already hurt!
 

Attachments

  • IMG_0040.jpg
    IMG_0040.jpg
    243.8 KB · Views: 260
  • IMG_0041.jpg
    IMG_0041.jpg
    179.1 KB · Views: 244
  • IMG_0042.jpg
    IMG_0042.jpg
    181.2 KB · Views: 230
  • IMG_0044.jpg
    IMG_0044.jpg
    244 KB · Views: 293
Sorry its been so long guys, project had to go on hold due to the illness of a family member. (Really makes you realize your priorities) But in an attempt to motivate myself I decided to try on my newly fabbed/painted tank from Pete's Ponies and my two seats. I am trying to decide between black and brown. My headlight has bronze ring and I thought brown grips would look cool. But I gotta admit I love the black seat with the tank.

What do you think?
 

Attachments

  • IMG_0056.jpg
    IMG_0056.jpg
    198.7 KB · Views: 307
  • IMG_0057.jpg
    IMG_0057.jpg
    207.1 KB · Views: 264
  • IMG_0058.jpg
    IMG_0058.jpg
    208.1 KB · Views: 254
  • IMG_0059.jpg
    IMG_0059.jpg
    232.5 KB · Views: 295
  • IMG_0062.jpg
    IMG_0062.jpg
    125.5 KB · Views: 249
I like the black seat, too. They always seem to work out.
But then, the gold trimring stands out, it needs some compliment.

Brown seats seem difficult to look good without something to compliment them, and the gold headlight ring isn't enuff. Could try more gold/brown or leather accents.

Airwolfie's build has a brown seat, numerous gold accents, and a really cool tank setup:

http://www.xs650.com/forum/showpost.php?p=358302&postcount=562
 
I have ditched the clip one and raised the forks back up, going the scrambler route. Previous pics were when trying to decide brat or scrambler.
 
So its been about two years since I have put any time into the build. I had some family matters to attend to. This week I have jumped back in and made some progress! I modified the rear XS500 wheel with help from 5twins, thank you, and it looks so much better with the 18 in wheel. I had my new tires mounted and rebuilt the forks with progressive springs. Still to do: rejet carbs, wire up the handle bars and lights, paint the exhaust and mount, and finally mount the number plates to hide the battery box. I hope to get this done quickly (over the next few weeks) and have the scrambler on the road soon. I'll keep ya posted.
 

Attachments

  • IMG_20160209_145018887.jpg
    IMG_20160209_145018887.jpg
    173.5 KB · Views: 224
Got quite a bit done today. Treated some rust areas, and painted. Then I cleaned up my pipes from Gordon Scott, sprayed them with clear ceramic paint (wanted to keep all the beautiful fab/welds visible) and mounted them up.

Also decided to go with the black seat instead of the brown. If anyone is interested in the brown Motolana seat send me a message.

Heres a few pics of the bike with the exhaust.
 

Attachments

  • IMG_20160210_161238547.jpg
    IMG_20160210_161238547.jpg
    192.5 KB · Views: 223
  • IMG_20160210_161227957.jpg
    IMG_20160210_161227957.jpg
    205.9 KB · Views: 213
  • IMG_20160210_161218204.jpg
    IMG_20160210_161218204.jpg
    212.2 KB · Views: 244
  • IMG_20160210_161007021_HDR.jpg
    IMG_20160210_161007021_HDR.jpg
    207.9 KB · Views: 236
Hey Doc, like what you did so far with your build. I am currently working on my "turd" and have lots of cleaning/polishing to do. I have a question on the wheels, did you purchase new or clean the existing? I am deciding on whether to try and clean mine, take them apart to powder coat, or just get mags. Keep the post coming, looking good.
 
Last edited:
Thanks Zero. I was fortunate to have wheels in really good shape to start with. The front is the stock, rear is from xs500. Just a little hand polishing to clean em up.
 
Looking good Doc. I noticed you changed the headlight from bottom mount to side mount. Any interest i selling the bottom mount ??? tim
 
Life happens and choices must be made but glad to see that you are continuing with you build . I like what you did and am in the progress of cleaning and making my bike into a cafe racer. Question on the engine painting, what kind of paint did you use. Thinking of doing the same. Keep the post coming.
 
I used BBQ paint with a small brush. Seemed the easiest way to paint the barrel with the engine still in frame. Looks good and should stand up to the heat. Pretty cheap too for a small jar at Lowes
 
Zero, not sure if they are considered track bars or euro bars. Regardless, I am not happy with the way they look, too modern.

I am going back to a café racer build, gonna put Clubman bars on it. The shocks I have on the rear aren't tall enough to give me the stance I wanted. Besides I switched to a tracker style to save time and money, using all the stock hand controls and headlight. Gonna go back to my original vision. Not sure if I am going to keep the seat though, don't want to reassemble a lot and spend the money of a rear loop and new seat. We'll see.

I already have midsets for it (bad back, don't want full rear sets. And will probably return the over sized 11 inch headlight. On the plus side, the rebuilt carbs with jetting from 650 Central fired up first crank of the starter and it sounds great with Scott's exhaust. So getting close to finishing, should be on the road soon.

Thanks for all the encouragement!
 
Hello everyone! I have come to my biggest headache right now, my side covers. Unfortunately I got over zealous in my initial cutting off needless tabs and removed the side cover tabs. I was never a fan of them anyway, but it would make my life so much easier now if I just went back to using them. I have gone back and forth on how to fab some up.

First option: fabricate some metal side covers out of aluminum, steel (and paint black, or use the blue or white from the tank), copper, brass, stainless steel ( too expensive) and attach them with either brass or stainless machine screws to the frame hopfully with hex heads.

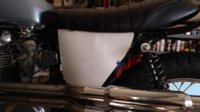
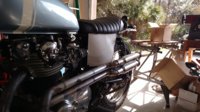
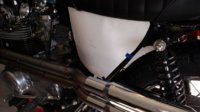
Attached is a cardboard template I fabricated to give you an idea of what I was thinking. The top, bottom and back piece of the cover follow the frame and can be attached with chrome, brass, stainless, etc. machine screws. My only thought with those was to maybe shorten the width at the front to give the pods more room.

Another thought was to make it one piece that would continue around and cover the other side.

Second option would be to fabricate and weld up some brackets to hold some oval racing number plates for each side. I already have them but not sure they would fit with a café racer build.

Final option I have in mind is to remove the current large stock battery, fabricate a nice looking box to cover and fill in all the visible holes, use a smaller battery, such as an Antigravity or Ballistic and stuff all of the exposed wires and plugs into the existing battery box. Since I am not using a café racer seat hump I still need a place to stash all of the existing plugs/wires. I do not want to weld onto the newly painted flame but feel I can remove the existing battery box and do all the mods bench top.
I do not want to run kick only so will a small Ballistic Antigravity battery suffice or will it leave me stranded? It could be a good size, just at least half the size of the stock battery.

Attached are few picks of the individual side covers I had in mind cut out of poster board. I have toyed with putting some large holes in it for ventilation or using a mesh insert.

What do you all think? I am open to any and all suggestions. (Trimming, extending, etc.)

Thank all of you in advance for any guidance you my give me, and would love to see pics of how else it could me done.

Thanks,

Mike
(Docwits, and yes I fix teeth for a living, but please don't hold that against me!)
 

Attachments

  • side1.jpg
    side1.jpg
    198.7 KB · Views: 175
  • side2.jpg
    side2.jpg
    136 KB · Views: 153
  • side3.jpg
    side3.jpg
    215.9 KB · Views: 173
  • side4.jpg
    side4.jpg
    135.7 KB · Views: 172
Back
Top