-
Enjoy XS650.com? Consider making a donation to help support the site.
XS650.com receives a small share of sales from some links on this page, but direct donations have a much greater impact on keeping this site going.
You are using an out of date browser. It may not display this or other websites correctly.
You should upgrade or use an alternative browser.
You should upgrade or use an alternative browser.
My 60th birthday present
- Thread starter Mailman
- Start date
-
- Tags
- 1977 xs 650d chain and sprockets clutch pushrod seal cranckcase seal new front master cylinder pamco e-advance pamco ultimate high output ignition rebuild brake caliper rebuild brakes rebuilt carburetors replace clutch solid state rectifier stainless steel braid front brake line starter gear fix steering head bearings vr-115 regulator
Every success seems to come with a new challenge attached to it.
I ran up to Ace Hardware this morning and bought some new E-clips, got them installed.

Then tried to start it up again. I made a little video of it running. It runs kinda rough in the lower rpm's but the bike has not yet been tuned.
Then I went on my first ride on it. Yay!


It sputters and misses some in the lower rpm's
But smooths out and actually pulls pretty good above 3,000 rpm. But as one of the resident pro's on this site said once, it's easy to make them run fast, it's much harder to make them run slow.
Next up , pulled it into the garage and checked the charging system with a voltmeter. Not good. This photo shows the battery with the bike not running.

And here it is with the bike idling.

And when I ran it up to 3,000 rpm there was no change at all. So then I tried the slap test, and got nothing. Sigh
So let's recap
1. At least I can start it now
2. Went for a short ride ( that was fun)
3. Runs crappy
4. Doesn't charge
5. I had a beer and said enough for now
I ran up to Ace Hardware this morning and bought some new E-clips, got them installed.
Then tried to start it up again. I made a little video of it running. It runs kinda rough in the lower rpm's but the bike has not yet been tuned.
It sputters and misses some in the lower rpm's
But smooths out and actually pulls pretty good above 3,000 rpm. But as one of the resident pro's on this site said once, it's easy to make them run fast, it's much harder to make them run slow.
Next up , pulled it into the garage and checked the charging system with a voltmeter. Not good. This photo shows the battery with the bike not running.
And here it is with the bike idling.
And when I ran it up to 3,000 rpm there was no change at all. So then I tried the slap test, and got nothing. Sigh
So let's recap
1. At least I can start it now
2. Went for a short ride ( that was fun)
3. Runs crappy
4. Doesn't charge
5. I had a beer and said enough for now
Last edited:
TimeMachine
SeventyEighte
Fantastic looking bike ! Bet it felt great ! no matter what set backs you are still well ahead of many of us . I sure do appreciate the work you have done and the pics ! Rt
You'll find the charging problem, do the tests, it just may be the reason that the PO sold it. Old bikes get parked for the strangest reasons.
Scott
Scott
Looks great Bob - you and the old gal have come a loooonnnggg way together.
You know, my bike ran badly at first but for no apparent reason, she got better and better every time we went out together. The difference was amazing - just from some use.
Pete
You know, my bike ran badly at first but for no apparent reason, she got better and better every time we went out together. The difference was amazing - just from some use.
Pete
johnnyc14
XS650 Addict
Being able to ride your motorcycle today---priceless!
-20 degrees today in Edmonton
I'm so jealous.
-20 degrees today in Edmonton
I'm so jealous.
DanielBlack
XS650 Junkie
What a day! I hope you raised that beer with feelings of great satisfaction!
I bet with some tuning she'll smooth out wonderfully. Getting my timing only halfway close to correct (didn't have a light, yet) made such a huge difference.
I bet with some tuning she'll smooth out wonderfully. Getting my timing only halfway close to correct (didn't have a light, yet) made such a huge difference.
Thanks guys! I'll get it sorted. It's just a matter of time. Yeah it was pretty great just to take it for a little spin. The charging issue has me a little concerned. Electrical is not my strong suit. I know there is a lot of info in the tech section and a lot of knowledgeable people here to lend support. I just have to be methodical and work my way through it.
I listened to the video of your bike running. I think I hear a squeaking, which sounds like extra air is being drawn in around the carb or rubber manifolds. That will make the engine run lean and cause the idle to hover high as you are seeing. Get your ears down close to the carbs and listen carefully.
No charging......................first thing to do is to remove both brushes, and then measure the resistance from one slip ring to the other slip ring. Should be around 5 to 6 ohms. Also measure from either slip ring to the rotor frame, which should be very high resistance. With brushes removed, measure their length. Acceptable down to 3/8", but I like to replace them if they are less than 0.4".
Beautiful bike, and I like the colour!
I listened to the video of your bike running. I think I hear a squeaking, which sounds like extra air is being drawn in around the carb or rubber manifolds. That will make the engine run lean and cause the idle to hover high as you are seeing. Get your ears down close to the carbs and listen carefully.
No charging......................first thing to do is to remove both brushes, and then measure the resistance from one slip ring to the other slip ring. Should be around 5 to 6 ohms. Also measure from either slip ring to the rotor frame, which should be very high resistance. With brushes removed, measure their length. Acceptable down to 3/8", but I like to replace them if they are less than 0.4".
Beautiful bike, and I like the colour!
Thanks RG,
Believe me you don't have to listen all that hard to hear that squeak you mention. I heard it right off the very first time I fired the bike up.
I have a fair amount of confidence that the carbs are air tight, however the carb mounts look hard and brittle, and where the air box attaches to the carbs , the seal is not tight. The clamps are tightened all the way up but I don't know if the rubber has just compressed or I need new clamps.
Re: checking the rotor with an ohmmeter, I did that when I pulled the stator off for cleaning but I intend to do it all over again. The brushes are brand new.
I've said it before, my bike is the poster child for every known issue this model bike has. Haha
It's going to make me earn the right to own it.
Also, that color is growing on me too!
You don't have to be concerned about an air tight seal where the air boxes attach to the carbs. Extra air at that point will not cause high idle. Only extra air coming in around the carb body/ throttle shaft area or the manifolds will cause high idle.
Yes, the carb manifolds always look hard and brittle. That does not mean they are bad.
Here's my experience with manifolds:
I had air leakage problems, so I thought I better buy new manifolds, since my stock ones looked old. I bought 2 new ones from Mikesxs and installed them. Well they were really bad! They fit very poorly and would not seal to the carbs at all. Removed the Mikesxs ones and re-installed my stock originals. The stock ones sealed perfectly to my carbs, with no air leakage. I am still using the original stock manifolds, now 39 years old.
With your bike you don't know if the manifolds have been replaced with aftermarket manifolds or if they are original OEM parts. If you think they are original OEM, I suggest they are high quality and may still be good to use. You can take them off the engine an inspect them if you wish, and you may find they are in good condition. Apply some silicone grease such as dielectric grease to the rubber manifolds. It softens and is very good for the rubber.
Yes, these bikes all take time to bring them back from years of neglected maintenance. One step at a time and slowly they come back to first class running condition.
Last edited:
TimeMachine
SeventyEighte
Wow - that is a very nice offer TimeMachine! What a great person!
Pete
PS - for Mailman / All: an easy way to find an intake side leak is to get a can of WD40, put the little hosey thing on and spray a tiny amount here and there where you think there may be a leak.
The engine idle speed will generally increase markedly when the spray hits a leaky spot.
P
Pete
PS - for Mailman / All: an easy way to find an intake side leak is to get a can of WD40, put the little hosey thing on and spray a tiny amount here and there where you think there may be a leak.
The engine idle speed will generally increase markedly when the spray hits a leaky spot.
P
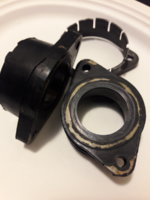
Mailman, And XS650 members. Are these hard to find ? Does this set appear usable ? Mailman, If you would use this set , PM TimeMachine and I will contribute ! These are 77 38's . Anybody have better ones to send ? RT
Thank you TimeMachine for that generous offer. Give me a chance to assess the condition of my stock manifolds and I'll let you know. Thanks again.
You know, my bike ran badly at first but for no apparent reason, she got better and better every time we went out together. The difference was amazing - just from some use.
Pete
You know I was thinking about that Pete. I think this bike hasn't really seen any use in a long time. I believe somebody in the last year (probably the dealer I bought it from) has done some tinkering and put fresh oil in it, just enough so they could show a customer that it would start.
Nothing is harder on a motor than non use. I know I have a lot of bugs to work out yet, but I do believe that really riding it can only help.
I also plan on doing the WD-40 trick to try and locate that air leak.
But right now, until I can find the cause of my charging woes, it ain't goin anywhere!
Last edited:
Yup, you've got to know that you will make it back home, before you depart.
Hey - have you had a look under the stamped metal cover of the voltage regulator? You may recall my note on checking and cleaning the starter safety relay (search on SSR) - the VR is actually a similar device with similar construction details. If it was full of crud, that could explain a no-charge condition.
Just drop those teeny tiny little JIS screws that hold on the cover.
Pete
Yes I did look under the voltage regulator cover. No corrosion, looked good.
TimeMachine
SeventyEighte
In my case of the charging issue after chasing many things and learning as I went, it turned out to be a corroded rectifier /plug connections.. suppose youve looked there under the battery box but still throwing it out there .
Yeah I even opened the rectifier up and cleaned it up. I've had so much of the electrical apart I can't help wondering if the failure was caused by something I did. I'll run through the all the prescribed checks. I'll run it down eventually.
Yes, it could be (hopefully) something as simple as a broken connection. A wire broken somewhere between point A and point B. Run some continuity tests on all the wires in the stator loom and the wires in it's corresponding plug. You said you tested rotor and stator and they checked out. That would probably mean you're getting no voltage on the green wire to the outer brush from the regulator. But, it could also be some bad diodes in the rectifier. The original regulators are pretty reliable even though their output is inconsistent. The rectifiers on the other hand do have diode failures. But, it could be the connecting wires to either unit too.
Similar threads
- Replies
- 785
- Views
- 81K
- Replies
- 3
- Views
- 2K
- Replies
- 1
- Views
- 2K