My new (to me) 81 xs650 Special

JoshieKona

XS650 Enthusiast
Messages
38
Reaction score
0
Points
6
Location
San Diego
Hello from San Diego!
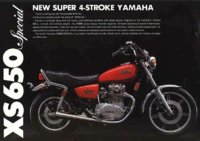
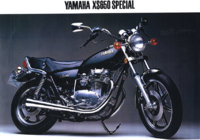
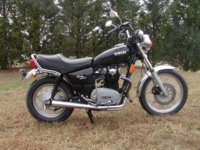
My name is Josh and I've recently (TODAY! :)) picked up a 1981 XS650 special. Its in very clean condition and has about 3,400 miles on it. I had been looking to get a bike that didnt have so many miles on it (compared to my CB750 that has atleast 30k) and didnt have 4 carbs, so when I started looking into and found that I really digged on XS's. When I saw this one, I was more than willing to make the hour and a half drive to get it.

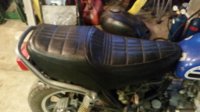
I plan on keeping it pretty stock, nothing I can't change back fairly easily. The main thing bugging me... that step in the seat.... I really want something a little flatter. I've looked into it and originally thought I was getting a special II, due to the stickers on the side panels, but once I got to the bike, I saw that it actually used the latching mechanism for the seat. So now I'm pretty sure its a special I. Back to the seat thing, the only luck I've had its either:
A. mikexs cafe seat
-but I want something two-up
B. buy a second seat and get the special to standard cover
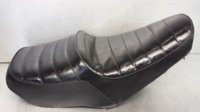
C. does anyone have pics of a bike with the following seat?
-
SahPQ79

http://imgur.com/SahPQ79
 

Attachments

  • Yamaha XS650SP 80.jpg
    Yamaha XS650SP 80.jpg
    53.6 KB · Views: 212
  • 1980-Yamaxa-XS650-Special.jpg
    1980-Yamaxa-XS650-Special.jpg
    205.4 KB · Views: 208
  • 80SG normal_yamaha_sport_fairinXSjohn.jpg
    80SG normal_yamaha_sport_fairinXSjohn.jpg
    65.9 KB · Views: 209
Last edited:
This is an '83 SK with a recovered cut down seat.
An electric carving knife works well to trim seat foam and can be found at thrift shops for a couple $. A local upholstery shop did the cover for $40.
 

Attachments

  • 07-05-11_1208.jpg
    07-05-11_1208.jpg
    49.8 KB · Views: 201
  • 07-05-11_1522.jpg
    07-05-11_1522.jpg
    52 KB · Views: 216
This is an '83 SK with a recovered cut down seat.
An electric carving knife works well to trim seat foam and can be found at thrift shops for a couple $. A local upholstery shop did the cover for $40.


Something, like this would work great!
 
As i explained in the PM i replied to, the 80SG seat does not have the extream rise and is way more comfortable than the later 81-83 seats

Comparison of the 80SG and 81SH/82SJ/83SK seats. All of these seats have the same pan and will interchange between these bikes.

These pics are in order from 80-83
 

Attachments

  • Yamaha XS650SP 80.jpg
    Yamaha XS650SP 80.jpg
    53.6 KB · Views: 205
  • BenS 81 650 Speciaql 1.jpg
    BenS 81 650 Speciaql 1.jpg
    89.6 KB · Views: 201
  • Yamaha-20XS650S-2082_3.jpg
    Yamaha-20XS650S-2082_3.jpg
    70.9 KB · Views: 326
  • normal_xs650_024.jpg
    normal_xs650_024.jpg
    72.8 KB · Views: 205
Last edited:
Skull I'm assuming the '82 is a factory advertisement?
Interesting they show the slotted rotor.
 
Sometimes bullheadedness prevails. I never much cared for the lift off Special seats, preferred the early side hinged Specials from '78 and '79. They have a smoother rise and the full back end.

Here's a '78 Special seat fabbed to an '83.........

750spokes001_zpse84a6309.jpg
 
Josh I got caught up in looking for those pics and forgot.
Welcome to the site.

@nj1639
Yeah what he said. Howdjadodat?
 
Here are a couple of better pics for the 80SG, (first 2 pics), and the 81-83, (third pic),
 

Attachments

  • $_12.JPG
    $_12.JPG
    24.9 KB · Views: 190
  • 80SG.jpg
    80SG.jpg
    137.7 KB · Views: 207
  • $_57 xs650.JPG
    $_57 xs650.JPG
    213.8 KB · Views: 189
I just wrote what seemed to be a book on the seat swap, posted a quick reply to this thread and it disappeared . FML.
I'll get back to it here shortly.....

I'll attempt to add it here in pieces.
First off, the two flat tabs at the back of the seat rail frame have to be removed along with upper locking mechanism to the lift off seat which is the upper extension to the helmet lock. If you're ready to sawzall and grind away then we'll continue......

On the side hinged seat remove the hinges and the seat latch. These bolts that hold them on usually break off. Be prepared though it won't matter to our application.

Remove the cover and foam to the hinged seat. Remove the rearmost rubber bumper and replace that with a bolt coming down from above. This will be a rear anchor to the seat. The bolt should be about two inches long and no more than 3/8ths diameter. Flat washer on top with the bolt going through, flat washer below with a lock washer and nut to hold it all together.

In the middle rear of the seat rail frame drill a hole to receive the bolt from the seat. I just drilled through the top of the rail and not totally through. There's not enough room between the seat and the rear fender to place a nut on the rear seat bolt to secure it, in my opinion, though a wing nut might work.

Take the forward fork mount off the lift off seat. Don't forget which side is up.
On the side hinged seats there's a recessed area, rectangular in shape located towards the front of the seat pan. The forwards most line of that recess is where the back end of the mounting fork will go. Compare the seat pans and it'll make sense as you want to mount the fork in the same area as the liftoff seat. There's about a quarter of an inch of wiggle room that you have in placing the fork, the closer to that upper recess line you go will give you about an eighth of an inch of clearance between the tank and the seat when finished, as in no seat to tank rubbing.
Place the fork down on the pan and drill two mounting holes using the fork as a template. Mount the fork with the appropriate nuts and bolts.

Now the rubber bumpers.
There are two types of bumpers used, a small tall one and a wide flat one. There's a small tall one on the hinged seat located next to the seat latch. You'll need two so find an extra which should be on the liftoff seat.
Remove the two flat bumpers at the front of the seat pan and replace them with two tall ones. Now looking at the seat pan from the rear, notice the two hinge locations. On the lower one, picture it as a rectangle. You need to drill into the seat pan on the lower right of that rectangle, on the raised portion of where the right and bottom lines of that rectangle intercept, and drill in at an angle. Imagine that intersection as a mountaintop and now you're going to turn it into a volcano by putting a hole in it. Of course use a bit that will allow the bumper to go into the hole but be secure. I find a little lubricant and a small screwdriver helps to get them out of their holes, then measure the hole to know what size to drill for new placement. This bumper just catches the rail.

At this point the foam and cover go back on.
The seat forks go into their mount on the frame and the bolt drops into its receiving hole on the rail. The rubber bumpers keep the seat level with no side to side movement. All is held by the front fork, gravity and friction. I've not had any problems with the seat coming loose at all and if I get into a situation where the seat is flying off then I'm flying too, and the seat would be the least of my worries unless it hits me in the head, though a longer bolt that would go through the entire rail and maybe a wing nut for quick release may work for those of concern.

With 11" shocks my seat height is 28" from the ground up to the lowest part of the seat. 31" inseam here and my knees are bent, flat footed on the ground at a stop. Very comfortable. The seat seems to sit lower on the rails with less space between the seat and the airboxes sidecovers and I do like that piece of chrome trim along the lower front of the seat.

With the three bikes, mild mods on the '77 and '78 (though stock in stance), and this '83 lowered, they're all the same-as all being xs650's- but they're all different.
 
Last edited:
That's a mighty fine specimen you have there! In a perfect world you keep that one totally stock, find a Standard model and keep that stock and then find a junker to mod.

I will, mostly. Just going to swap the seat and put some euro bars. I'm not a big fan of the huge bars. But that's it. It's too nice to molest. I'm going to keep the stock seat and bars some where safe though.
 
Pics to go with nj1639's description of the conversion and his bike.
Thanks nj for taking the time.
 

Attachments

  • rear bolt.jpg
    rear bolt.jpg
    67.6 KB · Views: 199
  • added front fork.jpg
    added front fork.jpg
    125.5 KB · Views: 186
  • where to put your rubber.jpg
    where to put your rubber.jpg
    63.2 KB · Views: 222
  • comparision shot.jpg
    comparision shot.jpg
    90.5 KB · Views: 184
  • photo 1.jpg
    photo 1.jpg
    124.3 KB · Views: 215
Back
Top