My precious money pit

Square Circle

XS650 Addict
Messages
277
Reaction score
4
Points
18
Location
St Louis Mo
Well, i wasn't even wanting to keep track, but my wife just finished the books for our taxes. She wasn't too happy to find that i have spent over 38 hundred so far on the xs since july (including actual bike purchase with ride gear) . Not too bad, but considering I'd like to plop down another grand asap for more needed upgrades and mods, things are starting to add up.. but hey ... I's only money right.
I am going slow with this cafe thing because of cash and time, but eventually I will get it together .
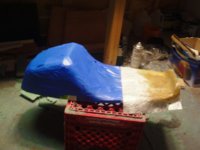
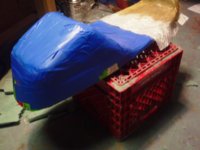
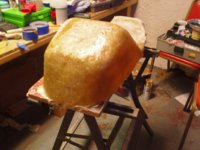
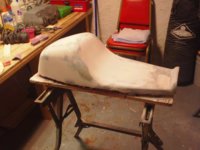
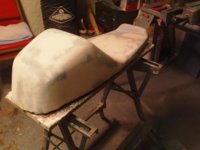
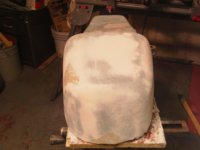
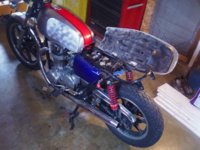
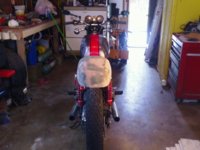
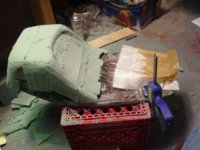
I had some materials ready to build my own cafe seat. I am attempting something i have't seen before. I am using a stock seat pan with hinges and lockable latch. I just like the helmet loop lock and love the idea of easily swapping over to the stock special tank and seat whenever i want. Maybe it could be good for resale too. I call it a transformer bike.
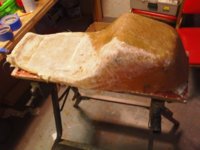
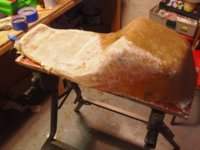
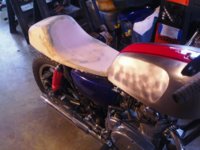
Here is a pic of seat build so far. i will be fiberglassing it tomorrow ish. I have the 750 standard tank weld modified to fit up to the stock ears on frame.
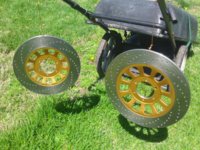
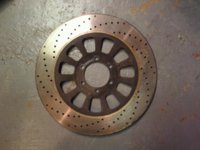
I also drilled the front rotor.
 

Attachments

  • SAM_0280.jpg
    SAM_0280.jpg
    195.2 KB · Views: 281
  • SAM_0281.jpg
    SAM_0281.jpg
    184.8 KB · Views: 279
Love your thread title.

I've been feeling the same way about mine....my precioussss.......money...pit.

What's money if you don't spend it....

Good job on the rotor. Did you use a center punch or just slap on the template and go for it?
 
Funny that you mention this.. I went through my xs650direct.com account and totalled my parts purchases which surpass well over $1500. Not to mention other monies spent on ebay.ca, xs650.com, monstercraftsman.com etc.

I say this as I click purchase on ebay... Oh well.. atleast its not meth or something lol.
 
its even worse for me because I'm the one that does the budget.!

I know exactly how much I am over-spending every month :yikes:

The bike shed roof repair ,cladding, insulation and lining just cost $500 and I haven't even got the bike in there yet !:banghead:

Still, when spring arrives and I'm cruisin down the empty winding country backroads with the sun behind me, the roar of the exhausts , money will be the last thing on my mind :bike:
 
Love your thread title.

I've been feeling the same way about mine....my precioussss.......money...pit.

What's money if you don't spend it....

Good job on the rotor. Did you use a center punch or just slap on the template and go for it?

I used a center punch and template that i found on this forum somewhere and a really crappy drill press, but it worked.
 
Wow, i'm picture slacking.. i need to locate better pics of the stock bike. I have some somewhere on a camera card. but i do have this one as of now. After this pic was taken, I have since put on new rear (crappy) but longer shocks. Blue tank is off now and am fitting up the seat. I was looking at the rough in of the foam, and wow.. its way too huge.. i have to get it back on the frame and feel for right fit.. as of now my bike is across town and seat is with me. I like the seat Chappell customs did with his bike ... his is the awesome looking gold trimmed cafe that won the monthly bike build here on xs650.com (gold bike) .. s thats my target on style, but limited with stock seat pan usage.
 

Attachments

  • SAM_0223.jpg
    SAM_0223.jpg
    141.1 KB · Views: 411
  • cafe racer gold.jpg
    cafe racer gold.jpg
    238.2 KB · Views: 524
Well, there is a concept called "guilt gold" that often keeps the peace - she gets a dollar to spend unquestioned for every one you spend on the bike. Down side is that it doubles the cost and probably the build timeline, but it's got a long, solid track record.
 
Next year, throw in a receipt for a $ 16K Harley and one for some $ 5K jewlery that she never saw.

The $ 3800 for the XS will pale in comparison.:)
 
I feel ya on the over budgeting. This was supposed to be a cheap bike to build. Nice job on the rotor. Did the same to mine. Slickest pattern Ive seen
 
I HAD a budget! Right now I am trying to just keep it near the budget. The inspiration cafe is stunning!
 
Hey does this look ok? Does this seat make me look fat? LOL!! I plan on mounting 2 small round taillights on the back of this seat, so i need that little bit of flat spot back there. I'm going to start the rest of the glass tomorrow.
 

Attachments

  • SAM_0282.jpg
    SAM_0282.jpg
    130.8 KB · Views: 208
  • SAM_0283.jpg
    SAM_0283.jpg
    130.4 KB · Views: 160
Well, Noboby chimed in on my seat style.. so my executive decision was to continue. Here are pics of the glass process. It took more cloth and resin than i anticipated, and I had to go buy more materials, my wife ought to like that later on. lol.
My mold wasn't perfectly smooth , so i will be doing some large fill in with bondo glass, I was thinking i would straighted out the surface a bit with the bondoglass , and glass coat again with the smooth cloth, and then more bondo again.. lots of work but i'm having fun. Outside today it's doing some sort of sleeting /snow crap today and i'm home stinkin up the place with the windows open in the bsement.. NICE. I hace now decided that i will be mounting 2- 1.5in.dia running/ brake lights together in a vertical fashion because of a racing stripepaint design, and the rear contour of seat. I think its going to look kick butt.
 

Attachments

  • SAM_0284.jpg
    SAM_0284.jpg
    171.2 KB · Views: 169
  • SAM_0285.jpg
    SAM_0285.jpg
    196.9 KB · Views: 163
  • SAM_0286.jpg
    SAM_0286.jpg
    193.7 KB · Views: 178
Just a little more progress on the seat . BONDO! it's your friend.
 

Attachments

  • SAM_0290.jpg
    SAM_0290.jpg
    176.8 KB · Views: 143
  • SAM_0289.jpg
    SAM_0289.jpg
    159.7 KB · Views: 157
  • SAM_0288.jpg
    SAM_0288.jpg
    141.3 KB · Views: 147
I now have pics of seat placed on bike along with the xs750 tank. I'll be making custom side covers eventually.
 

Attachments

  • SAM_0292.jpg
    SAM_0292.jpg
    205.5 KB · Views: 232
  • SAM_0301.jpg
    SAM_0301.jpg
    186.3 KB · Views: 262
  • SAM_0295.jpg
    SAM_0295.jpg
    175.7 KB · Views: 194
  • SAM_0305.jpg
    SAM_0305.jpg
    192.3 KB · Views: 216
Well, Noboby chimed in on my seat style.. so my executive decision was to continue. .


sorry mate..... some of us old folk on here need at least 3x days to decide anything :D

Its lookin good so far ,tank looks great..... any estimate on the final weight of the Bondo lol:laugh:
 
Thanks Peanut. Yea, the Bondo is heavy.. i used about a quart and a half of it along with almost 2 quarts of fiberglass resin. It looks fast, but feels like a shermin tank..lol It probably weighs 12 to 15lbs with the metal (stock) seat pan that i glued it to, it still needs primer/ paint, pad and upolstery, so a bit more weight to come. O well.
 
I finally drilled the rear rotor to go with the front. Cleaned up both, stripped old paint and coated it with some VHT Gold flake .The rear wheel needed new bearings, so i'm changing both front and rear, i got new tires ,new chain and sprokets..and other stuff... I almost ready for the season. More pics to follow.
 

Attachments

  • SAM_0341.jpg
    SAM_0341.jpg
    315.9 KB · Views: 267
Last edited:
those rotors look gorgeous ! how long did it take you ? I think I'll drill mine . Where did you get the pattern from?
 
those rotors look gorgeous ! how long did it take you ? I think I'll drill mine . Where did you get the pattern from?

Thanks . I got the pattern from "thelowlife" he posted a few different styles at theis thread...http://www.xs650.com/forum/showthread.php?t=12671
I had to tweak them a bit by moving the drill point 1/2 circle up. and dropping the outermost hole entirely to get 7 holes in each run balanced in the usable part of rotor.. TheLowLife also posted a rear wheel pattern on page 2.. again i had to tweak abit.. this one i dropped the outre most hole and moved drill point up one full intersecting line up from outer rim of hole circle marker...
each rotor only took about an hour on a drill press after getting the pattern on and holes marked with punch and hammer. paint prep took about as long as well. I used a 1/8 inch bit to start and blasted right through with that. then followed with the 3/16 bit 1/2 way through on 1 side, then flipped rotor and drilled through the other half all the way through.. (this avoided bad burrs) when done drilling i just used a flat file to remove any micro burrs and followed with 180 grit sand paper then 400.. both lightly and uniform striking. Have fun... I DID. Thanks for the compliment!
 
Back
Top