New tracker build

JesseeS

XS650 Junkie
Top Contributor
XS650.com Supporter
Messages
815
Reaction score
2,127
Points
243
Location
Rhode Island
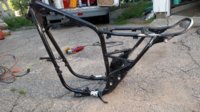
So after half assing my build before, cutting corners, I kicked myself in the nuts and got my shit together. I'm sparing no expense with the build and will be replacing every nut and bolt I feel needs to be replaced. I'm starting with the front end getting redone, and working my way back. I will be moving next April, so no engine building for now, simply trying to get a 100% done roller. So far i purchased the number plate, mounts, graphics, lights, bars, handguards and tire. Sending my forks out to hugh to have the forks rebuilt and the legs shaved. The only mounts will be for one disc as i plan on running a brembo. New rim and spokes will be ordered as thats getting done. Then i will be sending parts to powder coat. Everything marked in white on the bike will be removed. Also started planning out the tail section. The top hole by the hoop will be for an sv650 tail light with integrated turn signals, the bottom holes are simply for looks/airflow. Here are some photos, I hope you enjoy. Also, if you have any tips or suggestions let me know!
357g74y.jpg
2itptz5.jpg
2lbgzuh.jpg
 
As of right now I have been looking at Gordon Scotts high pipes. This bike will be doing different types of terrain (forest roads included) and would like to keep the pipes higher out of harms way.
 
I suggest building the bike completely first, cutting off only what you need to in order to fit custom parts. Then after you are happy with how everything is mounted, cut off what you don't need. Then send the frame for finishing.
 
@CDNTX650. Would it be wiser to maybe mount a fender to a fork brace and just remove it when not hitting the more water/rock infested terrain?
@rustyrocket. Do you have any tips? I would call my skill level intermediate as far as mechanical abilities, I'm just worried about seriously messing them up.
@signal. Thank you for the tips. I have left the exhaust mounts on the bottom just in case, but I have been doing some drawings and mockups and would say I am 98% certain the items in white will be useless for my build, but I will listen to your advice and hold up for a bit as I start obtaining more pieces and seeing the flow of the bike a bit better.
 
Hey jessee. The alum on those forks is thick you will have plenty of material to work with. I used my 4 inch grinder and cut all the tabs I didnt need. Cut them proud of the fork and work your way down. After I knocked everything down to a ruff state I used a big bastard file and filed everything up and down the fork so everything blends. After that its sand sand sand and then polish polish polish. I have a home made polisher that work well but i have to change my wheels everytime in go from cutting to polishing. I think my forks are very presentable but not show quality. I do have a few imperfections but Im happy and I want to ride the sum bitch. Hope this helps. Tim
P.s. look at my dakota tracker thread and there are some pictures of the forks.

Thank you very much Tim. Perhaps I will give it a shot myself. Yours look really good. Show quality is not really a concern of mine, as I will be sending them off to powder coat afterwards, but I will make sure to blend the best I can. As far as sanding did you just use one type of grit or did you work from slightly rough to super fine. I think I saw someone using a flapper wheel before, but I like the bastard file idea as it will be more controllable I guess you could say. Thanks again!
 
Yep I went down with the sandpaper 320,600 and I think I finished with 1500. I wouldnt use a flapper unless you really know how to use them they will take some material and gouge. With the bastard file it will take some time but its blends everything so nice. Plus its like therapy sitting down and making a silk purse out of a sows ear.
 
Yep I went down with the sandpaper 320,600 and I think I finished with 1500. I wouldnt use a flapper unless you really know how to use them they will take some material and gouge. With the bastard file it will take some time but its blends everything so nice. Plus its like therapy sitting down and making a silk purse out of a sows ear.
Thanks for the advice. I'm gonna see if I can give it a bit of a go this weekend. I don't mind taking my time with things, only time I get some peace and quiet. Will update when progress is made
 
Nice looking build so far! If you need any help let me know... Im in providence...
Thanks! I'll have to take you up on that. Im in Lincoln/Cumberland but work over in Cranston. Not too often you see anybody else from RI on the boards haha
 
Not really too much progress. School has been kicking my butt. I just mounted the headlight on off switch on the right hand side cover, then mounted the ignition switch and kill switch on the left hand side. Hoping to do some more work on the fork legs this weekend.
 

Attachments

  • uploadfromtaptalk1434146208725.jpg
    uploadfromtaptalk1434146208725.jpg
    169.9 KB · Views: 206
  • uploadfromtaptalk1434146251166.jpg
    uploadfromtaptalk1434146251166.jpg
    156.2 KB · Views: 228
One fork leg done, one to go. This was my first time ever completing something like this. I don't think I did too bad. There are some sections that aren't perfect and have a slight hump still, but usually when I end up refining something I go too far and ruin it, so I'm just going to pick up a really fine sandpaper and just hand sand the rest to try and even it out.
 

Attachments

  • uploadfromtaptalk1434218320961.jpg
    uploadfromtaptalk1434218320961.jpg
    127.7 KB · Views: 229
  • uploadfromtaptalk1434218335189.jpg
    uploadfromtaptalk1434218335189.jpg
    124.9 KB · Views: 224
Finally got the frame grinded down and used the flapper wheel to clean things up. Next weekend is my birthday so I think I may spend it hand sanding everything down so its nice and smooth. One step closer to powder coat
 

Attachments

  • uploadfromtaptalk1434401645919.jpg
    uploadfromtaptalk1434401645919.jpg
    301.7 KB · Views: 226
  • uploadfromtaptalk1434401675909.jpg
    uploadfromtaptalk1434401675909.jpg
    302.4 KB · Views: 204
Got to working on the front hub. After much cursing and tool tossing, I finally got the bearings out. What a pain ha-ha. Also got once fork lower painted up. I'm having an issue removing the lower of my other fork. I turn the Allen bolt on the bottom with no luck. I have early model forks and the inside it looks like almost another Allen bolt or a nut. I can't see too well. Well I saw someone used a 10mm on an extension and it worked but I had no luck with that. Anybody have any suggestions? It's really kicking my assuploadfromtaptalk1434928610677.jpguploadfromtaptalk1434928658290.jpg
 
This tech thread may help you get that fork apart.

http://www.xs650.com/forum/showthread.php?t=5537
Thanks! I've read through that thread a few times and have found my forks to be different? I have the early model forks, but when I removed the top cover, the spacer was about 3-3.5" in length, compared the the 1.5" looking one in the tech thread. I started digging through some old threads after you posted the link and I think I found the answer. It said some early models took an Allen key. One of the ones you buy that's attaches to a ratchet and turns into an 8mm Allen key. I'm going to purchase it this week and give it a try.
 
Thanks! I've read through that thread a few times and have found my forks to be different? I have the early model forks, but when I removed the top cover, the spacer was about 3-3.5" in length, compared the the 1.5" looking one in the tech thread. I started digging through some old threads after you posted the link and I think I found the answer. It said some early models took an Allen key. One of the ones you buy that's attaches to a ratchet and turns into an 8mm Allen key. I'm going to purchase it this week and give it a try.

You got it there...I have a 75 and had to use the allen key. Can't remember the whole process, but, looks like you're on the right track.
 
Back
Top