Okay this may seem like a lot to absorb in one post but ...
Obviously someone's aftermarket high compression pistons . I'm sure the pistons came with installation instructions that are all too often ignored because someone has been doing this for years and knows better . I'm going to assume a bunch of things based on just what I see so I'm as likely wrong as the next guy so consider that my only disclaimer .
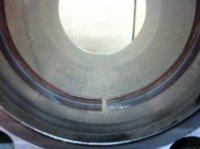
The rings appear to be coated or plated . This could be electrofusion chrome or molybdenum .These require specific bore finishes drastically different from cast iron rings and initial ring end gaps that are not even similar .
First the piston has to stabilize the rings by not sticking or rattling in the bore . A cast or hypercutic piston requires far less running clearance than a forged piston because of reduced thermal expansion . Now to get to that running clearance you begin with a bore that only gets close enough that the tool marks from the bore are completely removed by the honing process . Much like polishing the process is done in stages . Remove all the marks from the previous grade to arrive at finished bore size . For cast rings the final finish is much coarser than for chrome or molly rings . Again refer to the manufacturer of the rings for specific finish . Too fine a finish for cast rings and they will never seat or break in . Too coarse a finish for coated rings and they will quickly be torn up in the first few heat cycles . The latter is what I am assuming happened to your rings as evidenced by the vertical scoring in the bore . Simply honing the scratches out with the proper stone and crosshatch angle may not be enough of a fix because at this point removing all the damage may increase the running clearance to the point where the piston may no longer be stable let alone be within the manufactures installation tolerances .
You are correct in observing that the ring end gap in the pic is big enough to see big screen TV through . Now you have to determine why based on the above .
As for the head gasket I would never use silicone of any kind , shape , or description on the head gasket parting line when using a composition head gasket . The temperatures there will turn it to garbage in short order . The only thing I use when I use it is the spray versions of Hylomar or red aviation Hi-Tack . I'll add that there is such a thing as too smooth a finish on the head and block mating surfaces . The head gasket will grab on and seal to a moderate surface texture/finish where it will move on a relatively polished surface while allowing fluids to seep past even a correctly torqued and within tolerances , flat , parting line .
I suggest you have a look at the bore finish and diameter recommended for your pistons and rings .
I also suggest that you do a bit of research into the surface finish required by not only head gaskets similar to your own but look at the possibility of a copper head gasket . My experience with copper is it requires more frequent inspection and service but I consider that a good thing .
Your advanced investigation should be into using clay or a chamber cast to determine what your piston to head clearance is while the engine is apart . One of the keys to getting these engines to really work is adequate quench area and clearance .
I've given you a little (sic) to think about without being too subjective while providing not only a small amount of my own experience but attempting to point you in the right direction . I'll leave the rest up to you .
Should you really draw blanks after completing your homework and investigations I'm not that hard to find . Be warned however that I am a bit of a taskmaster , don't suffer fools well or at all , have a predilection towards profane outbursts , not easily offended but am described as offensive and generally find some way to solve it problem .
~kop
Excellent. First off, thanks for taking time out to write all of that. Great info.
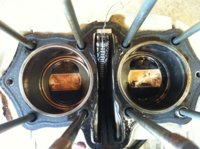
The first time I put it together, I attempted to do most of the work myself, with minimal equipment / tooling. Seemed to have ridiculous compression, but fired and ran, in short order (a few hours of run time) I saw obvious signs of oil making it's way into the combustion chamber. Tore it down, and saw some pretty nasty scuffing in the thrust area of the both cylinders, pistons didn't look too bad, and the ring gaps were pretty much the same as when I installed them.
Second attempt, sent the pistons, cylinders, and head off to a known professional. I was told that I had too small of piston / bore clearance, and had I kept running, it probably would have seized. He opened the cylinders up with the hone to remove some of the scoring, said I was still with-in spec to use the same pistons. I believe at this point we are talking like .004" total clearance piston to finished bore. Put it all back together, with in a few laps around the block, same results. Seemed to be oil in the combustion chamber. He also did a full valve job on the head.
Third attempt. I pulled the top end off, and could not come up with a solid reason as to what could be going on. So rather that go thru it again, I sent the entire motor off... He said he hit the cylinders again with the hone, just touched them, piston / bore clearance now about .005
And here I am, less than a full day on the motor, and obviously from those pictures, things are not good. I now have it apart, looking for reasons, why did my rings wear so bad? Where was the oil coming from?
Known facts.
-From the beginning, I've been using a set of brand new lectron crabs, which I have been told by many, that they have been running very rich. I've also been told that could be the reason the rings are not seating properly.
I have at this point ruled them out by switching back to stock carbs
-I know that both of the conn rods are worn at the wrist pins, one is almost .003" total clearance over the pin. I don't know if that can be a factor in my problem, I realize it is not good, but not so sure it is causing my problem.
-Piston to bore clearance best I can measure is around .0055 ish total depending on where I measure, the cylinders are not so round. There is obvious scuffing in the thrust area. The cylinders measure about .0008 larger front to back vs side to side.
-The pistons are forged JE 81mm
I can measure the surface finish on the cylinders if that helps, but I'm trying to trust that the shop that did the work....did good work.
It makes more sense that an amateur such as myself is overlooking something or making a mistake, rather that a shop that builds motors for a living has done wrong.
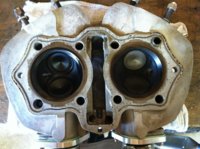
I did notice last night a very thin "crack" looking thing right above my intake valve on the head, like within a 1/16" or so from the outer edge of the valve. I can see it on both sides, but one side looks more like a crack, the other just looks like a flaw in the head... Don't know if that could be anything, but I did see it.
If any of that helps direct me to my problem let me know.
Thanks again!