Very Sharp, I like it!View attachment 156038 View attachment 156041 View attachment 156038 View attachment 156041 There are sure a lot of purty paint jobs out there. You guys really put your hearts into them. I'm currently working on an XS2. It was in great and complete condition except the P38 olive drab paint job so I decided to use creative liberty and do my own scheme. Used Auto66 base coat spray cans and topped it with SprayMax mat urethane clear coat. I couldn't resist the red because of its name- Spectral Racing Red Chroma Flair, a Land Rover color plus GM Charcoal and Alaska white stripes. Can't decide on badges or not. This is not my first rodeo using this paint and it works great without any equipment. Anyone can apply it easily. The desert is in the prep.
-
Enjoy XS650.com? Consider making a donation to help support the site.
XS650.com receives a small share of sales from some links on this page, but direct donations have a much greater impact on keeping this site going.
You are using an out of date browser. It may not display this or other websites correctly.
You should upgrade or use an alternative browser.
You should upgrade or use an alternative browser.
Painting Tins. No really...
- Thread starter Jim
- Start date
Group buy on Badges?
I'd be in for a set or 3.
I'd be in for a set or 3.
Last edited:
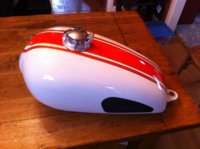
Lookin' good.There are sure a lot of purty paint jobs out there. You guys really put your hearts into them. I'm currently working on an XS2. It was in great and complete condition except the P38 olive drab paint job so I decided to use creative liberty and do my own scheme. Used Auto66 base coat spray cans and topped it with SprayMax mat urethane clear coat. I couldn't resist the red because of its name- Spectral Racing Red Chroma Flair, a Land Rover color plus GM Charcoal and Alaska white stripes. Can't decide on badges or not. This is not my first rodeo using this paint and it works great without any equipment. Anyone can apply it easily. The desert is in the prep.
designbum
XS650 Enthusiast

Designbum, fantastic paint job! Those colors really work well with the matte finish.")
View attachment 156038 View attachment 156041 View attachment 156038 View attachment 156041 There are sure a lot of purty paint jobs out there. You guys really put your hearts into them. I'm currently working on an XS2. It was in great and complete condition except the P38 olive drab paint job so I decided to use creative liberty and do my own scheme. Used Auto66 base coat spray cans and topped it with SprayMax mat urethane clear coat. I couldn't resist the red because of its name- Spectral Racing Red Chroma Flair, a Land Rover color plus GM Charcoal and Alaska white stripes. Can't decide on badges or not. This is not my first rodeo using this paint and it works great without any equipment. Anyone can apply it easily. The desert is in the prep.
That looks really great! I love that scheme designbum!
That is a lovely paint job.
In the garage, I have a spare W800 tank which will be painted n 20202 - needing some inspiration for a colour scheme . . .
In the garage, I have a spare W800 tank which will be painted n 20202 - needing some inspiration for a colour scheme . . .
which will be painted n 20202 -
Sounds nice, but that is a long time to wait to have it painted....
....sorry Raymond, somebody was going to get you on that one. They never fail to snag me on arithmetic errors.
designbum
XS650 Enthusiast
This the tank on my ‘75.That is a lovely paint job.
In the garage, I have a spare W800 tank which will be painted n 20202 - needing some inspiration for a colour scheme . . .
Attachments
Sounds nice, but that is a long time to wait to have it painted....
....sorry Raymond, somebody was going to get you on that one. They never fail to snag me on arithmetic errors.
Hahaha - clearly the bits shoogled round after I hit the submit button. Hoping to paint it next year in fact.
Designbum, the '75 tank styled after 1966 Triumph T120C? One of my favourite Triumph colour schemes. A very cool looking bike with the short TT pipes . . .
Jim those decals are some nice and will look great on that tank you are doing. 
Designbum that is a great looking paint job.
Designbum that is a great looking paint job.
This the tank on my ‘75.
Hi designbum,
nice paintjob. But why does the tank have a coffee pot for a filler cap?
designbum
XS650 Enthusiast
A teapot wouldn’t fit.Hi designbum,
nice paintjob. But why does the tank have a coffee pot for a filler cap?
A teapot wouldn’t fit.
Hi designbum,
alas that you tell me a falsehood.
A trip to my own kitchen plainly shows a 4-cup "brown betty" teapot is 6" tall, a 4-cup French press coffee pot is 8" tall and a 4-cup coffee percolator is 11" tall.
Perhaps the filler cap is also a turbo-encabulator or an Inter-rossitter?
Tank's ready for prime. I'm using an epoxy primer for the initial coat. It's past it's shelf life but I've used it in the past when I had a batch that was 15 yrs old and it worked just fine. But.... just to be safe, I did a couple of test pieces. Specs call for dry to the touch in 15 min.... and it was. Full cure in 4 hrs. I'll let it set overnight and see how it is. Boeing, Airbus and all the biggies use this stuff, so it's well proven. It's designed for fuels and chemicals, so I also made a test strip to drop in a jar of gas. If it holds up, it might make a good tank slosh.


Amazing stuff. Less than 2 hrs in and my fingernail absolutely will not scratch it.
Jim, are you aware of any advantages of 2K epoxy primers vs 2K isocyanate primers in relation to fuel tanks? An issue some have encountered is paint blistering around fuel cocks. Also, in some forums regarding auto applications I have seen it mentioned that 2K epoxy primers cannot be sanded. Have you heard this said, or know what they are getting at? Perhaps it is just much harder to sand 2K epoxy compared to the 1K primer option?
Thank you.
Thank you.
This guy gives a pretty good explanation. Me personally... I prefer epoxy primers. They just feel much more durable. As far as sanding goes, epoxy sands just fine as long as it's fully cured. As the guy in the link says, the bad rap comes from the slower cure times and guys trying to sand before it's cured. As with most primers, there's a "recoat" time... after which the primer is too hard and you have to sand it for recoating. Epoxy's are no different in that respect. This stuff I'm using has a "recoat" time of 48 hrs. After that it must be sanded.Jim, are you aware of any advantages of 2K epoxy primers vs 2K isocyanate primers in relation to fuel tanks? An issue some have encountered is paint blistering around fuel cocks. Also, in some forums regarding auto applications I have seen it mentioned that 2K epoxy primers cannot be sanded. Have you heard this said, or know what they are getting at? Perhaps it is just much harder to sand 2K epoxy compared to the 1K primer option?
Thank you.
Last edited:
It's been a little under 24hrs but here's our test results. Sanding with a red scotchbright pad fairly aggressively... enough to remove some of the old primer and 3 of 4 held up good. the single coat thinned started to cut through to metal. The rag soaked with lacquer thinner hardly touched any of it after 30 seconds of rubbing. There's a slight greenness to it, but I suspect that's more from the sanding dust than actual softening of the paint. Looks like it's still good primer. I'll let the gas test piece cure for a week or so before I begin the test on it.


Primed and Ready.
Shot one light coat and two full coats. Minor imperfections and pinholes are now standing proud. Ya gotta love a gloss primer for highlighting stuff that needs fixin'.


Shot one light coat and two full coats. Minor imperfections and pinholes are now standing proud. Ya gotta love a gloss primer for highlighting stuff that needs fixin'.
Similar threads
- Replies
- 214
- Views
- 25K