Ripping my hair out rear brake issues

Twitchknaf

XS650 Member
Messages
26
Reaction score
1
Points
3
Location
South florida
so this basket case project of mine keeps biting my butt
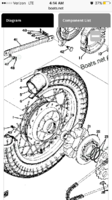
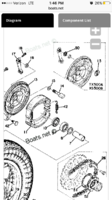
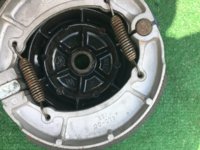
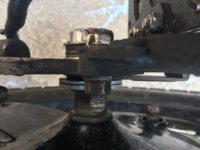
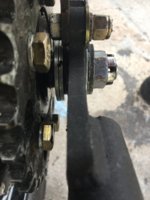
Thought I had my rear brake issue figured out took it for a shake down ride tonight and we'll I'll let the pictures speak for the rest

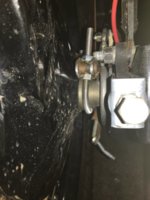
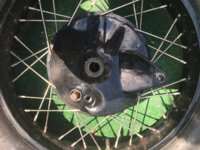
Had an issue with the brake stay tab bending in the location the po had it so I moved it down and re welded it in place"terrible welder but this did not break"
Plans where to take it to a friends and have him re weld all my stuff to clean it up.

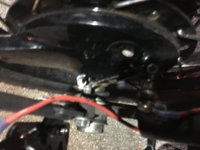
Brake was pulling on the pivot as I've read is the proper way. Pedal went soft briefly then had good breaks again, on the very next application of rear brake all hell broke lose.
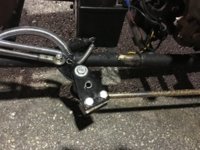
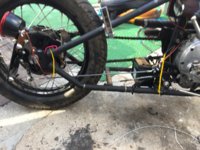
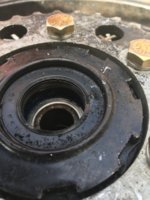
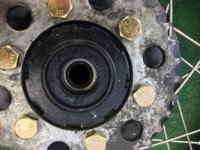
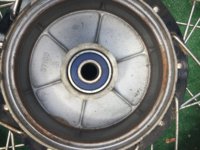
Brake pivot snapped off, ripped the brake stay nut right off at the drum pulling my brake stay arm right off wrapping the linkage around the drum locking everything up on me at about 30mph

Now the brake would kick me out from time to time on this little shakedown ride then have good bite, or would be completely useless then pop and be working fine again. Right before it failed I had a stiff pedal hard to describe similar to the end of a fluid brake pedal throw then well yeah
I want to do this myself and get it right but I'm at the point to take it to a shop that works on custom builds if need be.
 

Attachments

  • IMG_0841.JPG
    IMG_0841.JPG
    141.9 KB · Views: 170
  • IMG_0838.JPG
    IMG_0838.JPG
    230.3 KB · Views: 169
  • IMG_0839.JPG
    IMG_0839.JPG
    135.3 KB · Views: 171
Adding a before picture.
The brake stay tab was relocated to the end of the axle plate red marks angle of the brake stay rod and brake pivot are marked in yellow
Crude drawings on iPhone but they where straight
 

Attachments

  • IMG_0777.JPG
    IMG_0777.JPG
    199.4 KB · Views: 140
I'm not sure if I can see an axle adjuster in your 'before' pic. I see one in your first pic. It looks squished, as though the axle plate is thinner than original. That could mean that the axle is too long, and didn't clamp down on the axle plate, allowing the axle to move during braking.

http://www.xs650.com/threads/any-guesses-as-to-what-caused-this.34841/

The brake stay arrangement looks dangerous, with that flat vertical tab in compression.

Do a search on "brake stay". An ungodly huge number of posts on do and don't-do...
 
Hi Twitch,
ooh that looks nasty, I hope that only the machine was damaged and that you were not physically hurt.
So long as the brake plate itself is still in good shape the fix ain't particularly expensive, you just hafta do it right next time.
Your disaster photos show that you used hardware store fasteners where you should have used the correct bits and pieces.
(MikesXS sells them and Mikes plain ol' metal parts are usually OK and not insanely expensive)
There's real good reasons to use those custom designed multi-diameter swivel bolts and long shanked nuts.
So what EXACTLY let go to allow the brake plate to turn like it did? Your explanation was not clear to me.
 
I'm not sure what let lose on it to be honest I would assume the brake stay rod pulled out then it ripped the brake pivot off, I wasn't harmed thank you for showing concern. The hardware I used was recycled from what the po had on there originally
 
I'm not sure what let lose on it to be honest I would assume the brake stay rod pulled out then it ripped the brake pivot off, I wasn't harmed thank you for showing concern. The hardware I used was recycled from what the po had on there originally

Hi Twitch,
OK, I see the brake stay rod. Threaded thing with an eye on each end? But pulled out of WHAT?
And there's more than one part that could be called a brake pivot. WHICH one was it?
And back 'ome we had a term for that kind of PO. Bodging Sod.
 
Ok I'll try and do this correctly
The brake stay rod pulled out of the drum
Where part 42 is allowing the drum to roll pulling my brake pivot off the tack welds "p.o installed" the more I look at it the hardware failed at #42 but why was my break still acting weird I'm going to pull everything off and take pictures maybe someone here would have a better layout or insight
 

Attachments

  • IMG_0843.PNG
    IMG_0843.PNG
    598.7 KB · Views: 109
Good chance your rear axle was not tight. You have no washers. Your hard tail is designed to use at least two 1/16" thick washers inside of the axle plate and two 1/8" thick washers outside of the axle plates. These washers are placed between the axle adjuster and the axle plates. That is 3/8" of axle space that is not filled. That 3/8" probably allowed the axle nut to tighten to the end of the axles threads instead of actually tightening the axle against the axle plates. That's why your adjusters look like they're bent up and goofy looking. So, I really think your axle was moving forwards and backwards causing you to have brake pressure and no brake pressure. That brake rod only needs about 1/4 travel to work, so your axle was probably moving back and forth just less than 1/4" to cause your problems. That brake rod sure did a fine job of wrapping around that hub. Failure of the brake stay was just a poor/weak design.

Scott
 
Ok I'll try and do this correctly
The brake stay rod pulled out of the drum
Where part 42 is allowing the drum to roll pulling my brake pivot off the tack welds "p.o installed" the more I look at it the hardware failed at #42 but why was my break still acting weird I'm going to pull everything off and take pictures maybe someone here would have a better layout or insight

Hi Twitch,
I bet Scott's failure analysis is correct. The rear axle being unable to hold the wheel in properly so it could flail about when the brake was applied would explain why the brake was acting weird before the thing self-destructed.
Get the spacing washers on the axle so it grips, use the correct hardware instead of the PO's bodge-up, redesign the torque-arm placement and get the welds fixed and you'll be rolling once more.
 
Couple more possible PO induced rear brake issues.
Check that the LH bearing has the spacer installed! This has been missed many times when wheel bearings were replaced.
There is a "cam/washer" on the brake cam shaft it only fits properly one way, it has a recess that fits around the cam on the shaft. If that washer is installed backwards it causes the shoes to bid in the wheel hub. Either of these can alter how the rear brake works mainly because someone may have left the axle loose to compensate for improper assembly.
 
When you were under power the chain was pulling the axle forward. When you were using the brake the axle was moving rearwards.

Ditto, on Gary's comment about the brake cam and spacer.

MRTWOWHEEL
 
Last edited:
Good point gggGary ! that bearing spacer may well be missing ! LOL
Twitch...that rod that holds the bottom arm of the brake plate to keep it from turning needs to be STRONG ! I don't think those pivot pins are strong enough ! I'ed use 1"x1/8" bar stock with holes for bolts to go through to secure it to the brake hub (1/2" holes and bolts) obviously the far end where the rod attaches will have to be as strong to hold up to the forces applied to it .....
my 2 coppers !
Bob.........
 
I'll double check the axle spacers again and redo all the hardware the axle was cocked when all this happened, thanks again for the insight

The cam washer is installed I've cleaned and redone that drum 3 times now.

I'll increase the size of the the brake stay arm and figure a strong mounting point

Is the spacer #7 in the attached picture if so it is installed and the wheel is off a tx500 with a narrower hub then the xs650 wheel
 

Attachments

  • IMG_0845.PNG
    IMG_0845.PNG
    464.1 KB · Views: 159
Last edited:
I hesitate to recommend a brake stay design. Half of the designs I see, I would not use. Anyways, when mounting the stay under the frame, my choice of design, the problem to face is the clearance with the brake rod and the angle from the mounting point on the frame to the mounting point on the brake plate. This angle and clearance can be compensated for by a standoff at the frame and a standoff at the plate by using the width of a nut. Hence, I used a nut, more distance away from the mounting points will just get weaker.

Scott
 
Is the spacer #7 in the attached picture if so it is installed and the wheel is off a tx500 with a narrower hub then the xs650 wheel
Hi Twitch,
no, not that one. #7 is the tube that keeps the leftside and rightside wheel bearings spaced apart.
The spacer Gary means is the short, flanged spacer that's pressed inside of an XS650's
sprocket side rear wheel bearing to reduce it's bore to fit the axle's 20mm OD.
Some folks toss the spacer out with the old bearing because it looks like it's part of the bearing.
And as the new bearing ain't got one the wheel gets reassembled without it.
Which leads to all manner of problems.
Mind you, I've no idea if the TX500 rear wheel uses that particular spacer.
And yeah, I know, yet another of the dreaded PO's potential screwups to check out.
 
Doesn't the XS500 wheel run on a 17mm axle? Is the brake plate center bore also 17mm?
 
Ok pictures of the rear wheel internals
Grabbing lunch I'll post my current spacing setup rear fender and sissy are crooked as shit now so don't judge off that

Axle still spins with a screwdriver
 

Attachments

  • IMG_0869.JPG
    IMG_0869.JPG
    157.8 KB · Views: 108
  • IMG_0866.JPG
    IMG_0866.JPG
    247.9 KB · Views: 106
  • IMG_0863.JPG
    IMG_0863.JPG
    229.5 KB · Views: 80
  • IMG_0864.JPG
    IMG_0864.JPG
    222.1 KB · Views: 114
  • IMG_0861.JPG
    IMG_0861.JPG
    235.8 KB · Views: 97
  • IMG_0867.JPG
    IMG_0867.JPG
    330.8 KB · Views: 102
  • IMG_0872.JPG
    IMG_0872.JPG
    120.7 KB · Views: 107
  • IMG_0870.JPG
    IMG_0870.JPG
    127.4 KB · Views: 96
Last edited:
Back
Top